A post-position plot is simply a check made after enough time has elapsed since crossing the waypoint to detect a navigation error, but soon enough to fix things before a loss of separation with other traffic occurs. We started doing these after inertial reference systems replaced our navigators, and started wondering about the requirement when we installed our first GPS. Now the FAA recommends we still do them, but has generally softened the requirement almost into nonexistence.
— James Albright

Updated:
2021-02-26
I still believe in Plotting on Paper Charts. There are those who believe Plotting on an EFB is just fine, but just make sure you make a record of it. (I know of at least one major airline that does this as standard procedure.)
Two degree check

1
Requirement
Ten Minutes After Waypoint Passage. Cross-check navigational performance and course compliance by one of the following methods:
Source: AC 91-70B, ¶D.2.9.2
The old school method . . .
The “plotting” method is appropriate for all aircraft navigation configurations.
- Verify your plotting/orientation chart reflects the currently effective route clearance.
- Plot your present latitude/longitude and record the time on your chart.
- You should plot your position using coordinates from the nonsteering LRNS.
- Investigate/take corrective action if your plotted position does not agree with your currently effective route clearance.
- Using the steering LRNS, verify the next waypoint is consistent with the currently effective route clearance.
- Verify your autopilot steering mode is in LNAV/VNAV or other appropriate mode to ensure steering to the next intended waypoint.
Source: AC 91-70B, ¶D.2.9.1
The new school method . . .
The “navigation display” method is appropriate for and available for use in aircraft equipped with an operable FMS:
- Confirm the aircraft symbol is on the programmed route on the navigation display (at smallest scale).
- Check system-generated cross-track deviation or similar indication of any deviation from the programmed route of flight.
Source: AC 91-70B, ¶D.2.9.2
This will protect you against problems between the autopilot and the FMS, but not against an improperly programmed waypoint. Let's say you entered 5230N instead of 5330N, the classic "one degree" error that will throw you 60 nm off course. Since the line drawn by the FMS on your display is looking for a latitude of 52 degrees it will draw that as a point and you will think you are on course, no matter how small the display scale is set. I recommend that if you are not going to plot, you should at the very least bring up the GPS present position display and verify you cross the correct waypoint first, and that your course to the next waypoint agrees with the master document. (Check the magnetic course, not the heading.)
- Using the steering LRNS verify the “TO” waypoint is consistent with your currently effective route clearance.
Source: AC 91-70B, ¶D.2.9.2
Do not rely on the ARINC shorthand codes here. If you don't have a way of displaying the flight plan waypoints as latitude/longitude pairs, try bringing the waypoint into the scratch pad and then to a waypoint page to ensure your "TO" latitude and longitude points are correct.
- Investigate/take correction action to address any anomalies or unexpected deviations.
- Verify your autopilot steering mode is LNAV/VNAV or other appropriate mode to ensure steering to the next intended waypoint.
Source: AC 91-70B, ¶D.2.9.2
- An alternate method may be used with FAA acceptance.
Source: AC 91-70B, ¶D.2.9.2
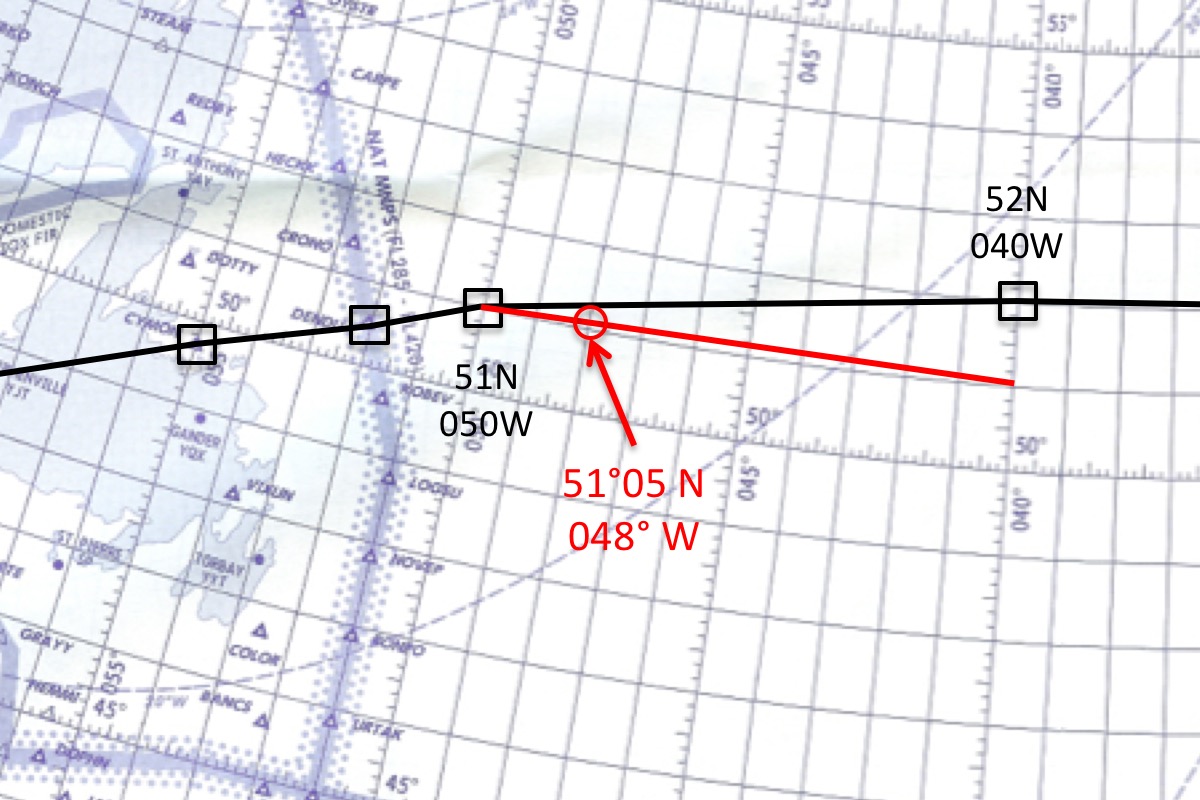
A position check should be made at each waypoint and the present position plotted 10 minutes after passing each waypoint. For a generally east-west flight, this 10 minute point will be approximately 2 degrees of longitude beyond the oceanic waypoint. It may therefore in fact be simpler to plot a present position 2 degrees of longitude after each 10 degree waypoint. There may be circumstances, (e.g. when, due to equipment failure, only one LRNS remains serviceable) in which additional plots midway between each waypoint may be justified.
Source: NAT Doc 007, ¶8.4.18.
The point is to plot the aircraft's position after about ten minutes to ensure the next waypoint wasn't entered in error. If, for example, the flight plan download (or manual entry) entered the next waypoint as 51N 040W, one degree south of the clearance, it would look perfectly normal on the cockpit displays but plotting the position would alert the crew that something is amiss, as shown on the figure. Don't think this is possible? Modern G550's continue to get caught in just this type of Gross Navigational Error.
2
Plotting on paper charts
All of the regulatory guidance, just ten years ago, talked about the ten minute check and made no allowance for a "two degree" check. But the logic, ease of use, and elimination of fifty percent of the error potential made it a winning technique. If "about ten minutes" puts you close to a meridian of longitude, then use it.
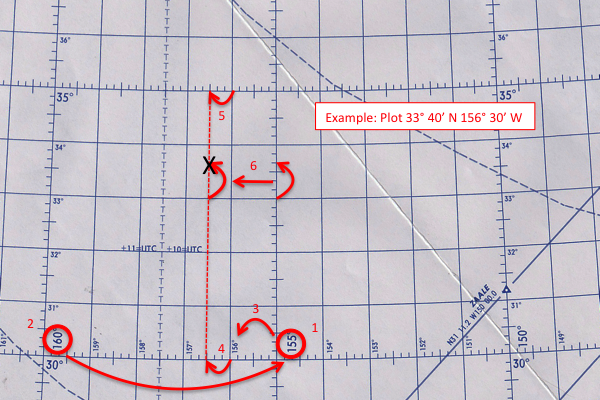
Plotting Chart Example
Plotting is a basic pilot skill, one thinks, but perhaps there are easier ways. See: Plotting.
3
Plotting on an EFB
The following comes from Michael Keller, a technically savvy friend. This is written for a Gulfstream PlaneView cockpit, but the procedures for other avionics should be similar.
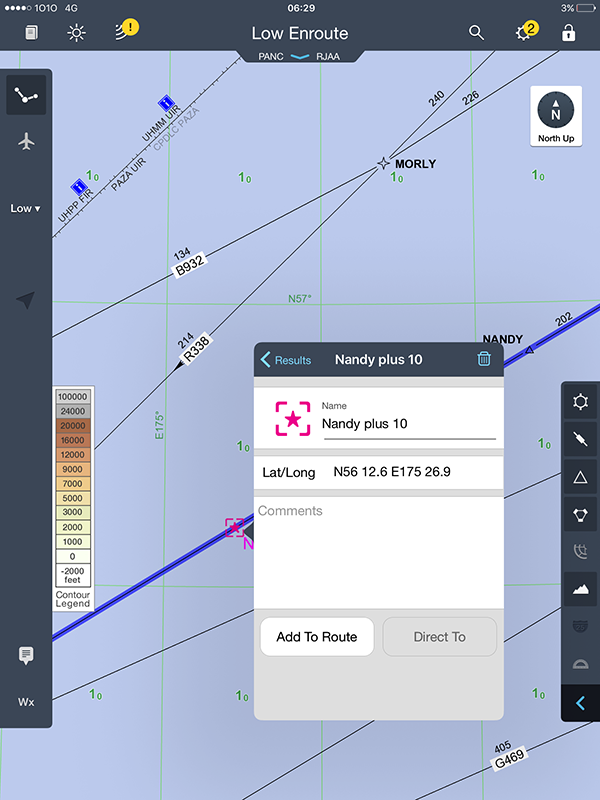
EFB plotting entry
You have plotted your waypoints onto the Jeppview when you enter it into the application, display it and crosscheck it against your Universal (or other) flight plan. Now, when you are flying the trip, and you need to plot your 10 minute cross checks against the flight plan . . . go onto the map near where you estimate the plane to be 10 minutes after passing a trip waypoint. On your MCDU, go into the Pos Sensor pages . . . do the position update button (R1 I think) and when you see 10 minutes on your clock after passing the waypoint, touch that position update and drop it into the scratch pad . . . "freezing it."
Back on the Jeppview app . . . at the point where you estimate you would be, touch and hold the screen (just off route, NOT on the line) and a user created way point will arise....You can rename that waypoint such as "NODLE +10" or "NODLE10" or your preference to indicate the waypoint plus 10 minutes. Then touch just below on the user created waypoint and you can quickly edit the lat long it has detected from your touch, but typing in the lat long from your scratchpad (which is now your crosschecking operation.)
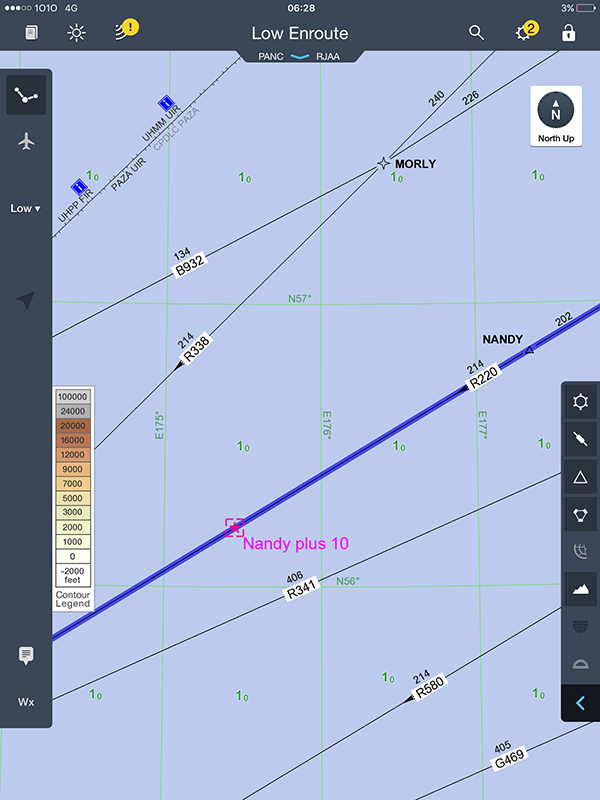
EFB plotting result
The user created waypoint, whatever you named it . . . should jump over to the route and show that you are on the filed/cleared route as you would expect if all is working to order.
Then, before the end of the flight, simply touch the button to save the flight plan to your IPad which you can later email to yourself to put in your files for safekeeping.
4
Rationale
These errors are caught . . . here is a two degree error by a GV:
| Date: | 10/01/01 |
| Error: | Gross Navigation Error |
| Narrative: | GLF5 W/B RAN F500 cleared GOMUP 62/20 64/30 observed by radar 6105N022217W (90 NM off track.) A/c reported 62/20 as cleared when actually at 60/20. No L-o-s in Reykjavik OCA*. *Checking separations in Shanwick OCA. Follow-up with operator. |
Table: Gross Navigational Error Report example.
References
(Source material)
Advisory Circular 91-70B, Oceanic and International Operations, 10/4/16, U.S. Department of Transportation
ICAO Nat Doc 007, North Atlantic Operations and Airspace Manual, v. 2021-1, applicable from February 2021