Flying in oceanic airspace requires pilots take on some of the burden that domestically belongs to air traffic control with radar contact. There are a few extra steps prior to and during the oceanic crossing. While procedures worldwide have become much more standardized, there are differences in various regions. The basic procedures are covered here, with regional differences noted. Of course these procedures are changing every day and you should check prior to every trip.
— James Albright

Updated:
2021-01-21
This section continues an example G450 trip from Bedford, Massachusetts (KBED) to Geneva, Switzerland (LSGG), to Tokyo, Japan (RJAA), back to Bedford. For the purpose of covering an oceanic departure, this section will focus on the KBED to LSGG leg. To view the steps required prior to oceanic airspace entry, see: Oceanic Departure.
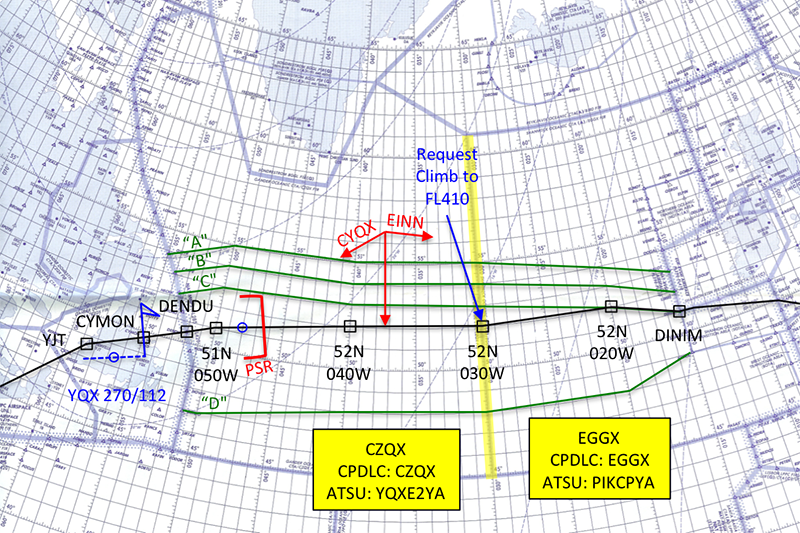
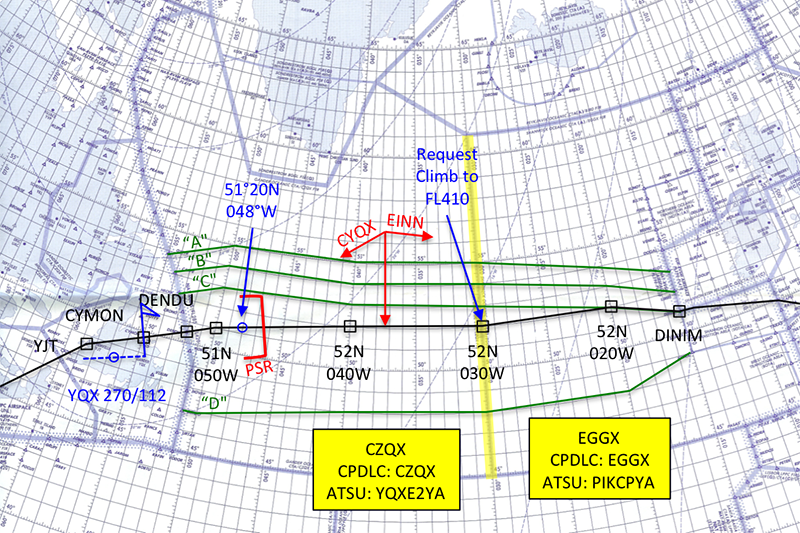
Example plotting chart (just entering oceanic)

1
Entering oceanic airspace
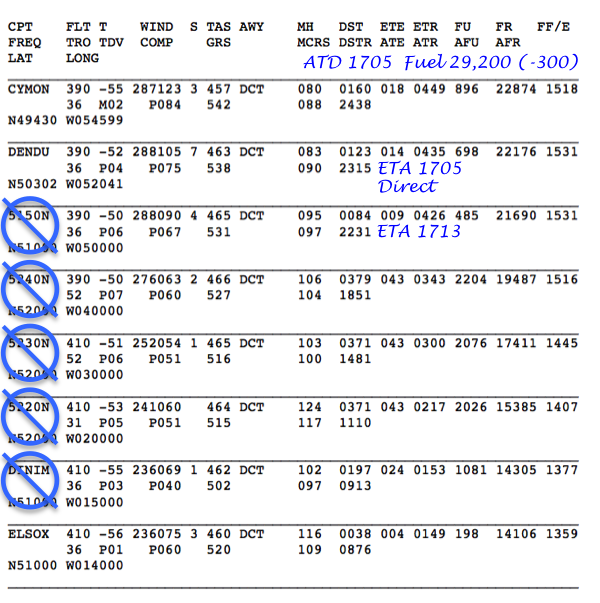
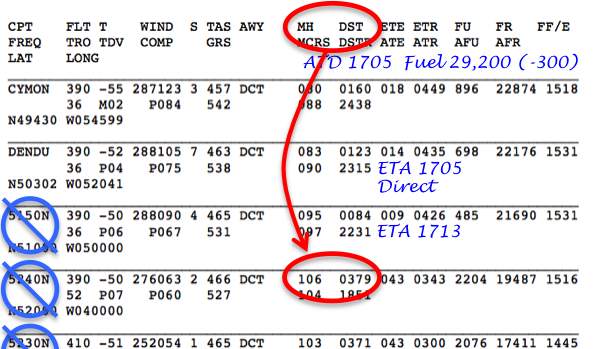
Master document after DENDU ETA
In most oceanic and remote airspace you are expected to make ETA’s plus or minus 2 minutes. All that usually begins with your oceanic entry point. Make sure you record that time on the master document. There are two sets of rules when it comes to making these ETAs.
- Prior to entering oceanic airspace, it is usually worth your while to adjust speed or use other techniques to make the ETA plus or minus 2 minutes. See Oceanic Departure / En Route Timing, for techniques.
- After entering oceanic airspace you expressly forbidden from adjusting speed in an attempt to make an ETA good. See the next section for the rationale behind this restriction.
Mach Number Technique
The primary method of maintaining proper longitudinal separation between aircraft throughout almost all of the world's oceanic airspace is for each aircraft to maintain a constant Mach Number Technique, which is actually more than a "technique," it is a required procedure. More about this: Mach Number Technique.
Do not chase the Mach indicator to make your ETA's good. Fly your cleared Mach Number and monitor your ETA progress. If you are off my three minutes or more, inform ATC. If you adjust your speed and the aircraft ahead or behind you do not, there could be a loss of longitudinal separation.
We were assigned Mach 0.80 for our example flight's oceanic clearance and our G450 cockpit indication gives us a True Mach Number. So we set 0.80 and allow the auto throttles to manage the speed control task for us. We keep an eye on each ETA and if they vary by three minutes or more, we inform ATC. Since we are in the North Atlantic, we'll wait 30 minutes after DENDU before switching the transponder to Code 2000.
VHF Switch from ATC to Guard / Interplane
Once you have departed very high frequency (VHF) radio range, set your radios to air-to-air (generally 123.45) and guard (121.5) frequencies. ATC and air defense authorities will generally attempt contact with aircraft on guard (121.5 or 243.0 megahertz (MHz)) before ordering an intercept.
Source: AC 91-70B, ¶6.4.3
An air-to-air VHF communications channel on the frequency of 123.45 MHz shall be designated to enable aircraft engaged in flights over remote and oceanic areas out of range of VHF ground stations to exchange necessary operational information and to facilitate the resolution of operational problems.
Source: ICAO Annex 10 Vol V, ¶4.1.3.2.1
Hand off procedures are not standardized internationally, but HF Frequencies are normally given by ATC on VHF or CPDLC, but may also be published on en route charts.
- When checking in on HF, you normally call the station by name, add your call sign and the frequency being called.
- If the domestic controller advised you to contact the radio station with a position report, you add the word "position" to your initial call. For example: "Gander Radio, November Seven Seven Zero Zero, Position on eight eight six four."
- Tune and listen to the frequency for a few moments to make sure you don't block someone's transmission and to get a feel for how good the frequencies are. If the frequencies are clear, you can combine your SELCAL request with the initial call. For example, let's say you are CPDLC equipped, your call could be: "Gander Radio, November seven seven zero zero, CPDLC, Shanwick Next, flight level four one zero, request SELCAL check Alpha Bravo Charlie Delta."
- Once ATC with VHF is terminated, you should switch to 123.45 and 121.5, as discussed next.
For more about CPDLC procedures, see: CPDLC - Coast Out.
Gander gives us direct to 51N 050W before we reach DENDU and asks for our "five zero west" estimate. We turn the aircraft direct 51N 050W and see the FMS estimates that point at 1713Z. We pass that on to Gander and record that on the Master Document, since we will now have to make that time plus or minus 2 minutes or have to revise it.
Since we are CPDLC equipped, Gander Radio tells us "November seven seven zero zero, Gander Radio, voice reports not required in Gander OCA, at thirty west contact Shanwick on three zero one six primary or five five niner eight secondary." We tune 121.5 and 123.45 on our VHF radios, turn the cockpit speakers on to listen to those frequencies and rely on the SELCAL for any HF contact.
Transponder Code
Change your transponder code to 2000 in accordance with regional requirements. This requirement varies with the oceanic airspace. You should confirm these procedures, through applicable AIP or other regional documents during flight planning. In the North Atlantic, for example, the transponder code should be changed 30 minutes after entering oceanic airspace.
Source: AC 91-70B, ¶6.4.3.1
Traffic Information Broadcasts by Aircraft (TIBA)
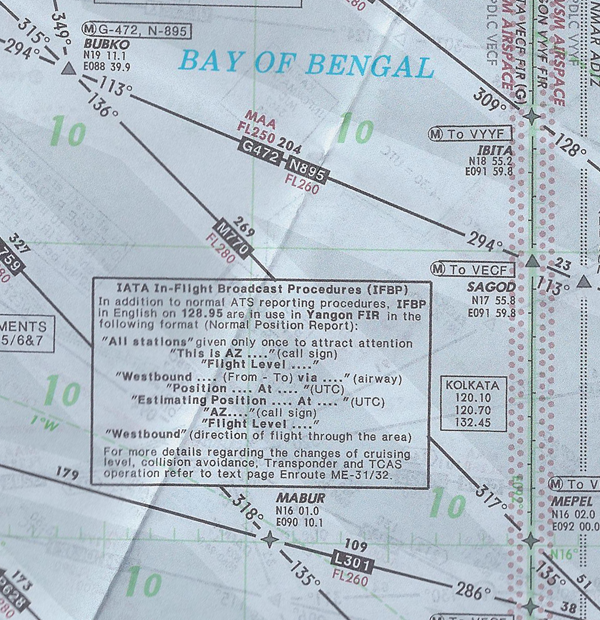
In flight Broadcast Procedures Note, from Jeppesen Airway Manual, Middle East/South Asia High Altitude En Route Chart, 1 ME(HI), 14 Nov 13.
In areas where Traffic Information Broadcasts by Aircraft (TIBA) or the IATA In-Flight Broadcast Procedure is mandated by the country specific AIP, Jeppesen Airway ATC pages, or en route charts, cockpit radios should be set up and procedures for these broadcasts.
More about this: Traffic Information Broadcast by Aircraft (TIBA).
For our example flight, there are no TIBA requirements in the North Atlantic, so we do not bother with this.
Strategic Lateral Offset (SLOP)
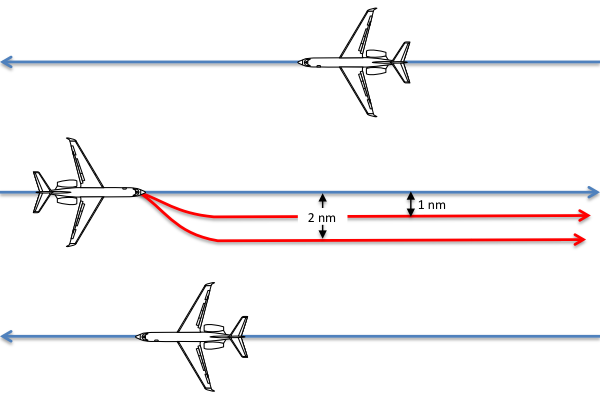
SLOP
Aircraft with an automatic FMS offset capability should routinely fly 1 nm or 2 nm right of course centerline while in oceanic airspace in most of the world, and in increments of 0.1 nm for much of the world. The selection of how much right of course can be made based on wake turbulence considerations. Where authorized, there is no ATC clearance required and it is not necessary to advise ATC. Position reports are based on the waypoints of the current ATC clearance and not offset positions. Aircraft without an automatic FMS offset capability should fly the centerline only.
SLOP is not universal, you cannot use it everywhere, but where it is authorized you should use it.
More about this: Strategic Lateral Offset Procedures (SLOP).
SLOP is recommended in the North Atlantic, so we initiate a 2 NM SLOP to the right.
2
Waypoint passage
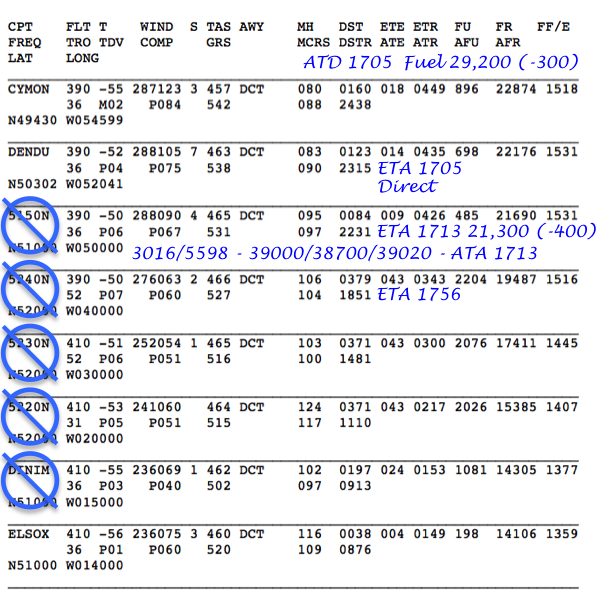
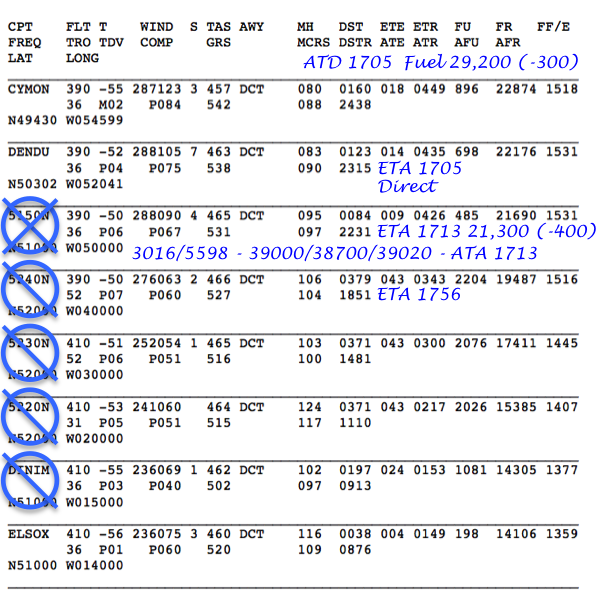
Master document, heading and distance
I recommend you brief the following prior to each oceanic waypoint:
- Current Weight
- Drift down Alt / Speed
- Divert Airport for Current Leg
- Weather at the Divert
- Route proximity to the OTS
- Altitude to get below the OTS
- Contingency Checklists
This might seem to be a bit of a nuisance and after a while unnecessarily repetitive. But if you are flying in tightly packed airspace (such as over the North Atlantic) if something goes wrong and you have to descend and divert, you won't have enough time to come up with a plan. More about this: The Great Escape (from an oceanic track).
Two minutes before reaching each oceanic waypoint, verify the next and subsequent (“next + 1”) waypoints. Using your currently effective route clearance, we recommend this verification include (1) a check of the expanded FMC coordinates for the next and subsequent waypoints and (2) a check that the expected outbound magnetic course and distance to the next waypoint presented in the FMC agrees with that clearance.
Source: AC 91-70B, ¶6.4.4.2
at the waypoint, check the distance to the next waypoint, confirm that the aircraft turns in the correct direction and takes up a new heading and track appropriate to the leg to the next waypoint.
Source: ICAO NAT Doc 007, ¶8.4.14.(b)
You will be fairly busy during waypoint passage and with most FMS the distance between waypoints starts to decrease once the waypoint is crossed. A good technique to get around all this is to placing the pilot's heading bug on the next expected magnetic heading listed on the flight plan a minute or so prior to the waypoint and at that point make sure the distance to the next waypoint checks. At waypoint passage, if a turn is needed, the aircraft should turn to the heading bug.
We are heading direct to 51N 050W and our next waypoint will be 52N 040W. Our example flight plan shows the heading to 52N 040W should be 106° and the distance will be 379 NM. We set the heading bug to 106 and verify the distance shown on the FMS is correct.
Master Document Update
Master document example after 050W
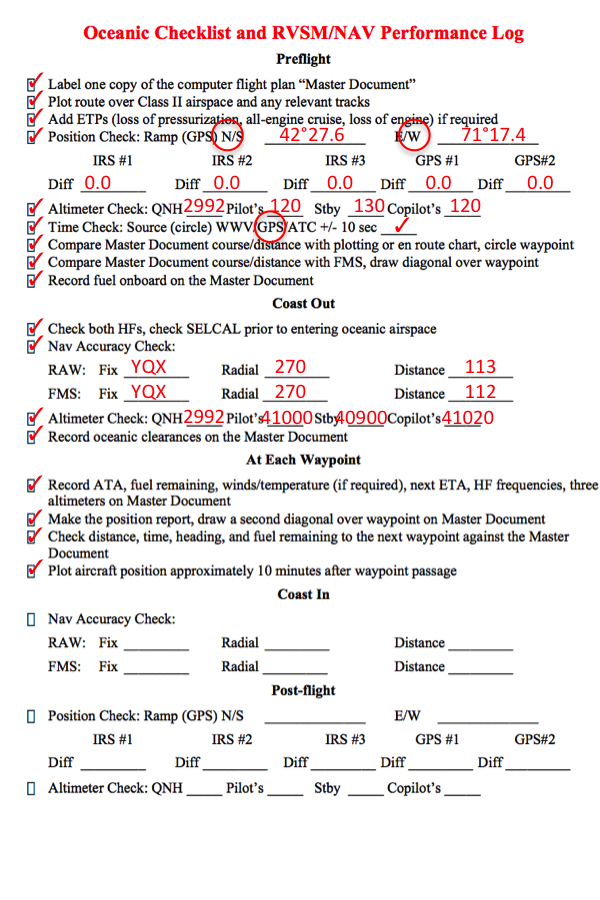
Altimeter checks—hourly.
Source: AC 91-70B, ¶D.1.6.6
The previous advisory circular advised us to record these checks and that remains a pretty good idea. If you have an altimeter that is gradually going bad it would be helpful to see the trend.
The first thing we do passing the waypoint is make note of the fuel, since that number is constantly changing. The annotation "21,300 (-400)" tells us how much we had at that point and that the amount is 400 lbs short of the flight plan estimate. Since we started at "(-300)" on takeoff, we know the trend is against us and make note of the fact we need to keep an eye on this.
We also make note of the frequencies, all three altimeters, and the next ETA.
Position Report

Make position report.
Source: AC 91-70B, ¶D.1.8.3
When position reports are made by voice, ICAO requires you to report to ATS authorities any change to your ETA in excess of 2 minutes, both for your initial oceanic entry point as well as all required reporting points along your route of flight through oceanic and remote continental airspace.
Source: AC 91-70B, ¶6.1.2.4.3)
Position reports can be made via voice or CPDLC:
Since we are CPDLC-equipped, our HF radio conversation goes like this:
- Us: Gander Radio, November seven seven zero zero, on three zero one six.
- Them: November seven seven zero zero, Gander Radio, go ahead.
- Us: November seven seven zero zero, CPDLC, Shanwick next, flight level three niner zero, request SELCAL check alpha bravo charlie delta
- Them: November seven seven zero zero, Gander Radio, voice reports not required in Gander OCA, at thirty west contact Shanwick on five five niner eight primary, three zero one six secondary, SELCAL check alpha bravo charlie delta.
At this point we get the SELCAL, acknowledge that, and get ready for our next chores.
3
After waypoint passage
Heading Check
If you preset the heading bug during the Next waypoint preparation step, you need only verify that the aircraft turned to the correct heading. Otherwise you should now crosscheck the aircraft's heading against the Master Document.
We make a second diagonal on the 050W waypoint, signifying the waypoint duties have been completed. At this point you should set a timer to make the post-position plot, about ten minutes after waypoint passage. Flying east-to-west or west-to-east at a mid-latitude, two degrees on longitude will make this chore easier. More on that next. . .
Post-Position Plot
Two degree check error example
Cross-check navigational performance and course compliance by one of the following methods:
Source: AC 91-70B, ¶D.2.9
The old school method . . .
The “plotting” method is appropriate for all aircraft navigation configurations.
- Verify your plotting/orientation chart reflects the currently effective route clearance.
- Plot your present latitude/longitude and record the time on your chart.
- You should plot your position using coordinates from the nonsteering LRNS.
- Investigate/take corrective action if your plotted position does not agree with your currently effective route clearance.
- Using the steering LRNS, verify the next waypoint is consistent with the currently effective route clearance.
- Verify your autopilot steering mode is in LNAV/VNAV or other appropriate mode to ensure steering to the next intended waypoint.
Source: AC 91-70B, ¶D.2.9.1
The new school method
The “navigation display” method is appropriate for and available for use in aircraft equipped with an operable FMS:
- Confirm the aircraft symbol is on the programmed route on the navigation display (at smallest scale).
- Check system-generated cross-track deviation or similar indication of any deviation from the programmed route of flight.
Source: AC 91-70B, ¶D.2.9.2
This will protect you against problems between the autopilot and the FMS, but not against an improperly programmed waypoint. Let's say you entered 5230N instead of 5330N, the classic "one degree" error that will throw you 60 nm off course. Since the line drawn by the FMS on your display is looking for a latitude of 52 degrees it will draw that as a point and you will think you are on course, no matter how small the display scale is set. I recommend that if you are not going to plot, you should at the very least bring up the GPS present position display and verify you cross the correct waypoint first, and that your course to the next waypoint agrees with the master document. (Check the magnetic course, not the heading.)
Using the steering LRNS verify the “TO” waypoint is consistent with your currently effective route clearance.
Source: AC 91-70B, ¶D.2.9.2
Do not rely on the ARINC shorthand codes here. If you don't have a way of displaying the flight plan waypoints as latitude/longitude pairs, try bringing the waypoint into the scratch pad and then to a waypoint page to ensure your "TO" latitude and longitude points are correct.
Investigate/take correction action to address any anomalies or unexpected deviations.
Verify your autopilot steering mode is LNAV/VNAV or other appropriate mode to ensure steering to the next intended waypoint.
Source: AC 91-70B, ¶D.2.9.2
An alternate method may be used with FAA acceptance.
Source: AC 91-70B, ¶D.2.9.3
The point is to plot the aircraft's position after about ten minutes to ensure the next waypoint wasn't entered in error. If, for example, the flight plan download (or manual entry) entered the next waypoint as 51N 040W, one degree south of the clearance, it would look perfectly normal on the cockpit displays but plotting the position would alert the crew that something is amiss, as shown on the figure. Don't think this is possible? Modern G550's continue to get caught in just this type of Gross Navigational Error.
More about this: Post Position Plot.
Plotting procedures are fairly straight forward but require a level of precision and perhaps some practice. Need a refresher? See: Plotting for some basic instruction.
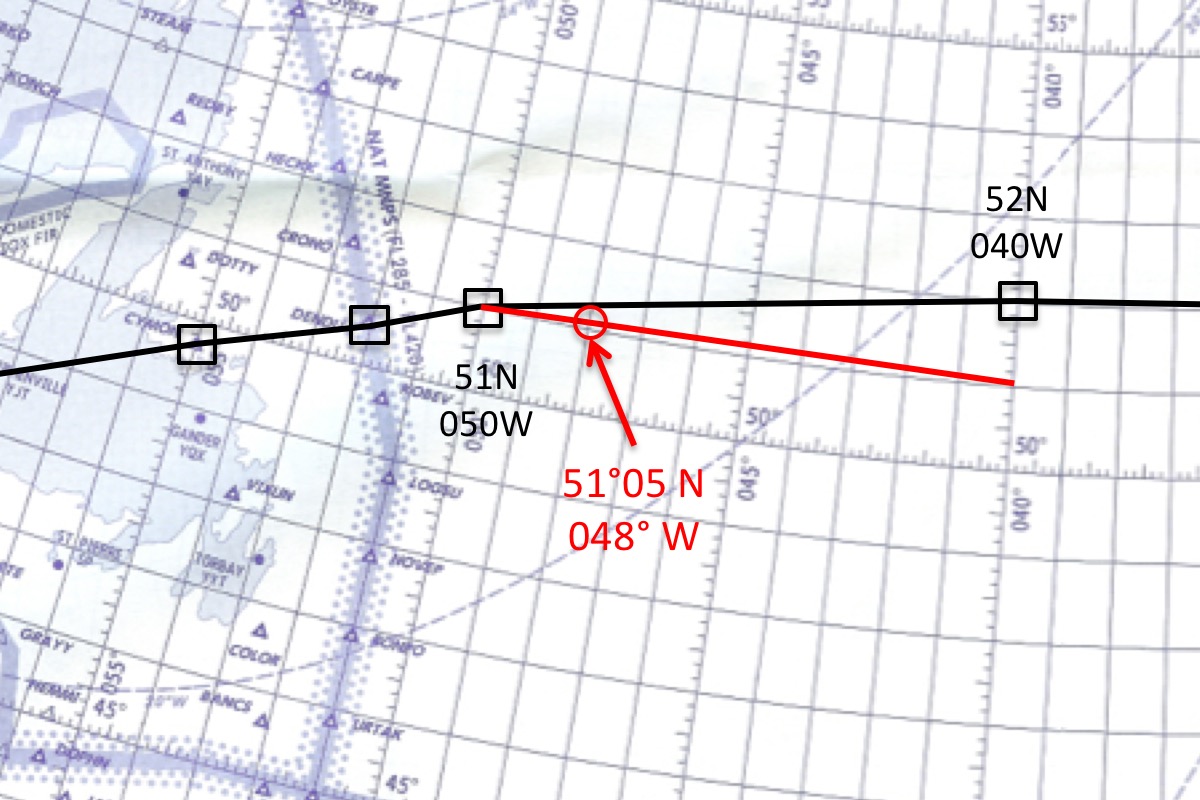
Of course we are on course, as evidenced by our two-degree post-position plot:
Example plotting chart, after first post-position plot
4
Next waypoint preparation
Confirm time to next waypoint. Note: ETA changes in excess of 2 minutes require ATC notification.
Source: AC 91-70B, ¶D.1.8
It is a good technique to preset your heading bug to the expected heading leaving the next waypoint. If the aircraft turns to a different heading, you should be prompted to investigate.
What about aircraft with data link? It depends on whom you believe. The ICAO says . . .
In the NAT Region, if the estimated time for the next position last provided to ATC is found to be in error by three minutes or more, the flight crew should provide a revised estimated time. The flight crew may assume that the estimate for the next waypoint, shown on the FMS at the time a waypoint is crossed, is the estimate transmitted to ATC. The flight crew should provide the revised estimate to the controlling ATS unit as soon as possible via voice or CPDLC using free text DM 67 REVISED ETA (position) (time).
Source: ICAO Doc 10037, ¶B.4.1.4
The NAT SPG says . . .
The flight crew should monitor the forward estimate for oceanic entry, and if this changes by 3 minutes or more, unless providing position reports via ADS-C, pass a revised estimate to ATC. As planned longitudinal spacing by these OACCs is based on the estimated times over the oceanic entry fix or boundary, failure to adhere to this ETA amendment procedure may jeopardise planned separation between aircraft, thus resulting in a subsequent re-clearance to a less economical track/flight level for the complete crossing. Any such failure may also penalise following aircraft.
Source: ICAO Nat Doc 007, ¶5.1.7
Unless providing position reports via ADS-C, if the estimated time for the ‘next position’, as last reported to ATC, has changed by three minutes or more, a revised estimate must be transmitted to the ATS unit concerned as soon as possible.
Source: ICAO Nat Doc 007, ¶6.3.4
In my view, ADS-C has provided the update for you. You could argue the extra position report doesn't hurt.
Midpoint Weather
We recommend you cross-check the winds midway between oceanic waypoints by comparing the master document, LRNS, and winds aloft chart. This cross-check will also assist with situational awareness and in the event your navigation capability is degraded to the point where you need to dead reckon (DR).
Source: AC 91-70B, ¶D.2.10.1
In 2010, ICAO eliminated the requirement to report weather data via voice reports.
Source: AC 91-70B, ¶D.2.8.2
Remember that you do not adjust speed to make the ETA good, you adjust the ETA, otherwise you may have a loss of separation with the aircraft ahead or behind you.
More about this: Mach Number Technique.
From here on each waypoint uses the same procedure, but we'll have to remember to:
- Note when we pass our ETP that our primary divert location changes from Gander to Shannon.
- Look for new ADS-C contracts with Shanwick approaching 030W, followed by a "NEXT CTR" notification with CPDLC, in the case of a Honeywell-equipped Gulfstream.
- Contact Shanwick at 030W and request our climb to FL 410.
RVSM/Nav Performance Log example after post-position plot
References
(Source material)
Advisory Circular 91-70B, Oceanic and International Operations, 10/4/16, U.S. Department of Transportation
ICAO Annex 10 - Vol V, International Standards and Recommended Practices, Annex 10 to the Convention on International Civil Aviation, Vol V, Third Edition, July 2013
Jeppesen Airway Manual
ICAO Nat Doc 007, North Atlantic Operations and Airspace Manual, v. 2021-1, applicable from February 2021