How do we turn our high altitude, high speed projectile into a graceful bird ready for approach at a lower altitude and reduced airspeed?
— James Albright

Updated:
2015-02-29
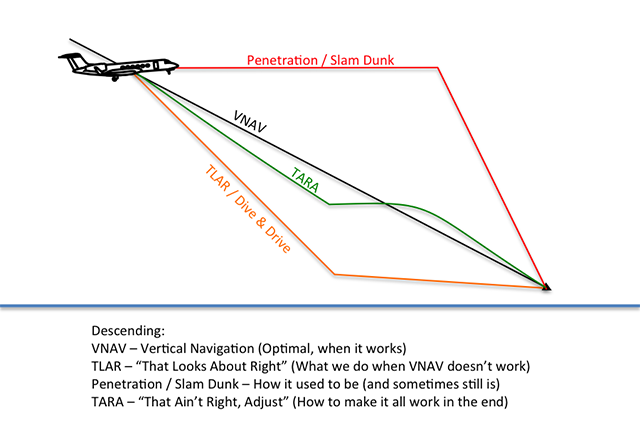
- Penetrations. Back in the bad old days, big airplanes flew to a point very near the airport, threw out the anchor, and down we came. (See Penetrations.) Sometimes we get rushed and end up doing the same thing these days in the proverbial "slam dunk" approach.
- VNAV. In our more modern era we rely on computerized vertical navigation systems to make it all work nicely in a fuel saving, quiet, and trouble free descent. Except sometimes we don't program the computer just right, sometimes ATC has other ideas, sometimes other airplanes get in the way. When that happens. . .
- TLAR. We can guess at the descent rate thinking, "That looks about right." Of course that risks not getting down in time so we quite often resort to hitting the "Flight Level Change" button which brings the throttles to idle and gets us down in time for us to push them back up again wondering what the hurry was. Or . . .
- TARA. We can come up with a plan to computerize the descent without the computer, constantly critiquing our performance with, "That ain't right, adjust." With practice, we can make this work every time. If you want to remember one thing and one thing only about all this, try this: a three degree glide path comes to around 300 feet per nautical mile.
Yes, math is involved, but it is math you can do.
The math is explained in 60 to 1, 60 to 1; Engineer to Pilot Translation, Top of Descent, and TLAR. But everything you need to know to descend gracefully is right here.

1
When to start down
We can sometimes be the master of our fates and start descent at our own discretion. Chances are your FMS has a "TOD" function, where it depicts a top of descent and maybe even gives you a count down. There can be a few problems:
- FMS programming. The FMS itself may have software issues that botches the descent on occasion. You may think they are random events, but the box may have certain things it doesn't do well under certain conditions. The person doing the programming probably wasn't a pilot. But even if he or she was, the programmer didn't think of everything.
- Pilot programming. You may have entered the wrong altitude or distance, you may have put a diagonal in the wrong place, or maybe you did everything right and that guy in the seat opposite of yours undid it. In any case, the box has bad numbers.
- ATC programming. You may have the world's best-designed STAR, the best FMS, and you may have done a superb job programming it. But then ATC throws in a new restriction.
For those days you are told to start down "at your discretion," give the FMS a vote, but you have the final decision. There are two good start down points depending on your airplane and your arrival expectations.
Three degree top of descent
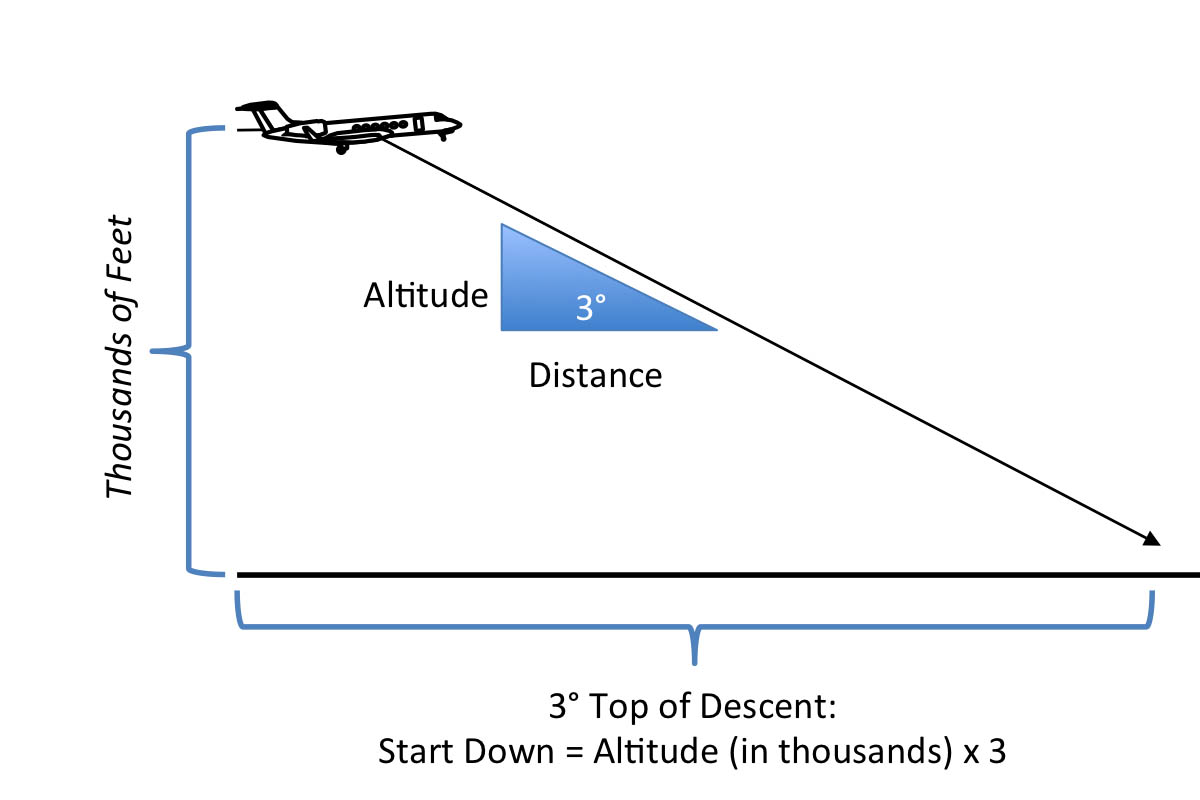
Air Traffic Control used to be designed around the idea most airplanes are most efficient flying a three degree descent and there are still parts of the world where you can do this. Figuring it is easy. The rule for descents is that your gradient equals flight levels divided by nautical miles to go. If you throw in a 3.33 degree descent, the math becomes easy . . .
We can hardly detect 0.33 degrees so we'll call it 3.

Start descent at three times your altitude (in thousands of feet) to achieve a 3 degree descent.
If you are at 45,000 feet, for example, round the altitude up to 50, just to make things easy, and start down at 3 x 50 = 150 miles out. If you are descending to a high altitude airport, you may want to adjust for the field's elevation.
Two and a half degree top of descent
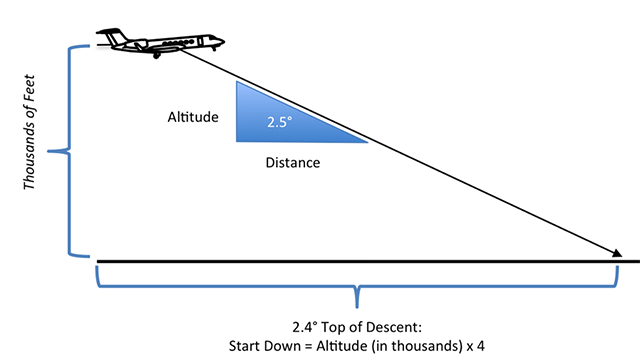
Not all aircraft can manage a 3 degree descent. The G450, for example, cannot do 3 degrees at high altitudes without picking up speed. It can, however, manage half a degree less. The math for a 2.5 degree descent is just as easy for 3.0 . . .
The actual math comes to 2.4°, which is close enough to 2.5°.
Start descent at four times your altitude (in thousands of feet) to achieve a 2.5 degree descent.
If you are at 45,000 feet, for example, round the altitude up to 50, just to make things easy, and start down at 4 x 50 = 200 miles out. If you are descending to a high altitude airport, you may want to adjust for the field's elevation.
2
Crossing restrictions
Required Descent Gradient
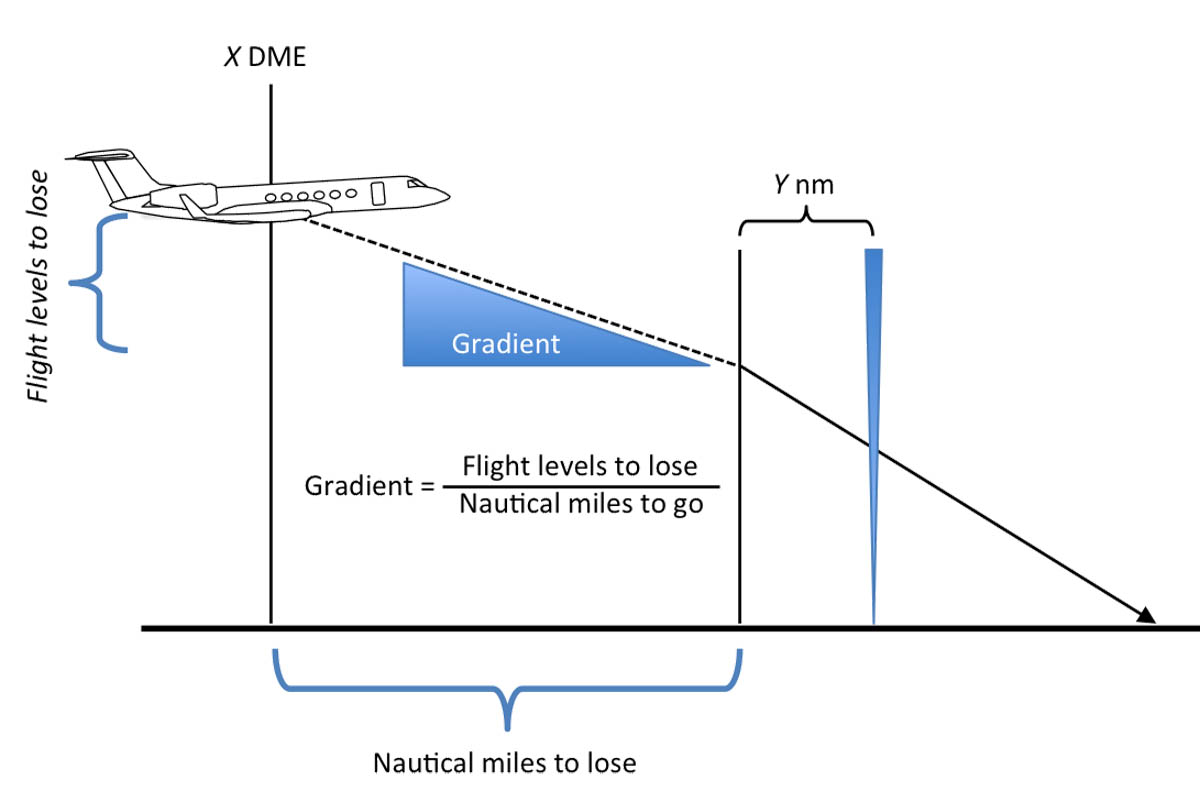
What happens if you don't have a choice and are told to get down within a fixed distance? You could program that into your FMS and chances are it will make it happen. But sometimes it doesn't. You should always come up with your own answer to check the FMS or to have a Plan B for the days the FMS throws up its hands and says, "I don't know, you do it."
You can compute a required descent gradient by dividing the flight levels to lose by the nautical miles to go. (See 60 to 1 for an explanation of why.) Once you have that, you can compute a desired VVI. (More on that after an example.)
Required descent gradient = flight levels to lose divided by nautical miles to go.
Example: Boston Arrival Start Descent with a Crossing Restriction
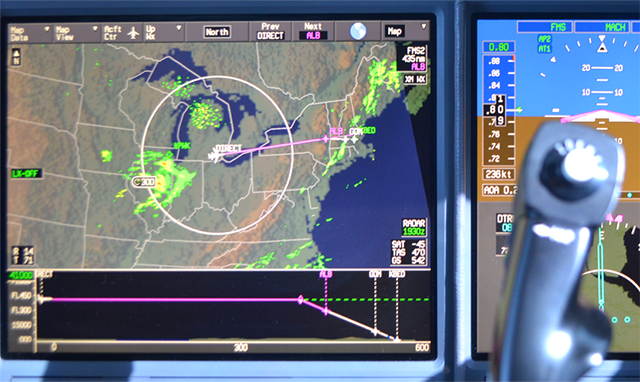
You are at FL 410 and they gave you direct ALB with 435 nm to go and you have absolutely nothing to do for the next 48 minutes. But then they throw in a curve ball: "Cross 100 miles west of Albany at 10,000 feet." No problem, says you, just enter ALB//100/10000 in the line above ALB in the FMS and the box does everything for you. But then, for some reason, the airplane flies right through TOD. Maybe you never hit the VNAV key, maybe the PM put one fewer slash on the FMS command line than Mister Honeywell expected, or maybe there is a gremlin in the system. But you are behind in the game now.
How could you have detected this earlier? Well, once you typed in all that data you could have taken one more step. Figure a start descent point on your own. For a three degree descent you would have to start down no later than:
At this point I would brief the PM, "If the box doesn't start us down 193 miles from ALB, I will.
But that is water under the bridge. You are now at FL 410 at 180 DME, you only have 80 miles to go. The flustered PM can't seem to get the FMS to communicate and you need to get down. You can hit Flight Level Change, pull out the boards, and end up droning for a few miles, red-faced. Or you can start the nose down and do some quick mental math.
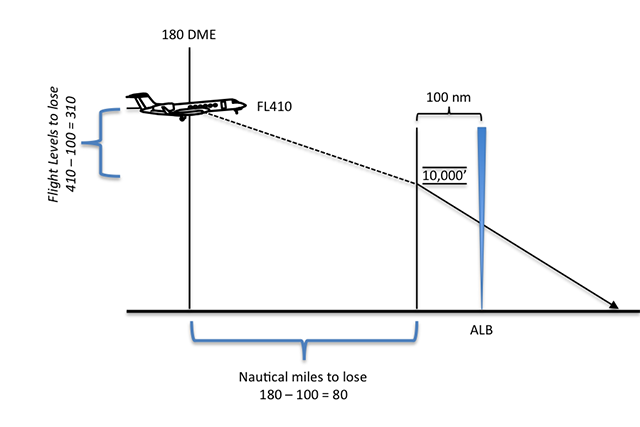
We know the descent gradient is equal to the flight levels to lose divided by the nautical miles to go, but the math isn't so straight forward.
We want to do this without a calculator, slide rule, or Stephen Hawking in the jump seat. Well, 8 is a factor of 32 — it divides easily — and if we can make the gradient with 320 flight levels to lose we can certainly do it with only 310 flight levels. And that makes life for us as pilots easier:
If we achieve a 4° descent gradient, we will make it to our restriction with room to spare. So leave the boards stowed for now and see what kind of VVI we've got with the power levers at idle.
Required VVI
60 to 1 tells us that nautical miles per minute times the descent gradient times 100 gives us our required VVI. But we don't have a meter that tells us our nautical miles per minute, do we? Most modern cockpit do have a ground speed readout, however, and that is easily converted.
Required VVI = Required Descent Gradient times (nautical miles per minute) times 100.
It is easier if you break this down into steps. Take your ground speed and divide by sixty and round that to the nearest number. Back to our example:
Example: Boston Arrival VVI Needed
In our Boston example we see our ground speed is 542 nm/hour so:
- Ground speed can be rounded to 540 which makes our math easier: 540/60 = 9 miles per minute.
- A 4 degree descent means the required VVI will be 4 x 9 x 100 = 3,600 fpm
So we are looking for 3,600 fpm. If idle and clean gives us that, we are good to go. Not enough? Sneak just enough boards out to get it.
3
Progress check
Once we've started down we should make occasional progress checks to make sure our initial math was okay and that the winds aren't changing the conditions on us. As we descend, picking the right altitude or distance can simply for math. For example . . .
Example: Boston Arrival Progress Check

Let's say in our example we started down a bit aggressively, trying to take care of the steepest part of the descent early. We should pick easy altitudes to give ourselves a progress check. Perhaps crossing FL 250 we find ourselves at 150 DME:
So we've caught up on the descent and now have a nice, normal, three degree gradient in front of us. Our ground speed will have decreased with altitude, of course, and now reads 350. We can round that up to 360 so we have 6 nm/min, which makes the required VVI easy:
The Magic of 3 Degrees
Most airplanes are happiest when descending on a 3 degree glide path all the way from altitude to touchdown. Some, like my G450, can't quite manage the 3 degrees at high altitude without accelerating, but generally speaking 3 degrees is the magic number.
Is this number magic or is it related to the 60 to 1 cult many of us belong to? Neither. It is simply math: if you multiply the distance to go (in feet) by the tangent of 3 degrees you get the height at that point (in feet). For a 3 degree glide path that comes to 318 feet every nautical mile. Or you can round that to 320 feet per nautical mile, or even 300 feet per nautical mile.
More about this: Trigonometry.
4
The peskier math
What if the math just doesn't work in your head? I can offer three solutions:
- Calculator. You can keep a pocket calculator in the cockpit and just cheat.
- Whiz Wheel. I did this for years, spin the numbers on the whiz wheels. It gets easy with practice. But now I do something else. . .
- Lazy Math. Make the numbers conservative. Let's say in our example you came up with 4.5 degrees and 9 miles per minute. Whaaah? 9 times 4 is 36. 9 times 5 is 45. 9 times 4.5 is between the two, call it 40. So your target VVI would have been 4,000 fpm.