My first book on navigation was issued to Air Force navigators in 1972 and had this to say about celestial navigation: “When the ground is not visible and a position cannot be established ·with other methods, celestial observations offer the only available aid to dead reckoning.” Of course, those days are long gone.
— James Albright

Updated:
2024-11-15
From Air Almanac cover
So that begs the question: why bother learning it? I offer basic celestial concepts here to show how it used to be done in hopes that it can help a modern navigator’s “big picture” view of the task at hand: getting from here to there. I think having a cursory understanding – which is all I am providing here – will make you a better navigator when the GPS doesn’t seem to be up to the task.
We’ll cover the equipment you will need if you want to actually shoot the heavens to find where you are, some basic terminology, and then two methods to turn a view of the heavens into your latitude and longitude. The first method is easier than the second but is rarely available. Again, we aren’t trying to turn you into Ferdinand Magellan. But going through the methods will make you a better navigator.
1 — A celestial navigator's toolbox
1
A celestial navigator's toolbox
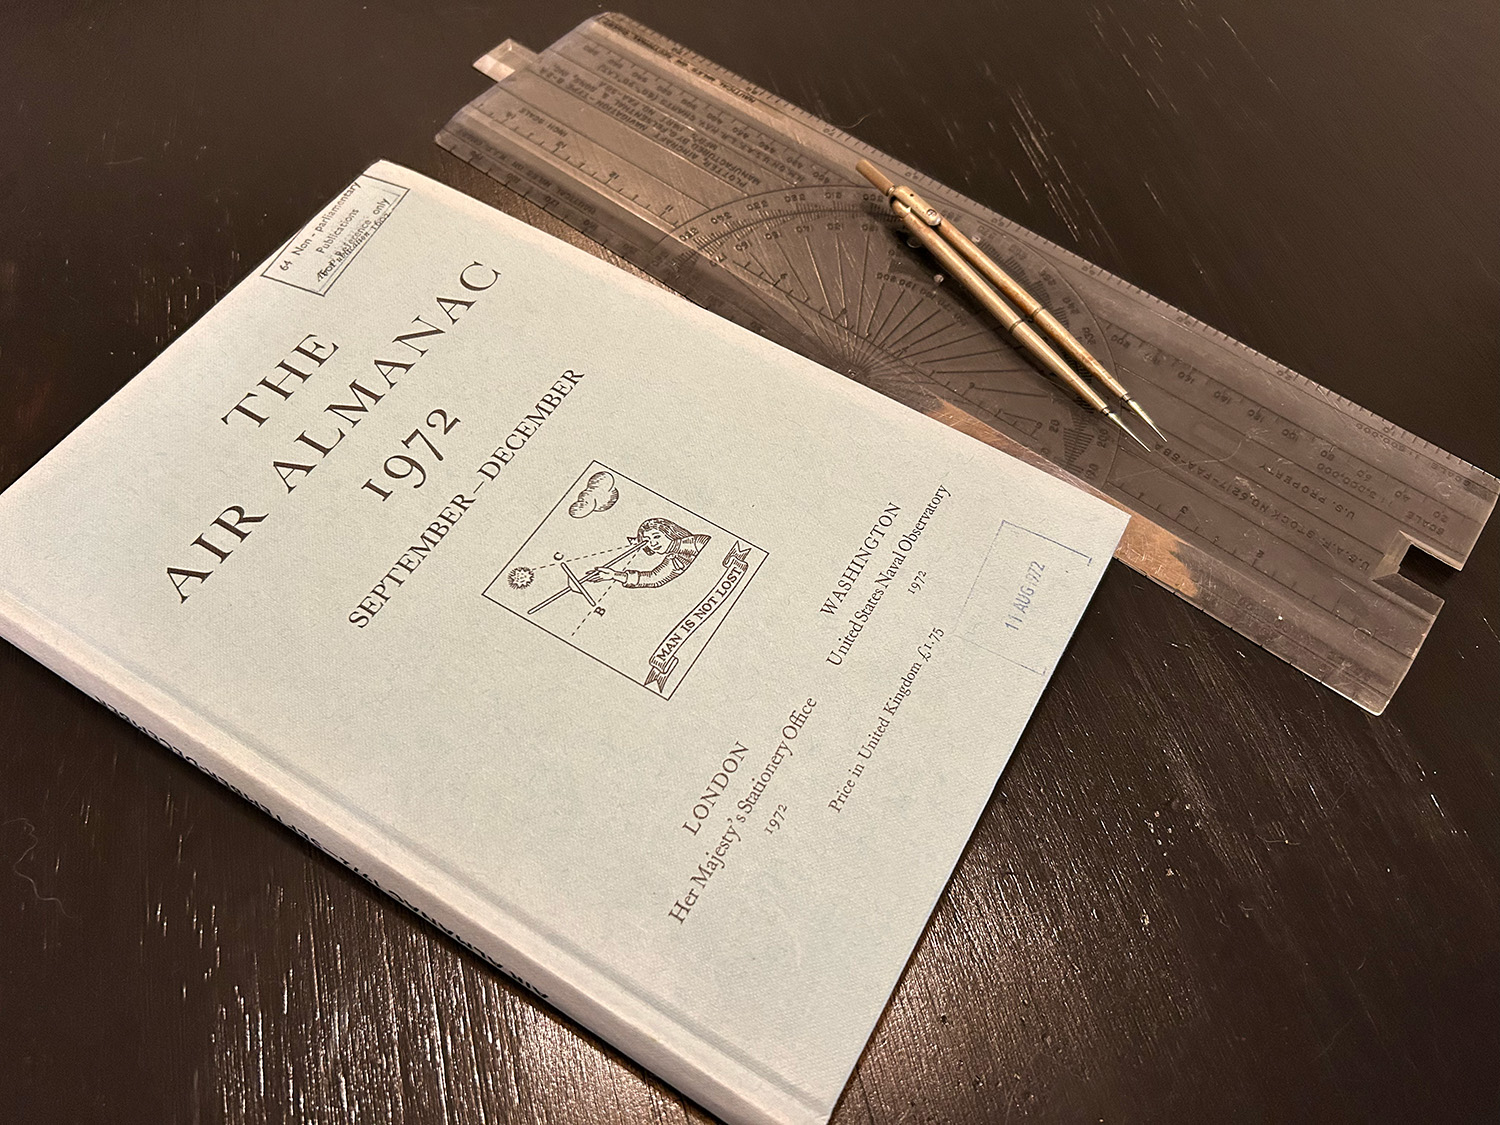
Air Almanac, plotter, dividers
A celestial navigator needs:
- A sextant for measuring the angles between celestial bodies or a celestial body and the horizon.
- A watch to record the time of the observation.
- An Air Almanac for locating the position of the celestial body. Most Air Almanacs contain the expected positions of 57 stars, Mars, Jupiter, Saturn, Venus, the sun, and the moon for given dates and times.
- Side Reduction Tables use for computing the Line of Position (LOP).
- A plotter and a chart
2
Some terminology to begin with
The terrestrial sphere
For the purpose of celestial navigation, the earth is considered to be a perfect sphere, called the terrestrial sphere, so that every point on the surface has the same distance to the center. We know that the earth rotates 360° every 24 hours, but we will normally assume the earth is not rotating for the purpose of celestial navigation.
Great circles
You can cut the sphere into slices called circles. Any slice that goes through the center of the earth is called a great circle. Great circles that go through the poles are called meridians, or lines of longitude. The equator and every meridian are all great circles. The meridian that goes through the Royal Observatory in Greenwich, England is called the prime meridian, which is 0° longitude. Lines of longitude go east and west to 180°.
Small circles
Any circle formed by a slice that doesn’t go through the center is called a small circle. Small circles that are perpendicular to the earth’s axis of the earth’s rotation are called parallels of latitude. Latitude starts at the equator with 0° and goes north and south to the poles at 90°. The equator is often abbreviated with the letter Q.
Distances
The distance along the terrestrial sphere is known as arc distance. When that arc is along a line of longitude, 1° of arc equates to 60 nm, which means 1’ (one minute) of arc equals 1 nm.
The celestial sphere
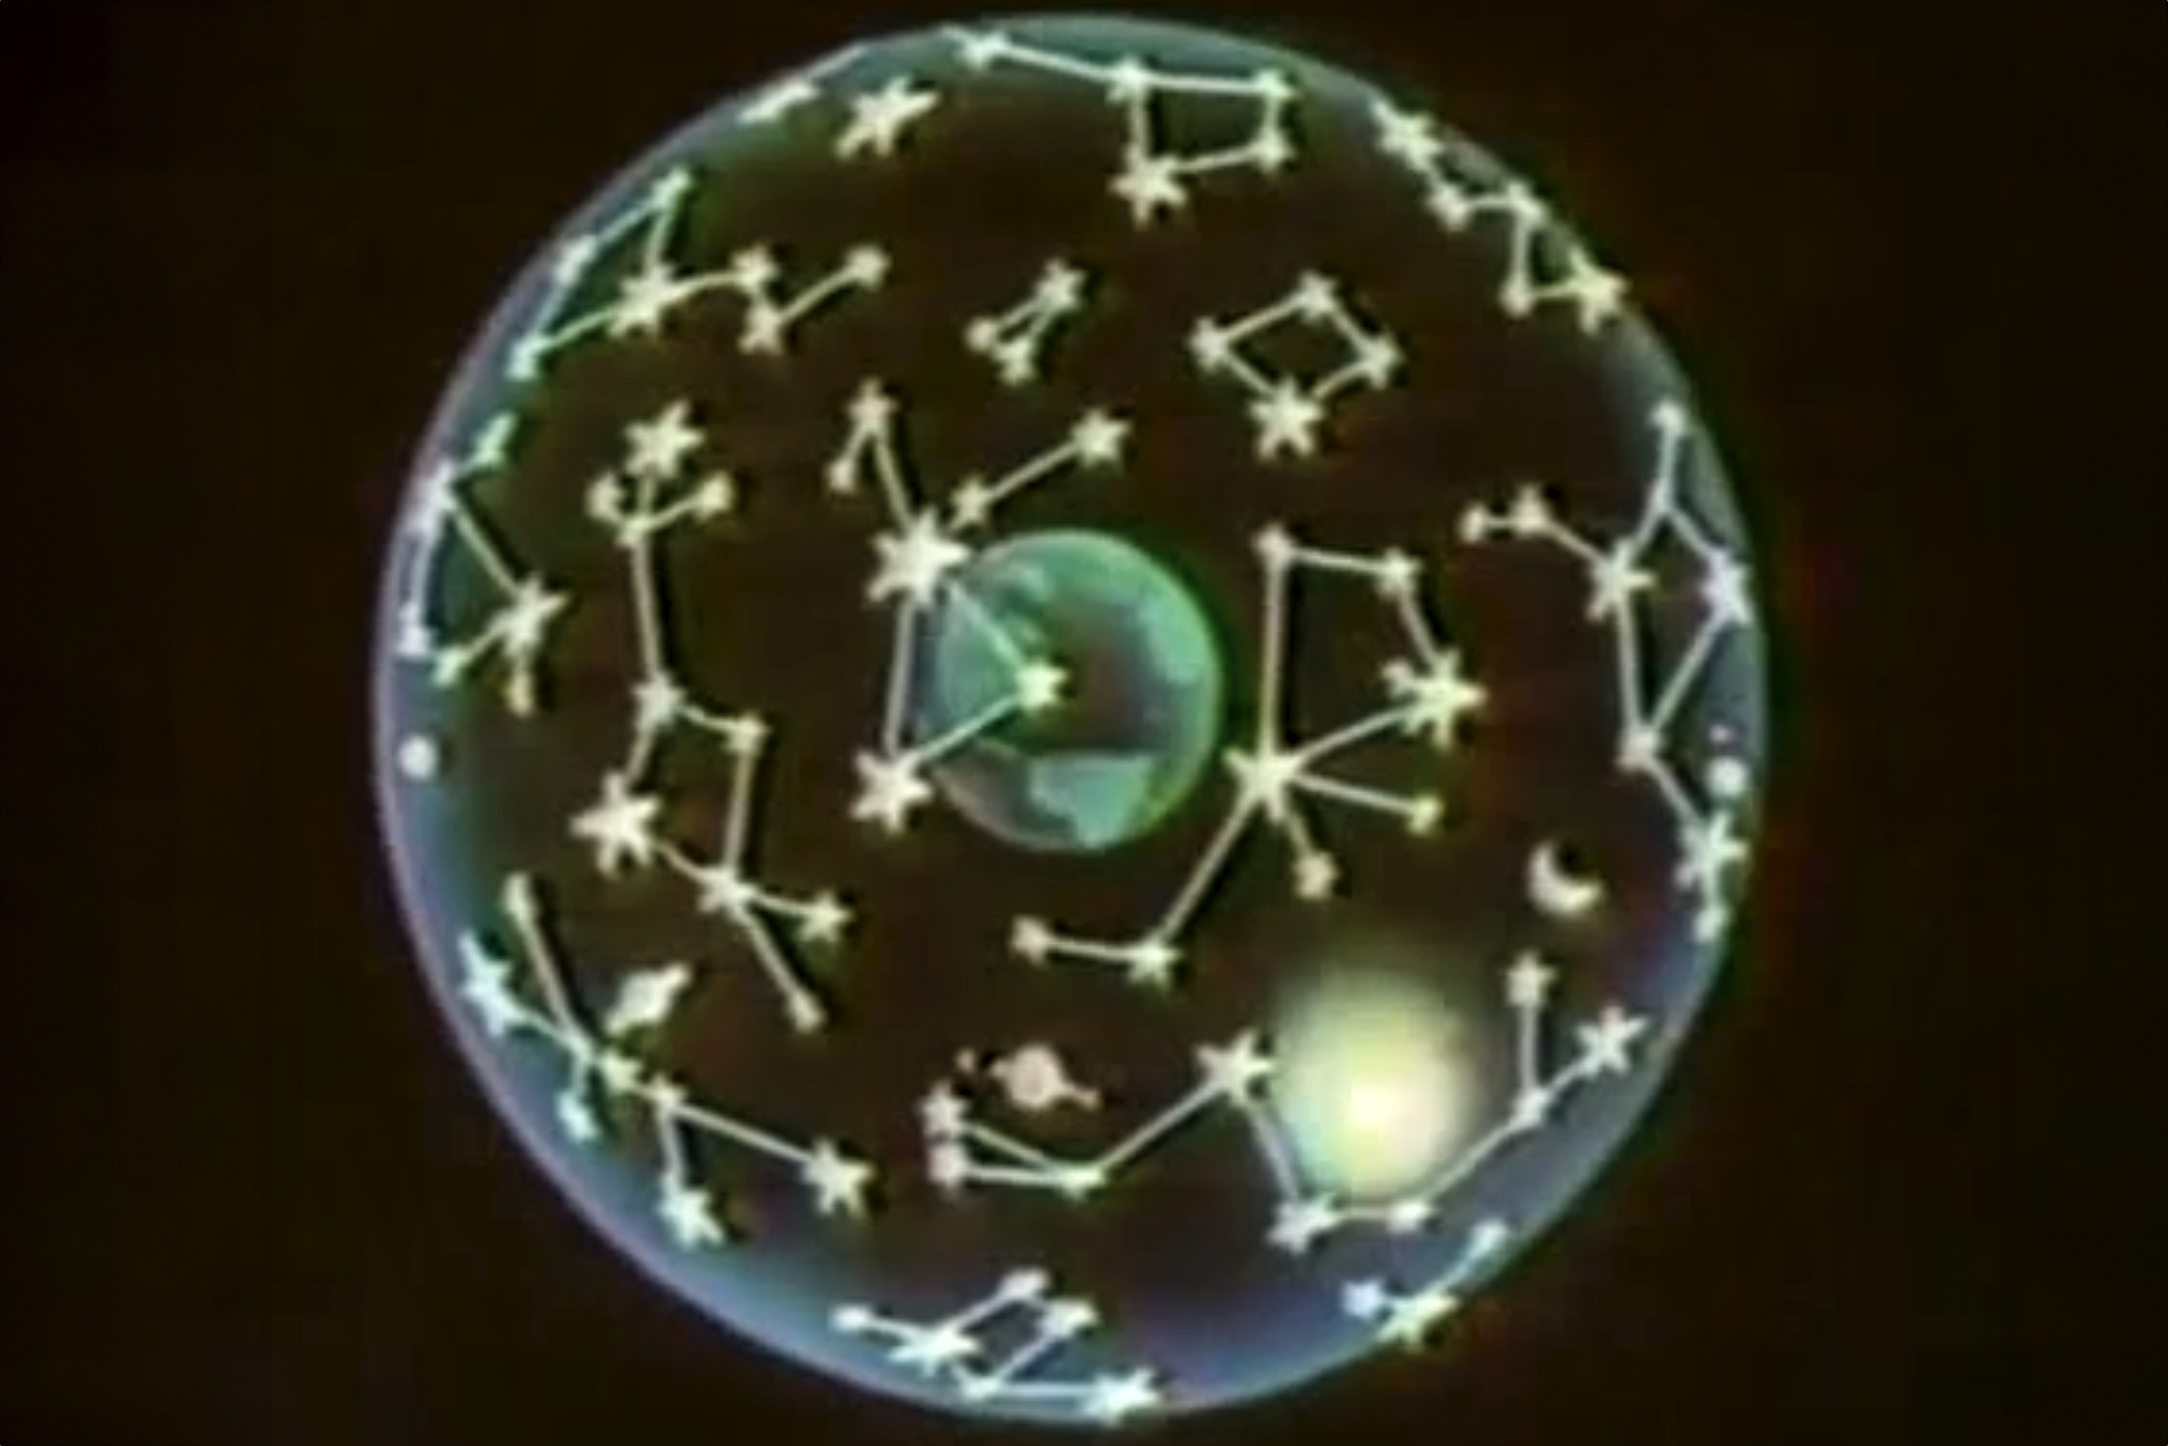
In celestial navigation we assume that all celestial bodies are infinitely far away on an imaginary sphere called the celestial sphere. This sphere (and the celestial bodies on it) rotate westward about an axis that is an extension of the earth’s axis. It rotates 360° every 24 hours, 15° every hour, and 1° every 4 minutes. The axis goes through the center of the earth and the north and south poles.
Because the celestial sphere is infinitely large, any point on earth can be considered the center of that sphere, greatly simplifying the geometry of celestial navigation. (You don’t have to consider the distance from you in the air to the surface of the earth as well as from there to the center of the earth.)
Every point on earth has a corresponding point on the celestial sphere and every point on the celestial sphere has a corresponding point on earth. Accordingly, we have a celestial axis, a celestial meridian, and so forth. There are, however, a few special names.
- Declination is the celestial latitude.
- Parallels of declination are the celestial parallels of latitude.
- Zenith is your position on earth extended outward to the celestial sphere.
- Geographic Position (GP) is a celestial body’s position drawn to the earth, also known as its subpoint on earth.
Apparent motion
We know the earth is rotating and the celestial bodies are stationary, but in celestial navigation we think of it the other way round. The celestial sphere appears to us to be moving from east to west.
Hour Circle
An hour circle can be thought of as a line of longitude on the celestial sphere that contains a given celestial body. The sun, for example, has an hour circle. The star Rigel has another hour circle, and so on. Hour circles appear to us to move east to west at the standard rate of 1° every 4 minutes.
Greenwich Hour Angle (GHA)
Greenwich Hour Angle (GHA) is the angle from the Prime Celestial Meridian to the hour angle of the celestial body and is measured west of that meridian through 360°.
Prime Hour Circle and GHA-Aries
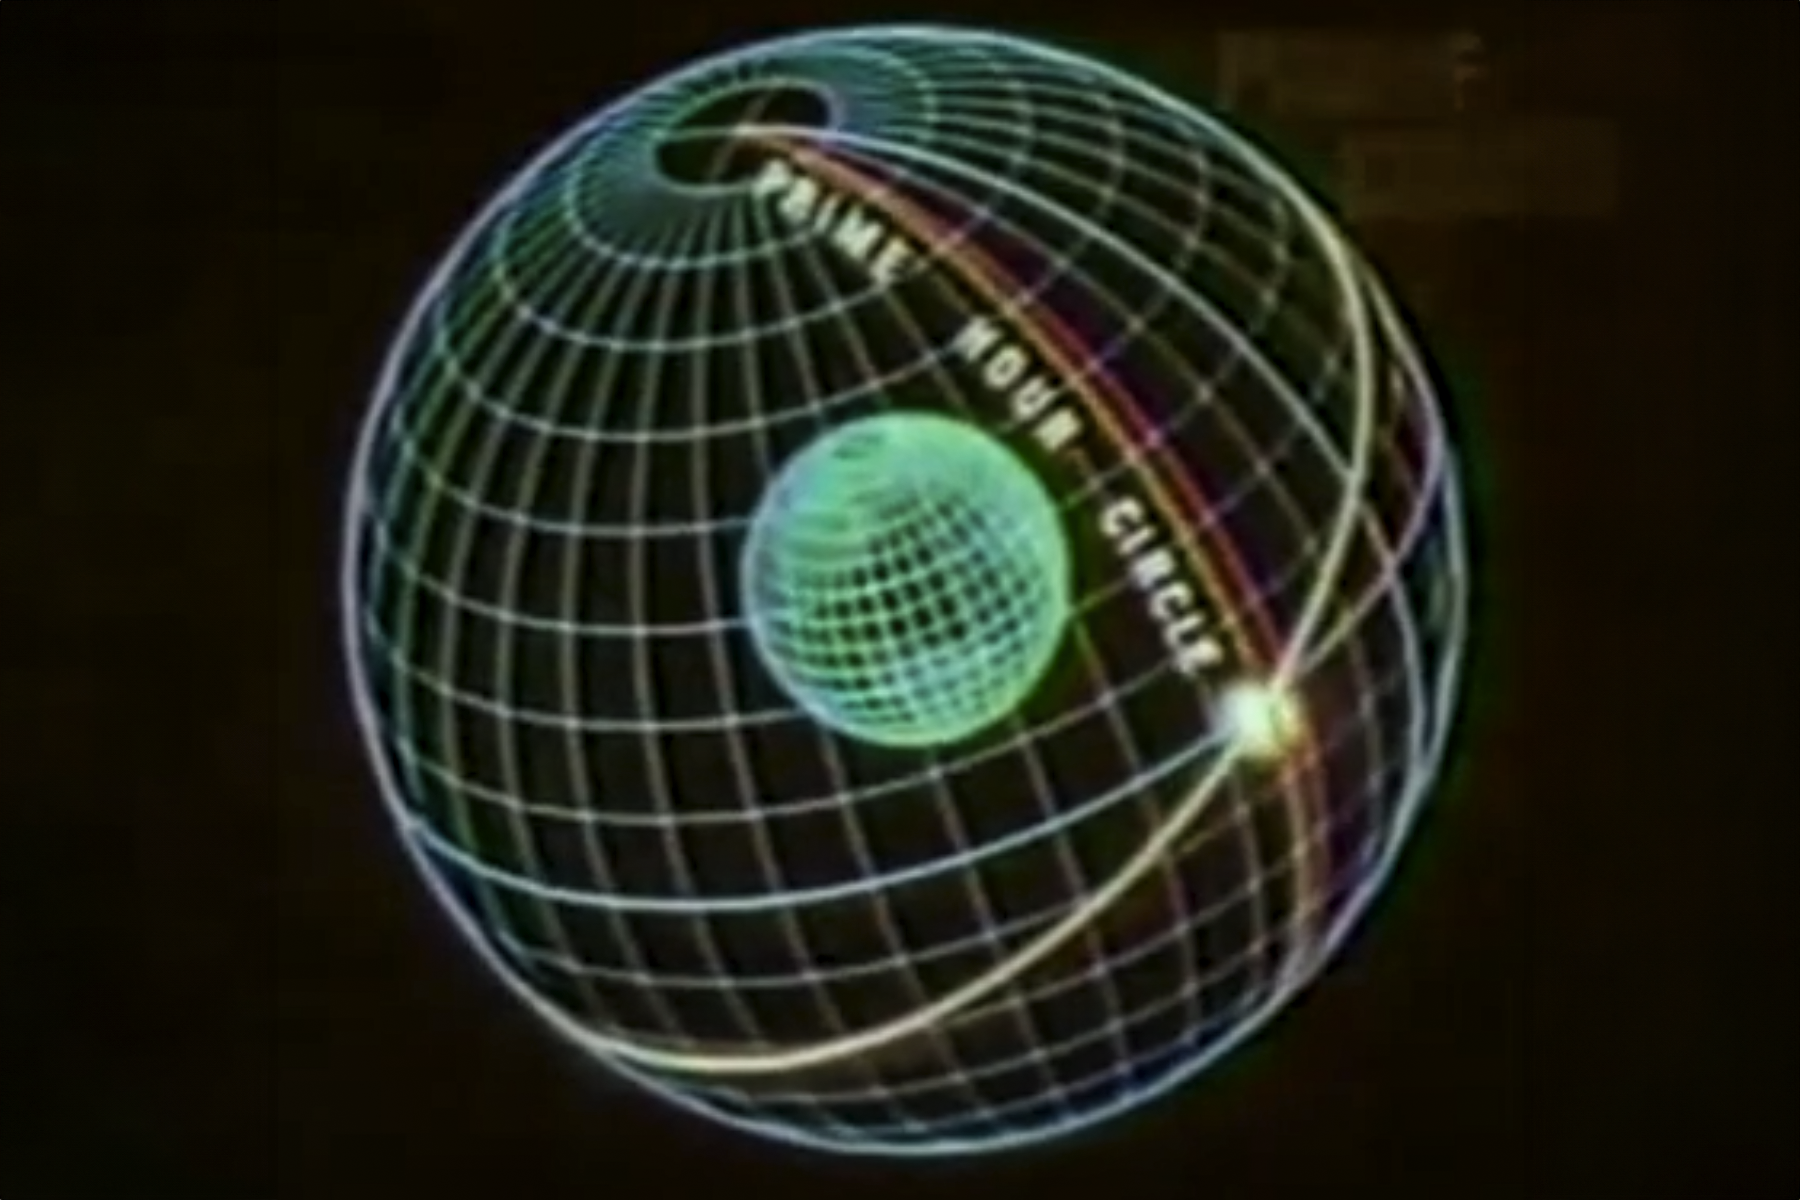
Prime Hour Circle is the hour circle of the sun when it crosses the celestial equator (the point where its declination is zero.) This is also known as the Hour Circle of Aries, or GHA-Aries.
This point changes the first day of every spring.
Local Hour Angle (LHA)
Local Hour Angle (LHA) is from the observer’s celestial meridian to the hour circle of the celestial body, again measured to the west through 360°.
Sidereal Hour Angle (SHA)
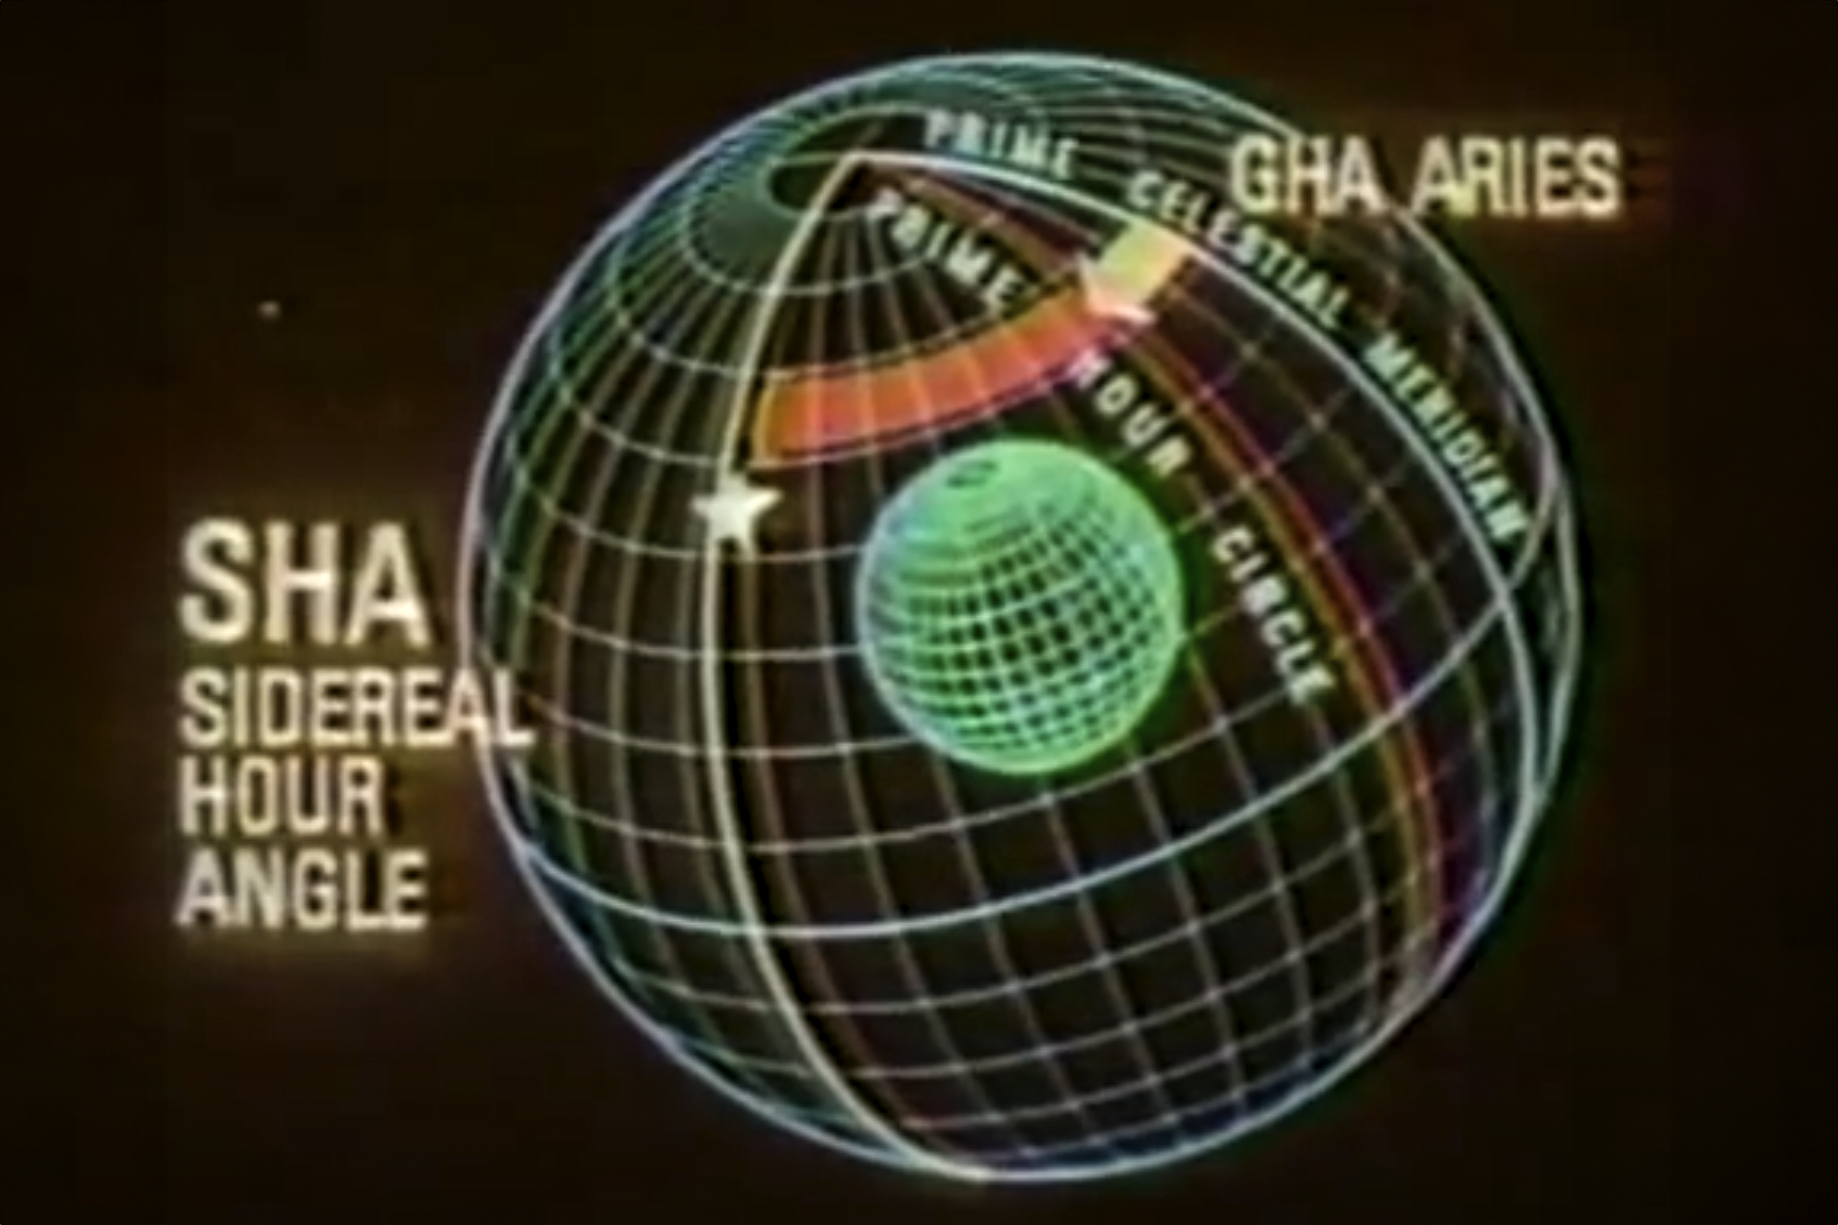
Sidereal Hour Angle (SHA) is measured from GHA-Aries to the hour angle of a star (other than the sun). A star’s position relative to the sun and its declination relative to the celestial equator is constant. This makes life easier since you don’t need to update the GHA of the stars, only that of the sun and selected planets. If you have the GHA-Aries, adding a star’s SHA will give its GHA.
3
The basic idea
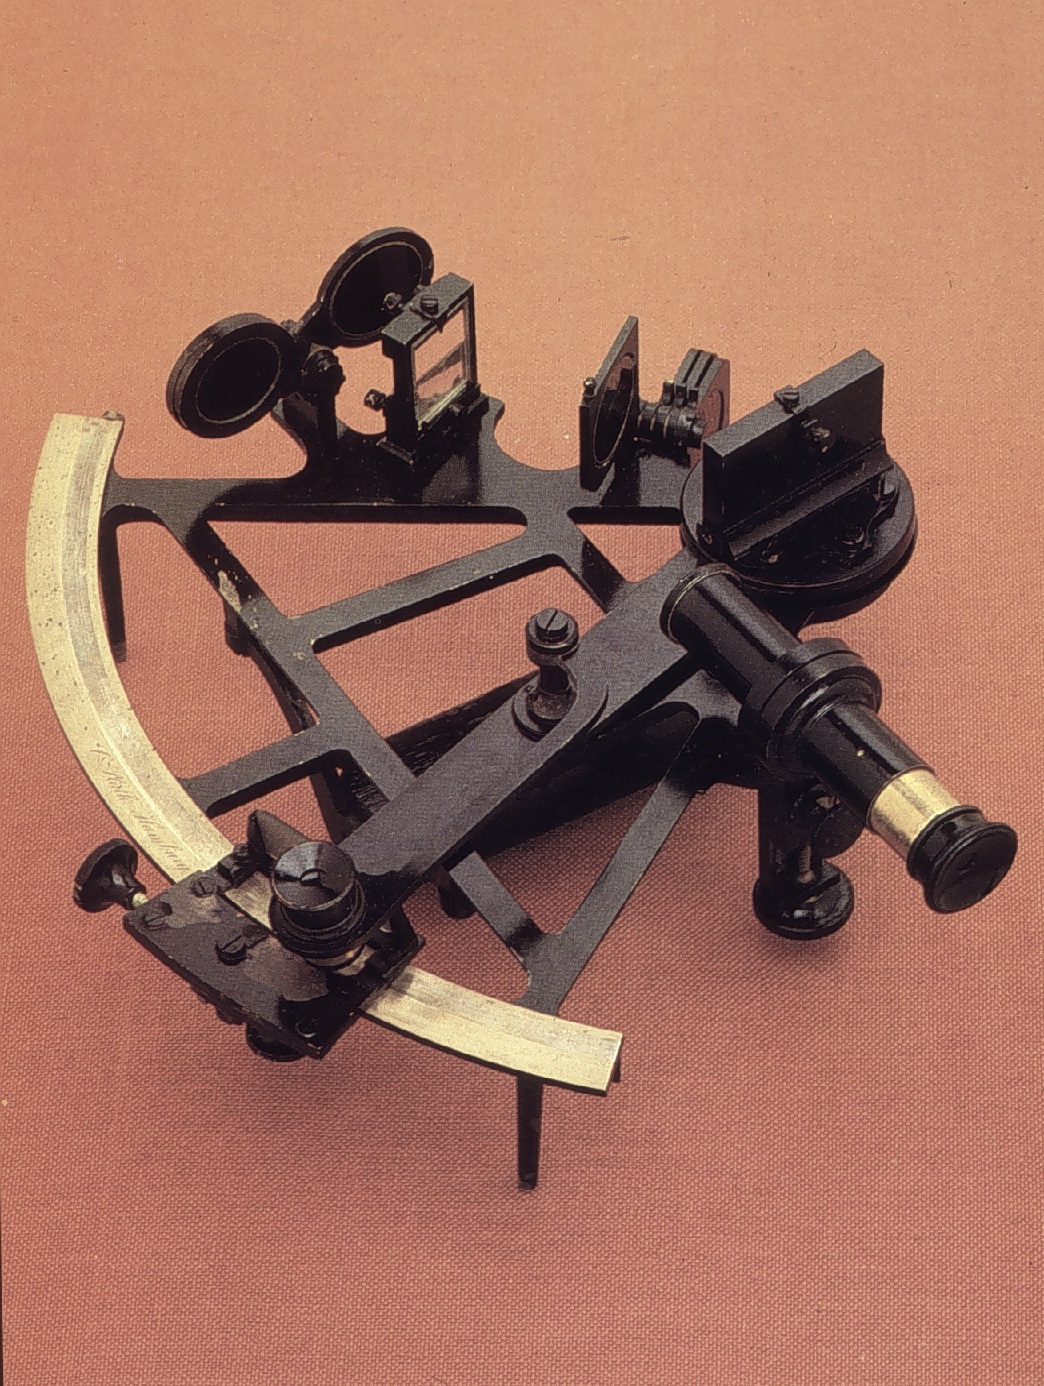
A sextant (NOAA photo)
You need a rough idea of where you are through dead reckoning and a basic knowledge of which celestial bodies will be visible to you. You aim your sextant at the celestial body and measure the angle between it and the horizon. Celestial angles like this are called altitudes. Record the altitude and the time.
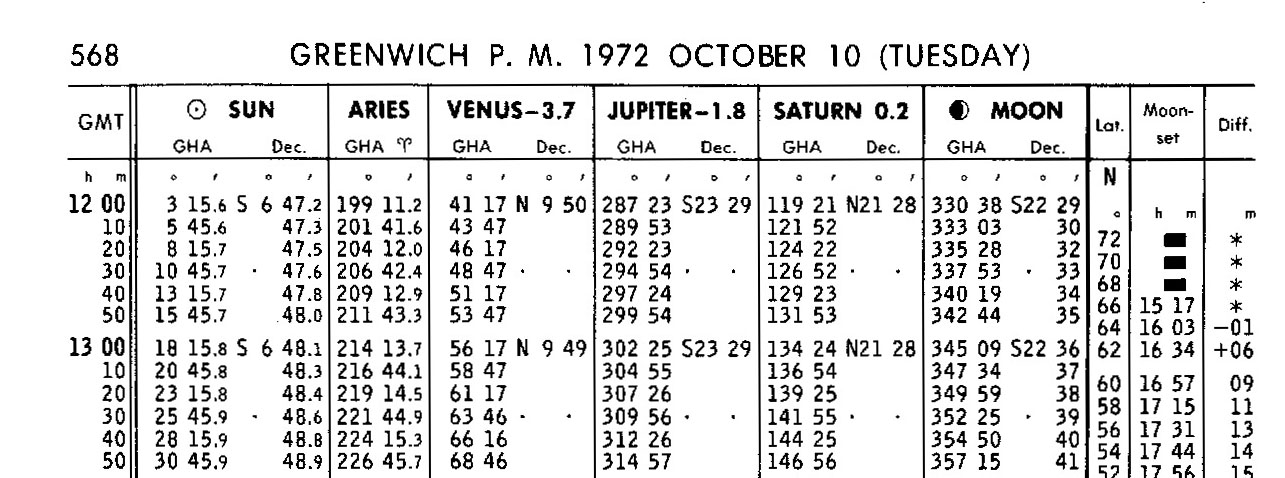
GHA examples from Air Almanac
You now need the GHA and declination of your celestial body. You can find this information for the Sun, Venus, Jupiter, Saturn, or the Moon directly in the Air Almanac on the page for your date and the row corresponding to the time of your sighting. If celestial body is outside the solar system, you will need to record the GHA-Aries.
A celestial object's altitude
Armed with this information, you sight the celestial body with your sextant and record its altitude. For now, let’s say we sighted the Sun and have GHA-Sun and Declination-Sun.
We have enough information to determine the location of the celestial body – the Sun in this example – and its position over the earth. That is defined as the Geographic Position (GP) of the celestial body.
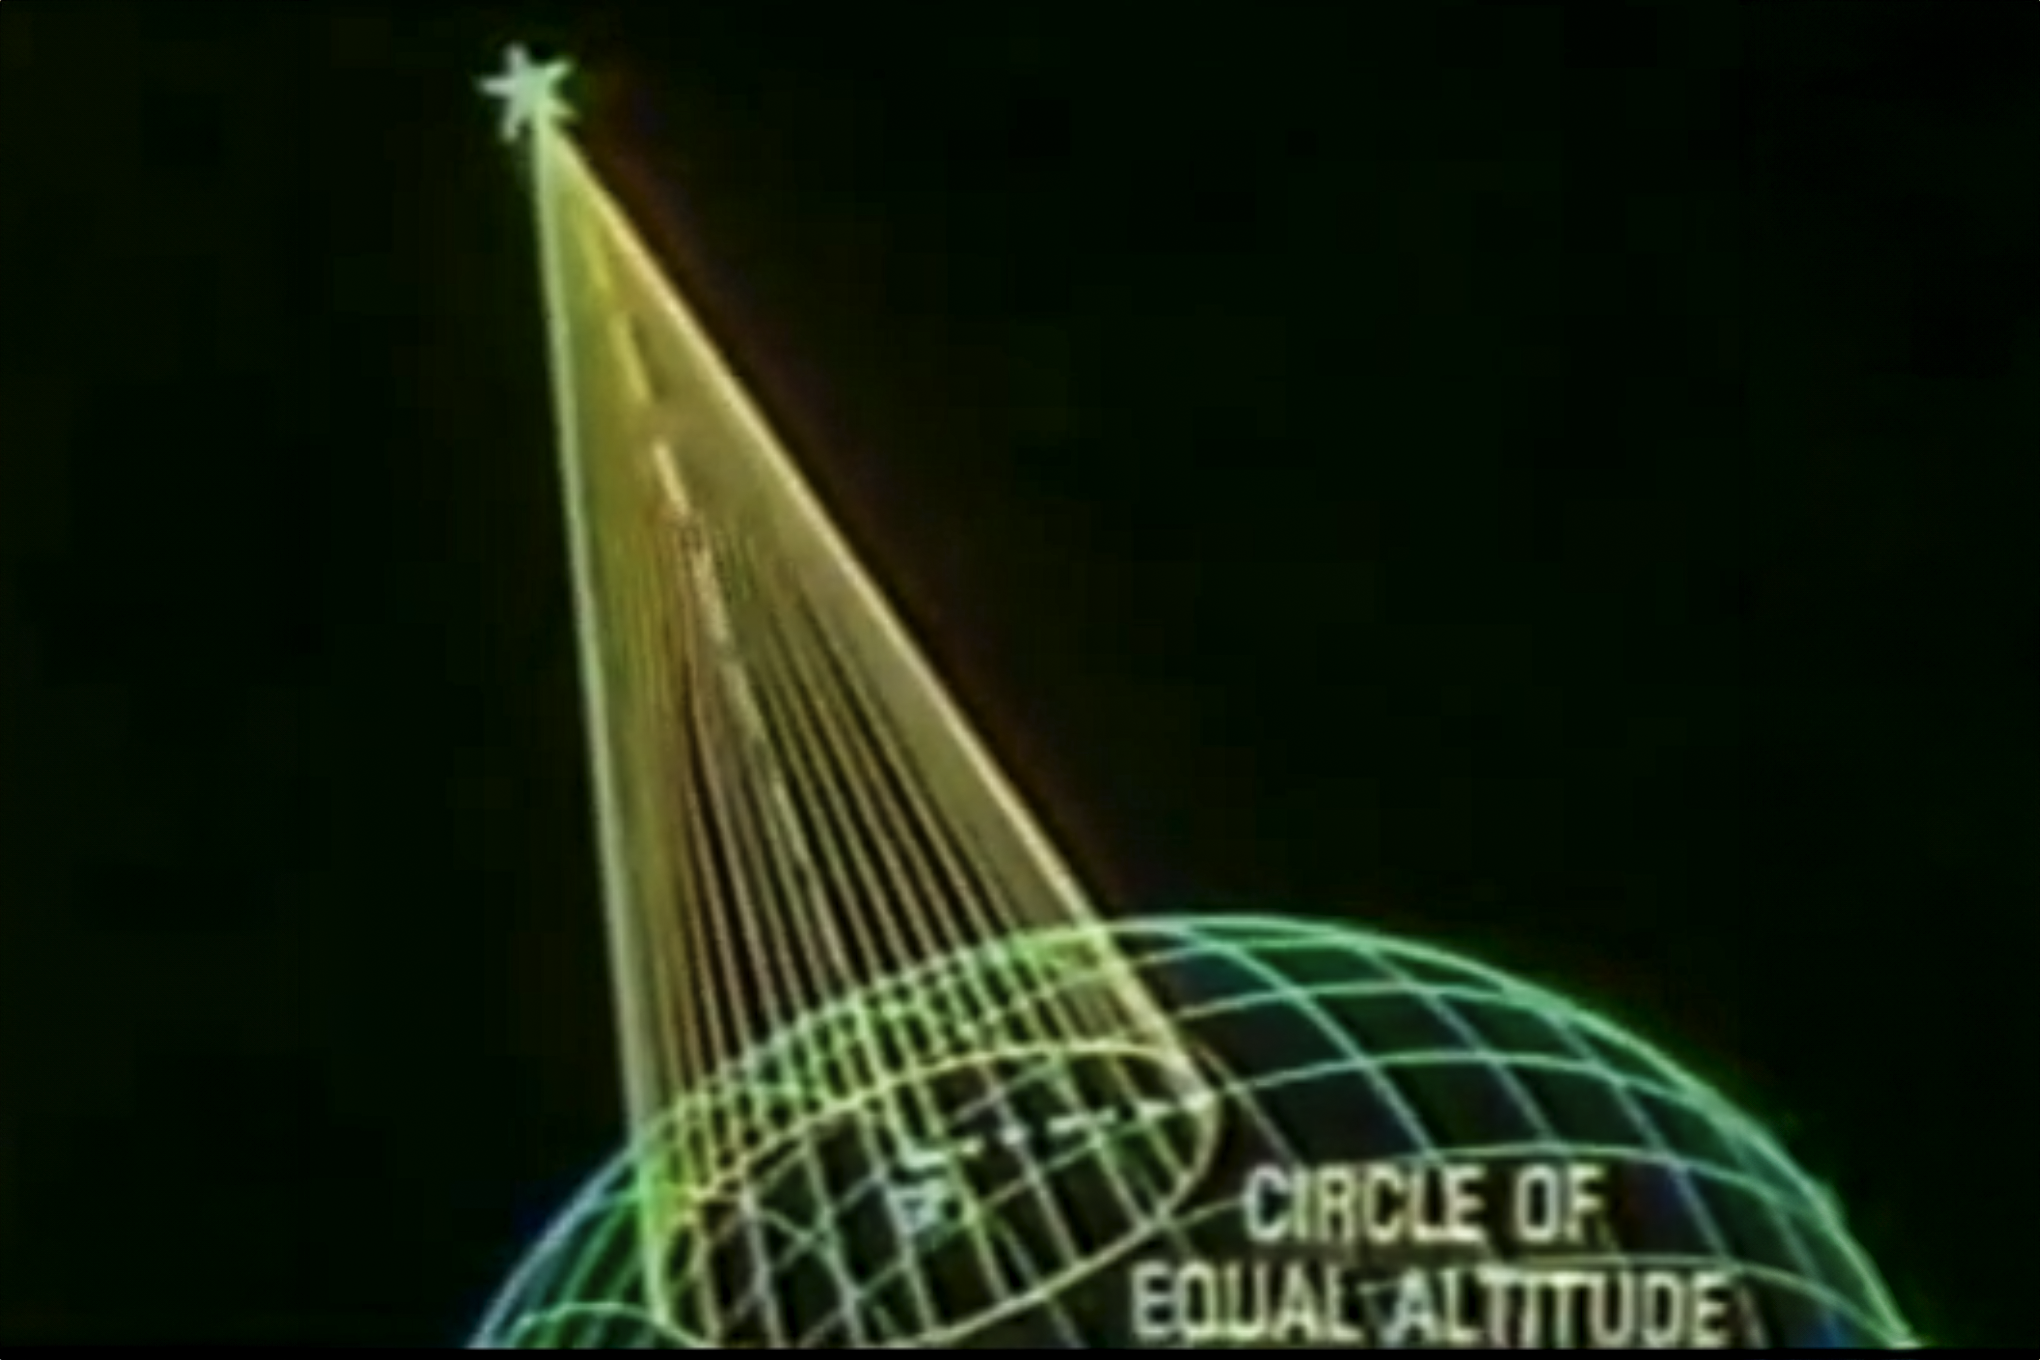
Circle of equal altitude
The altitude of the celestial body can be seen by more than just you in your location, but also by others at other locations. Each of you sighted the same angle. The points on earth with the same angle are on what is called the Circle of Equal Altitude.
The entire circumference of that circle is a Line of Position (LOP). You could, theoretically, be anywhere on that LOP.
If you were to repeat the process on another celestial body and come up with a second circle of equal altitude, you will have narrowed your possible solutions to anywhere within the shared areas of those two circles.
A third circle would further reduce the uncertainty.
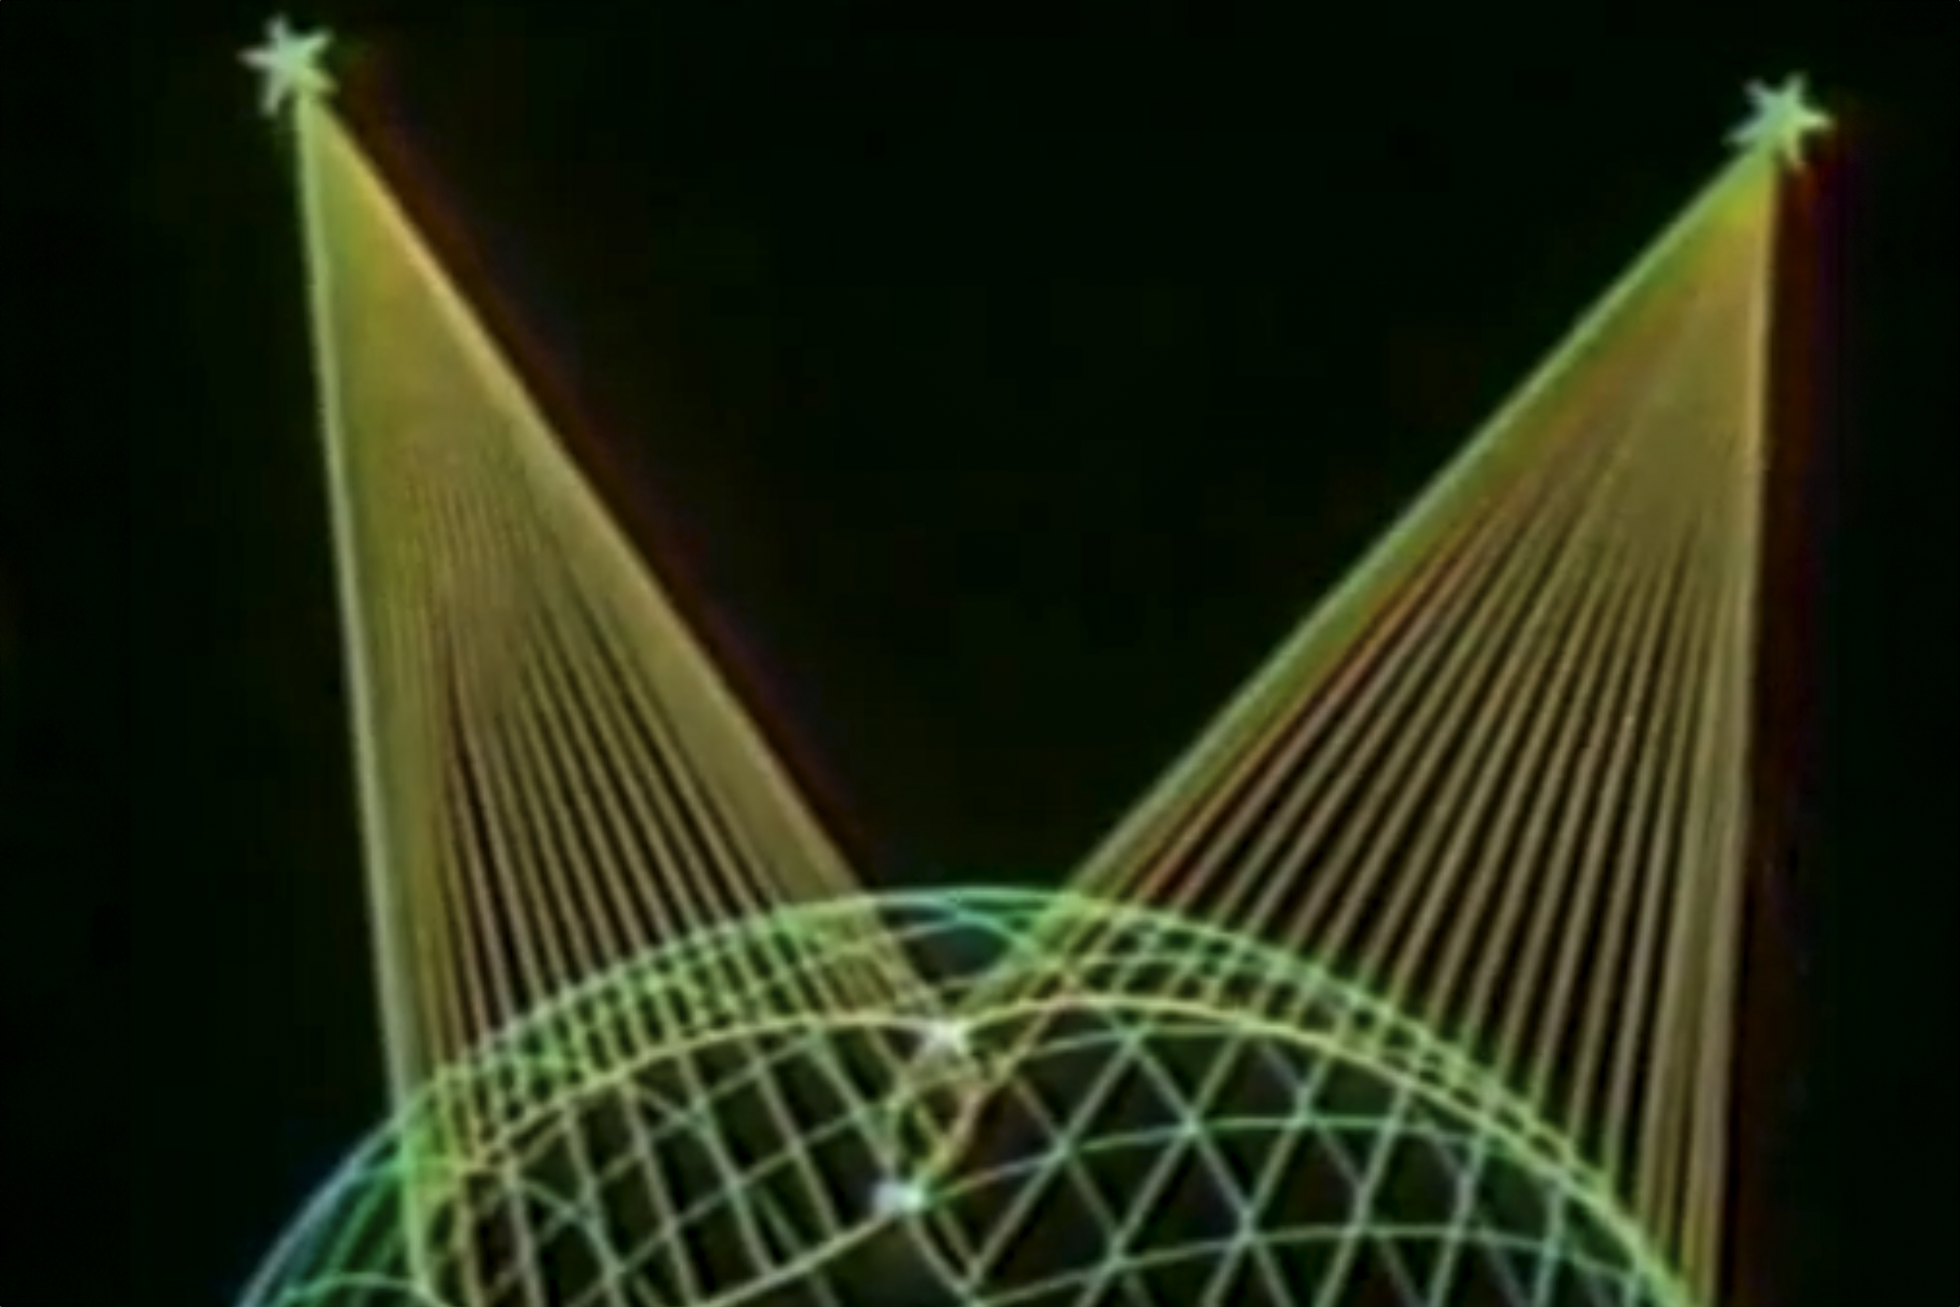
Two circular LOPs
We’ve left out the math needed to pinpoint the Geographic Position (GP) of each celestial body and we’ve sidestepped the complexity of actually plotting these LOPs.
There are two methods of note, one easier than the other. But the easier method requires that you are very near the GP of each celestial body. Let’s look at that first. It will help understanding the harder method.
4
The Horizon System
When you’ve found a celestial body’s GHA and declination, you will know its subpoint on earth, also known as its Geographic Position GP. If the celestial body was directly overhead, you would know your position. But that would be extremely rare, you are almost always a distance away from the celestial body’s GP.
The Horizon System simplifies the process by drawing the axis of the terrestrial and celestial spheres through your position.
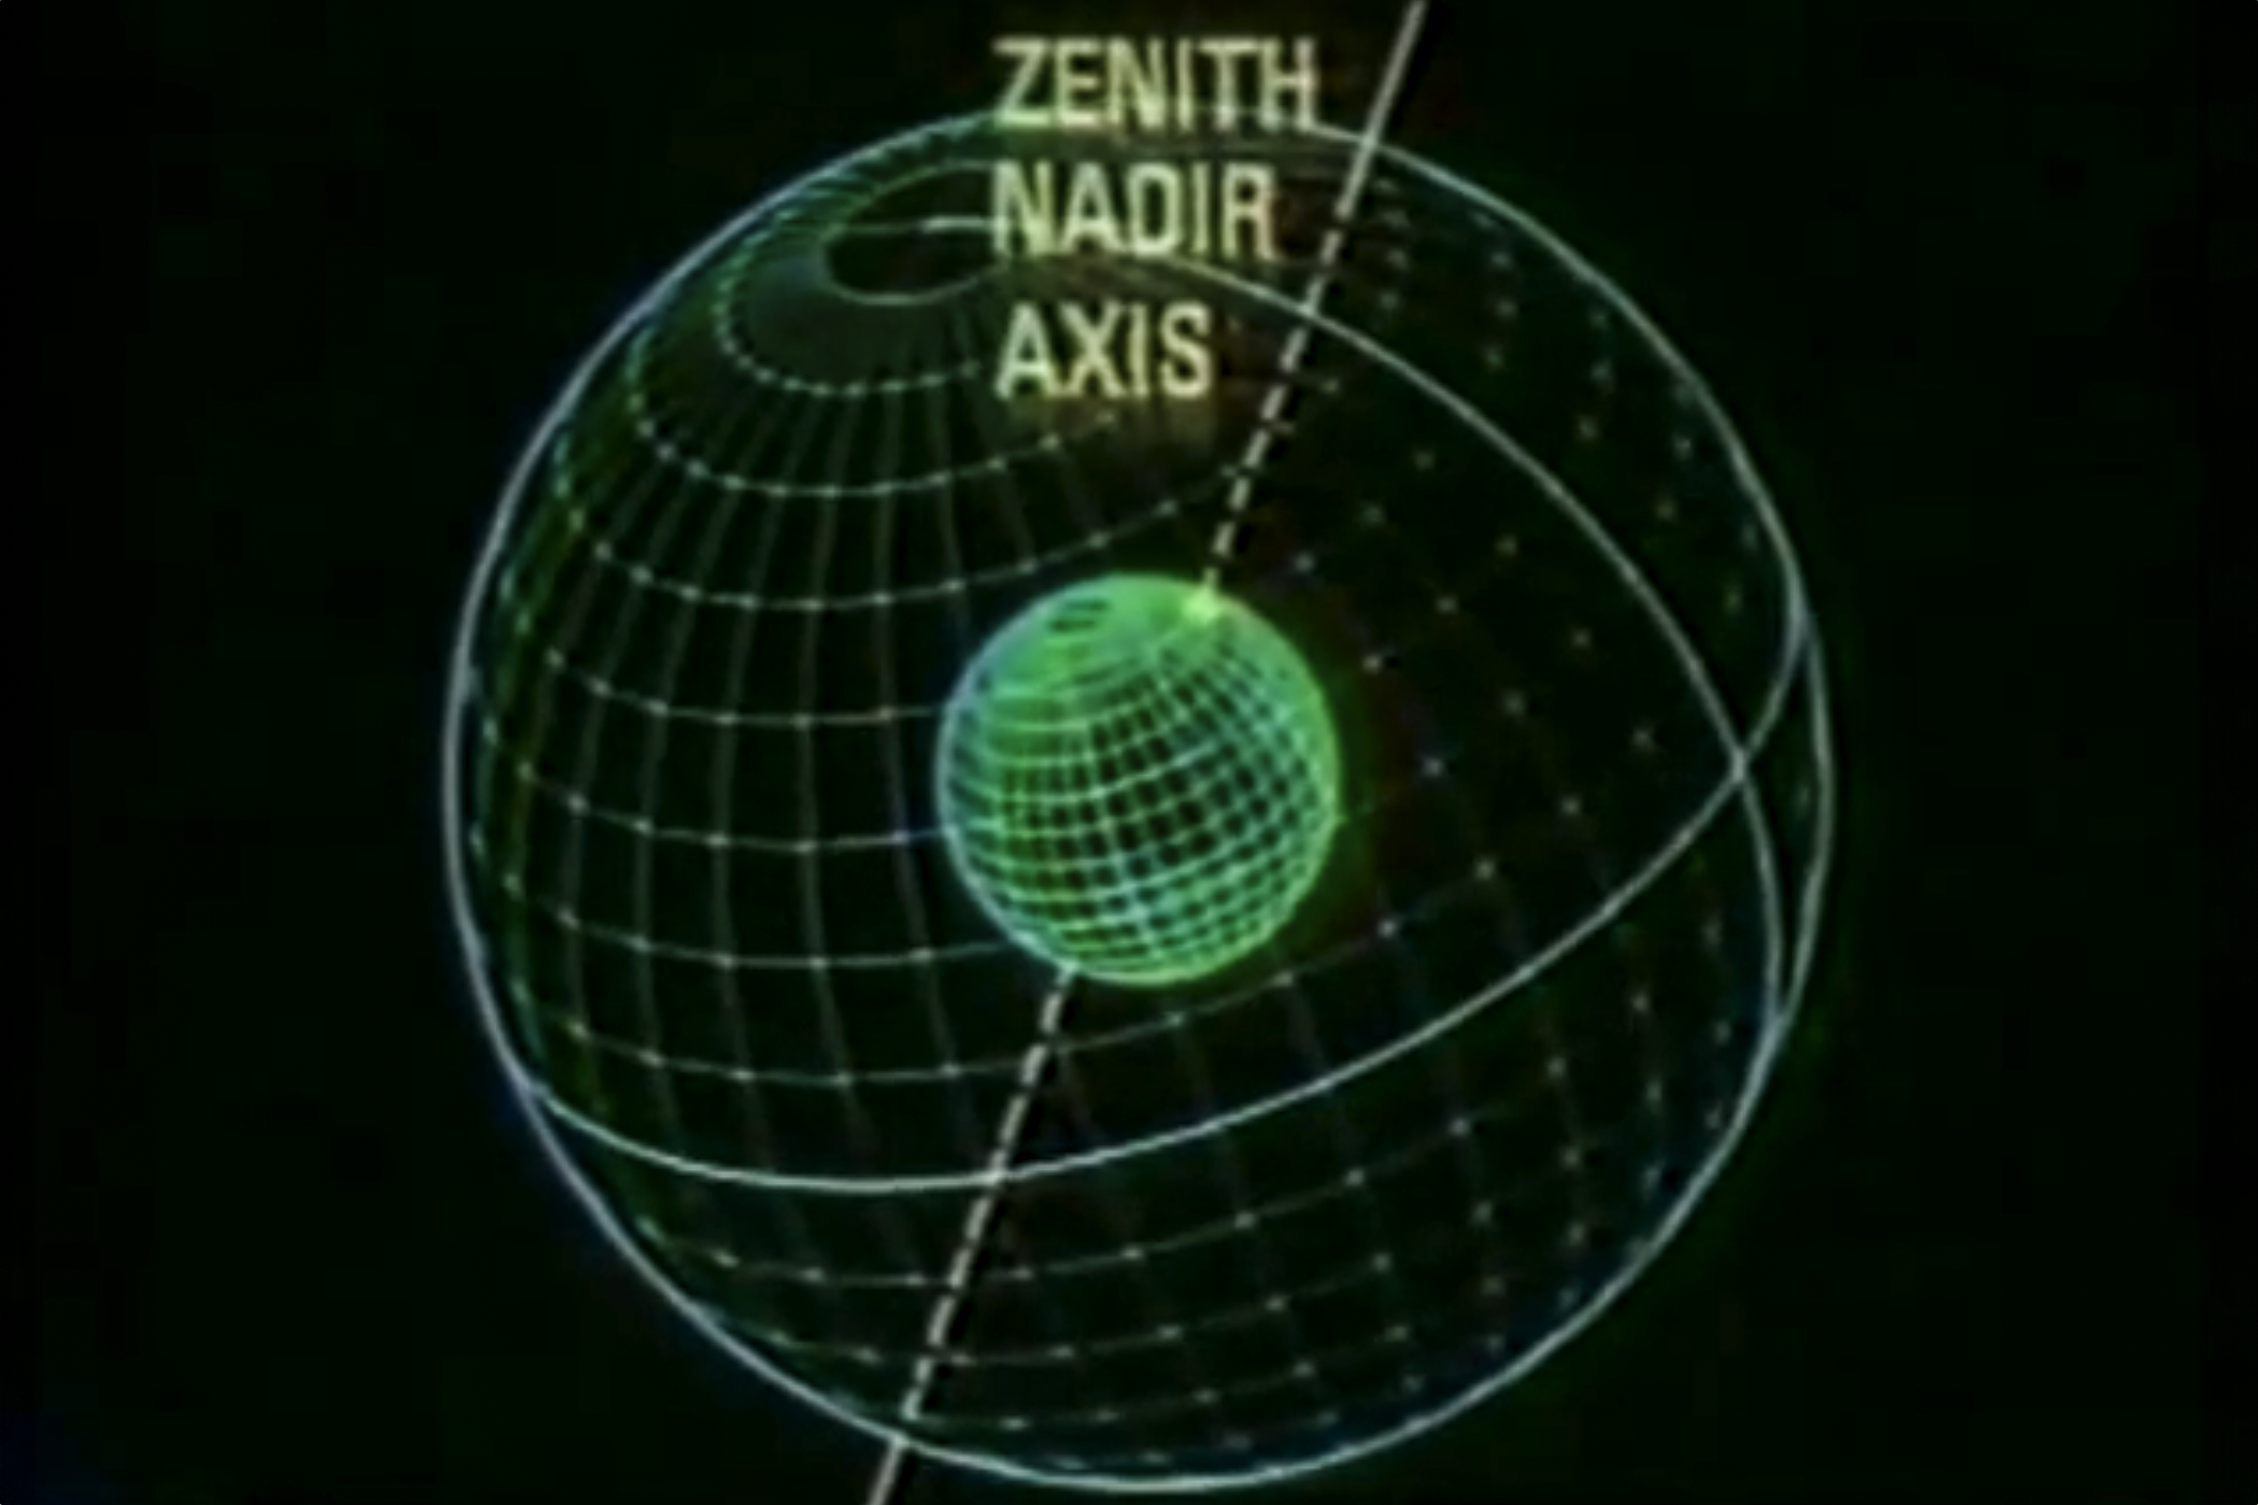
Zenith Nadir Axis
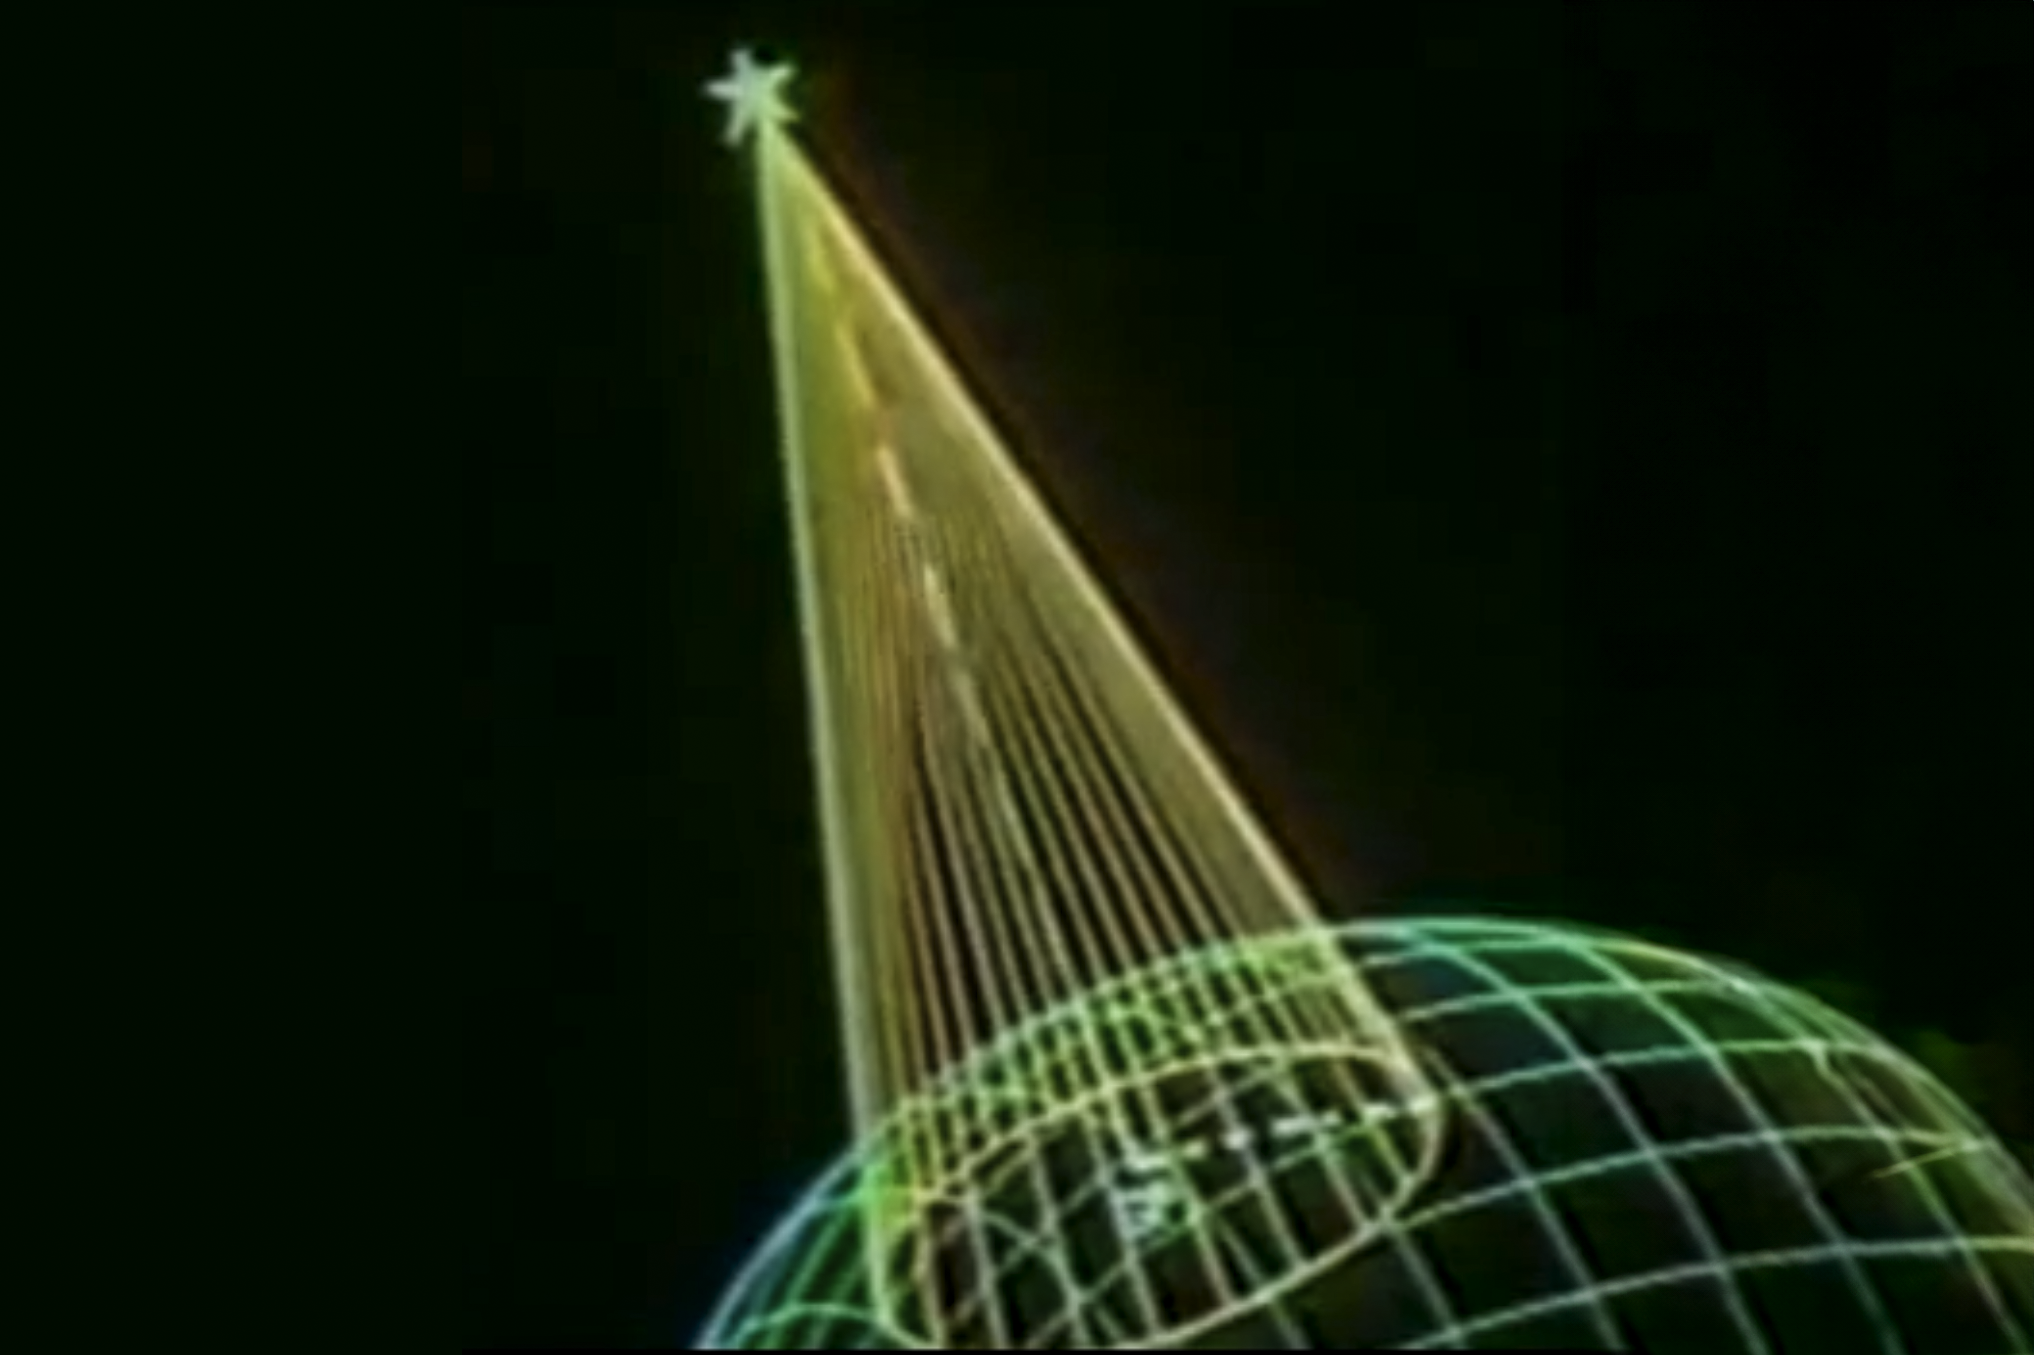
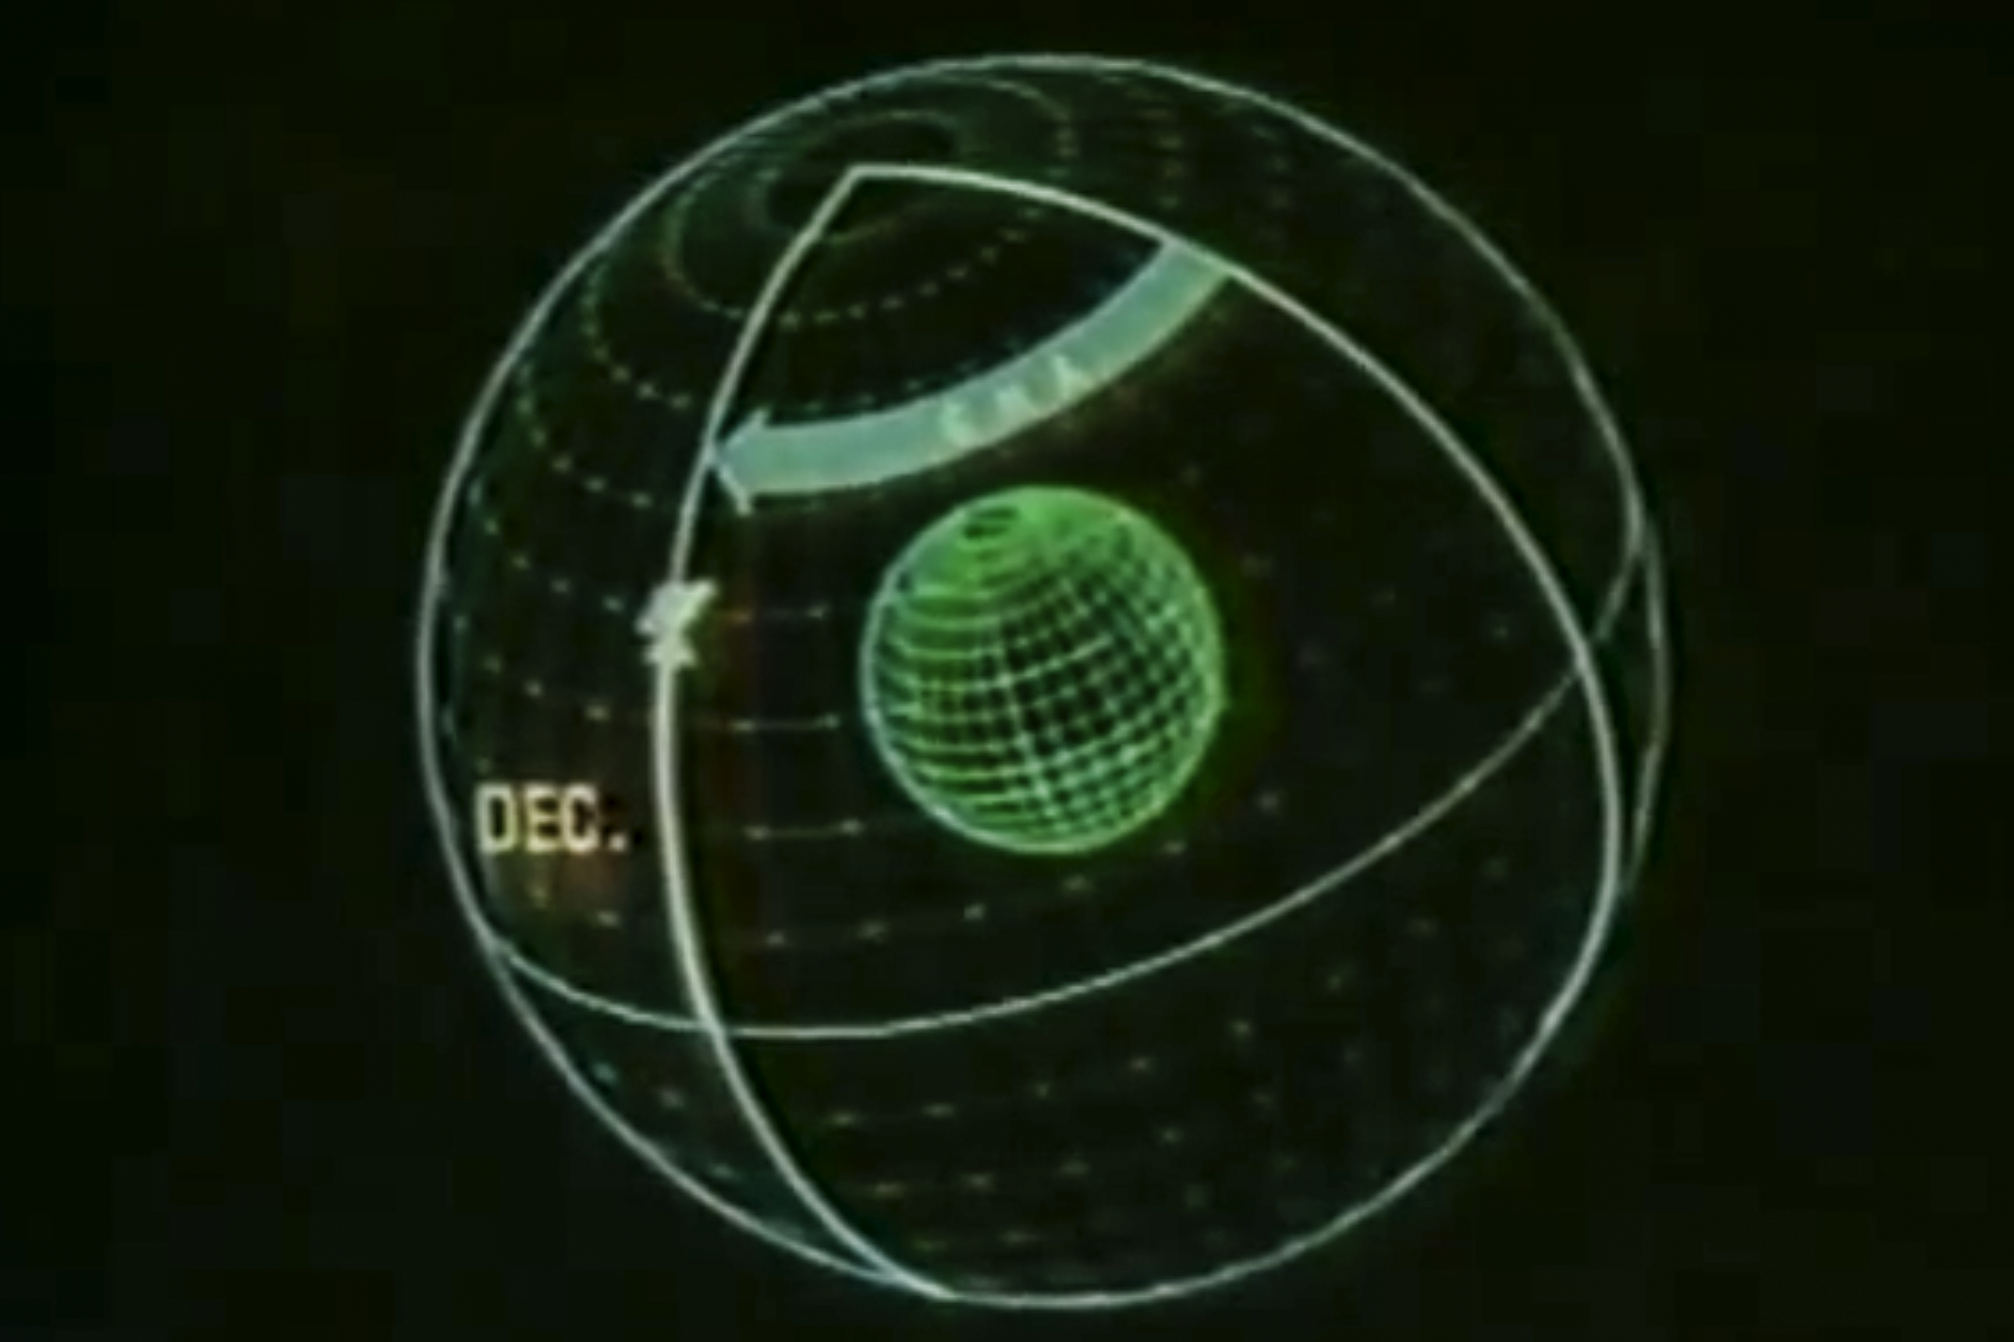
Zenith Nadir Axis – a line from your position to the celestial sphere and to the center of the earth to the other side of the celestial sphere. Now draw a great circle around the earth’s center perpendicular to the Zenith Nadir Axis. This is called the celestial horizon. The light from your celestial body comes to the earth in a narrow line. Because the distance between the celestial body is so great and the relative size of the earth is so small, we can assume any measurement of the angle between the celestial body and the celestial horizon will be the same.
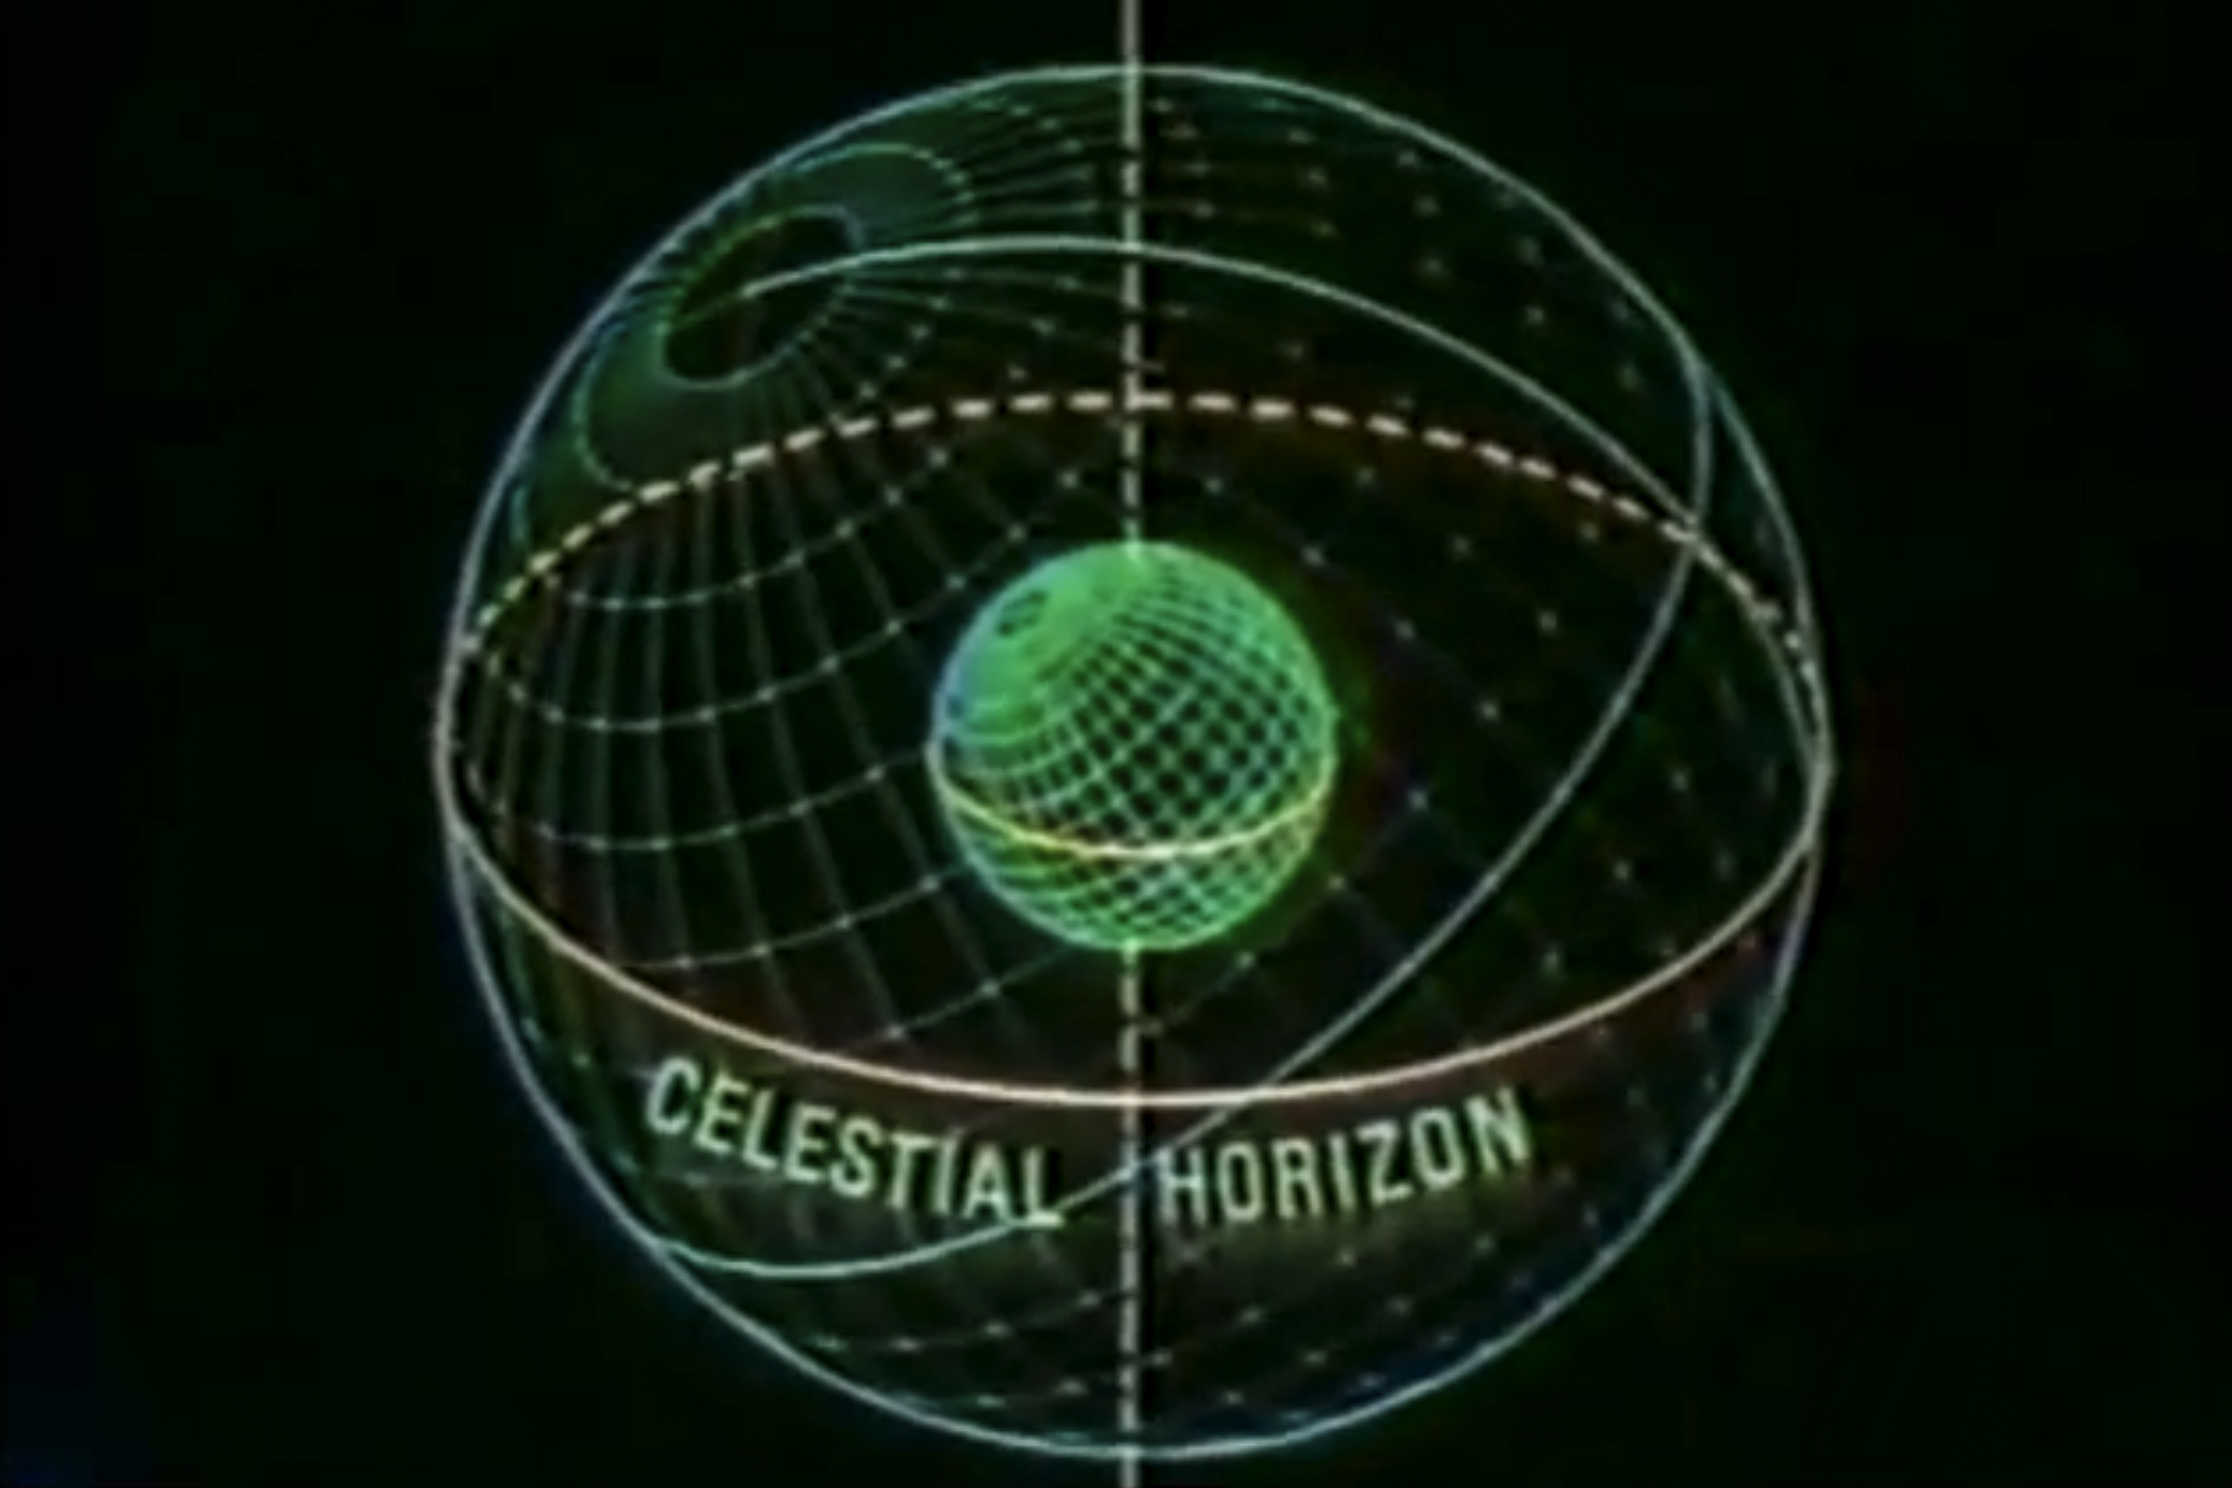
Celestial Horizon redrawn
“Tilting” the earth to put yourself on top greatly simplifies operating the sextant. You simply point the thing to your celestial object, measure the angle down to the celestial horizon, and you have a part of the puzzle solved.
Altitude (H) is the angle between celestial body and the celestial horizon. (As opposed to declination which is measured from the celestial equator.)
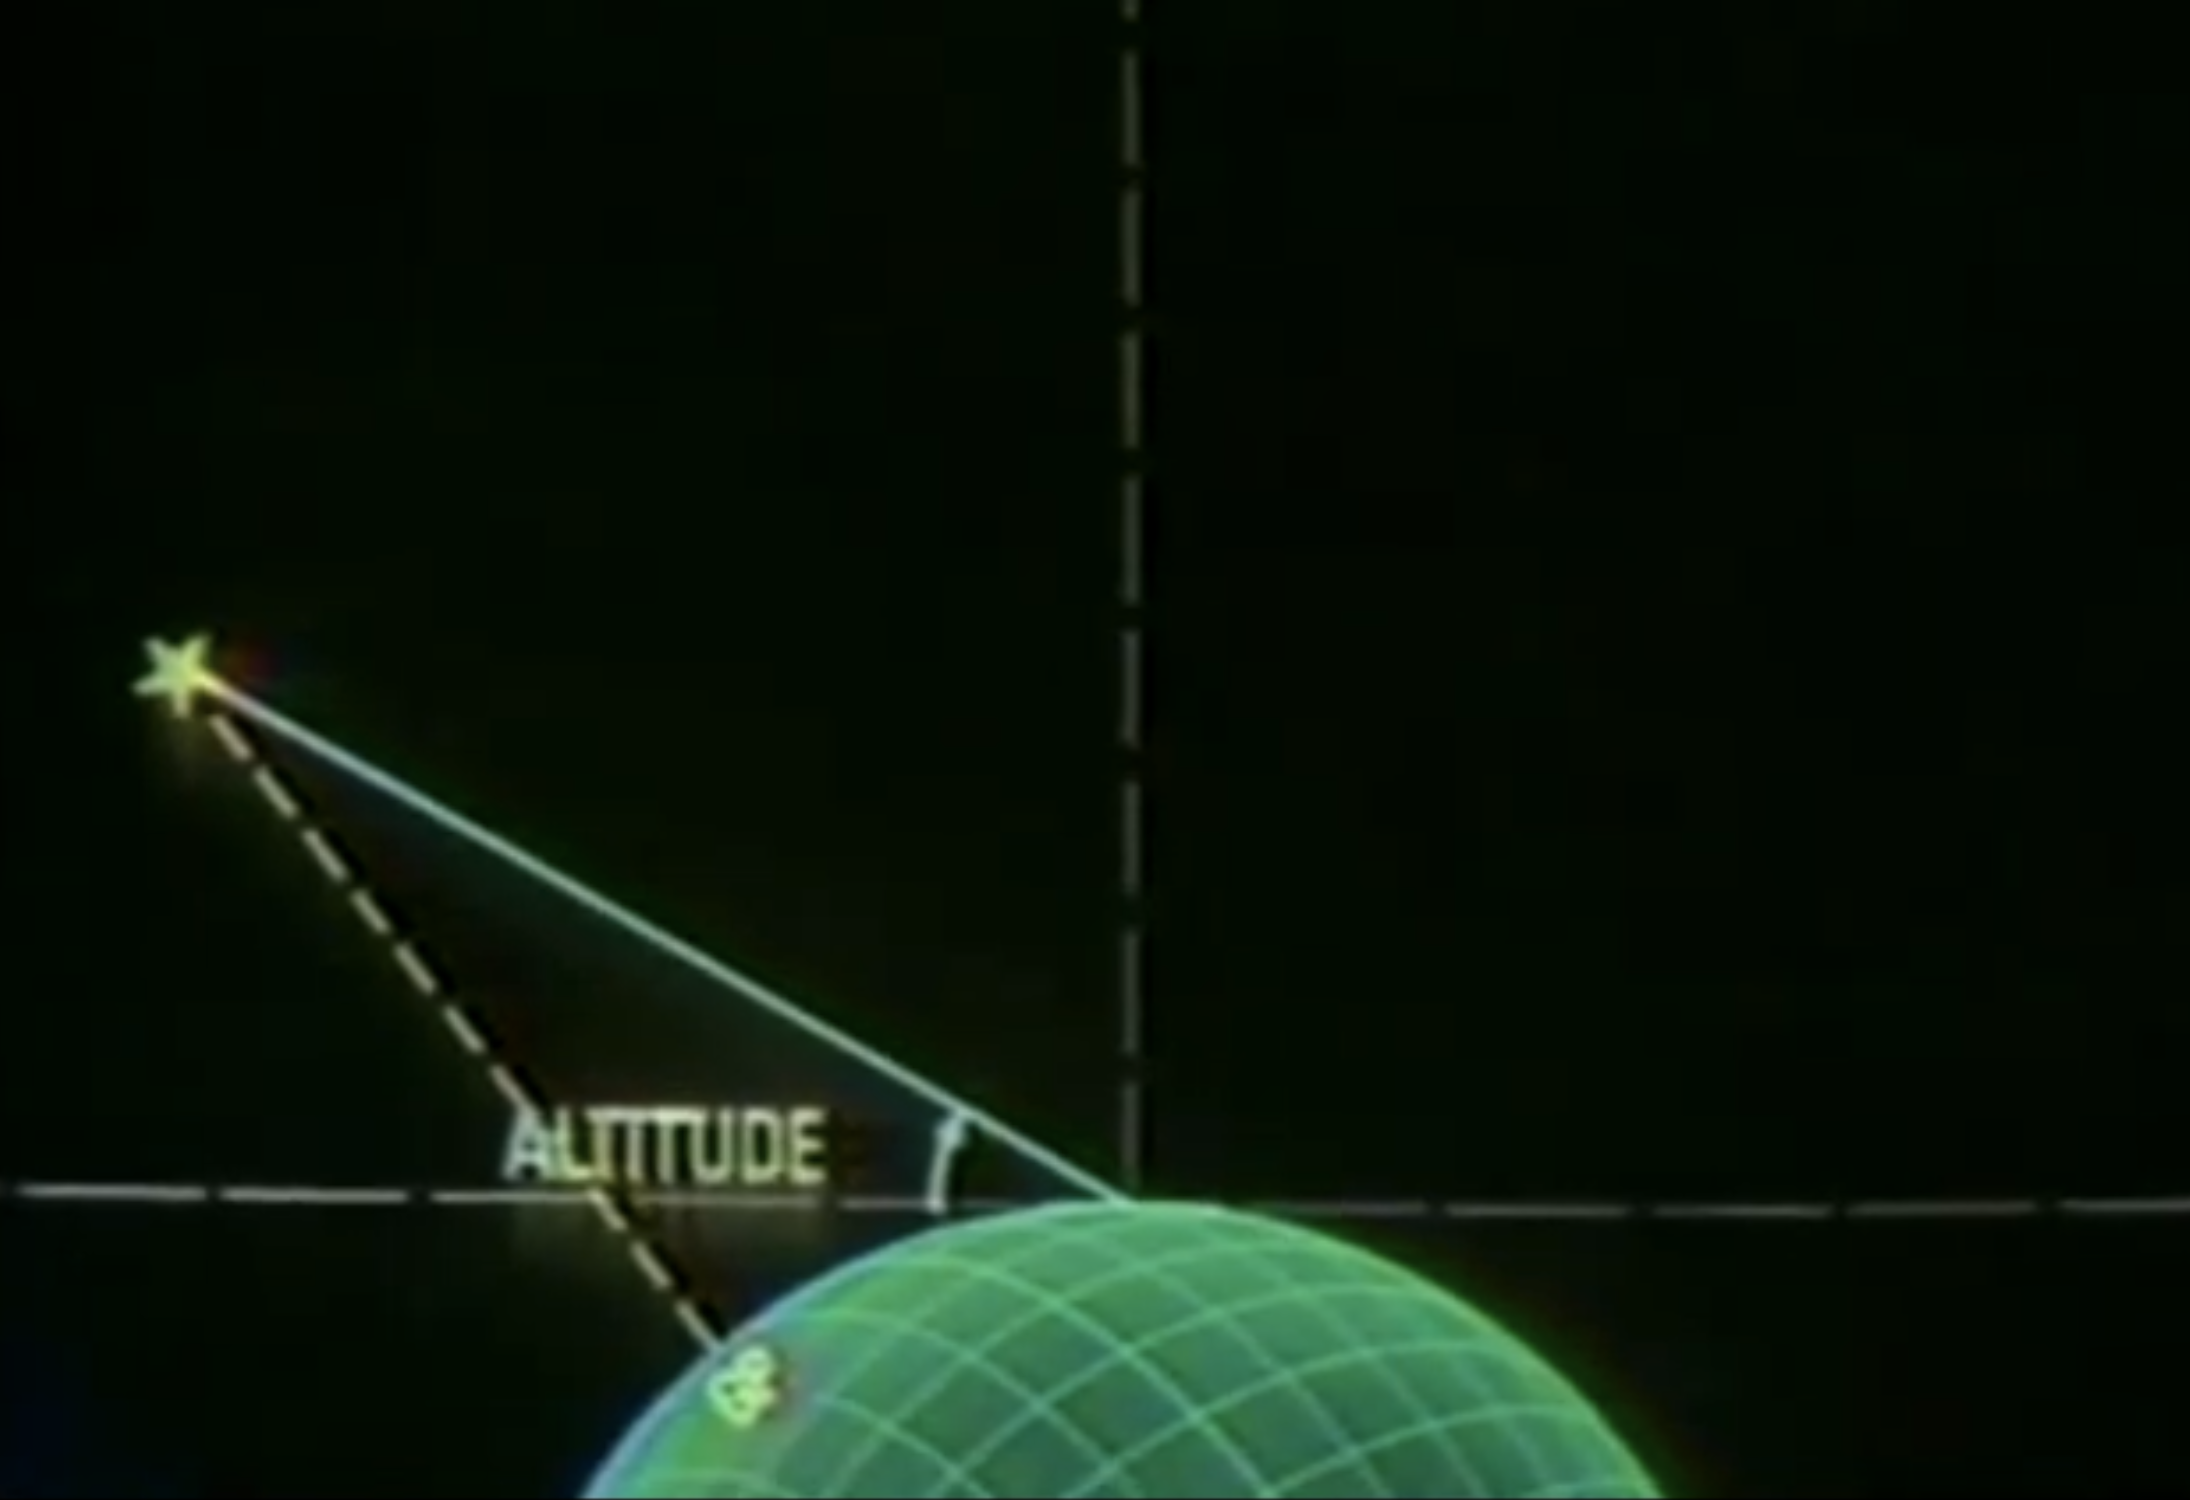
Altitude from the Celestial Horizon
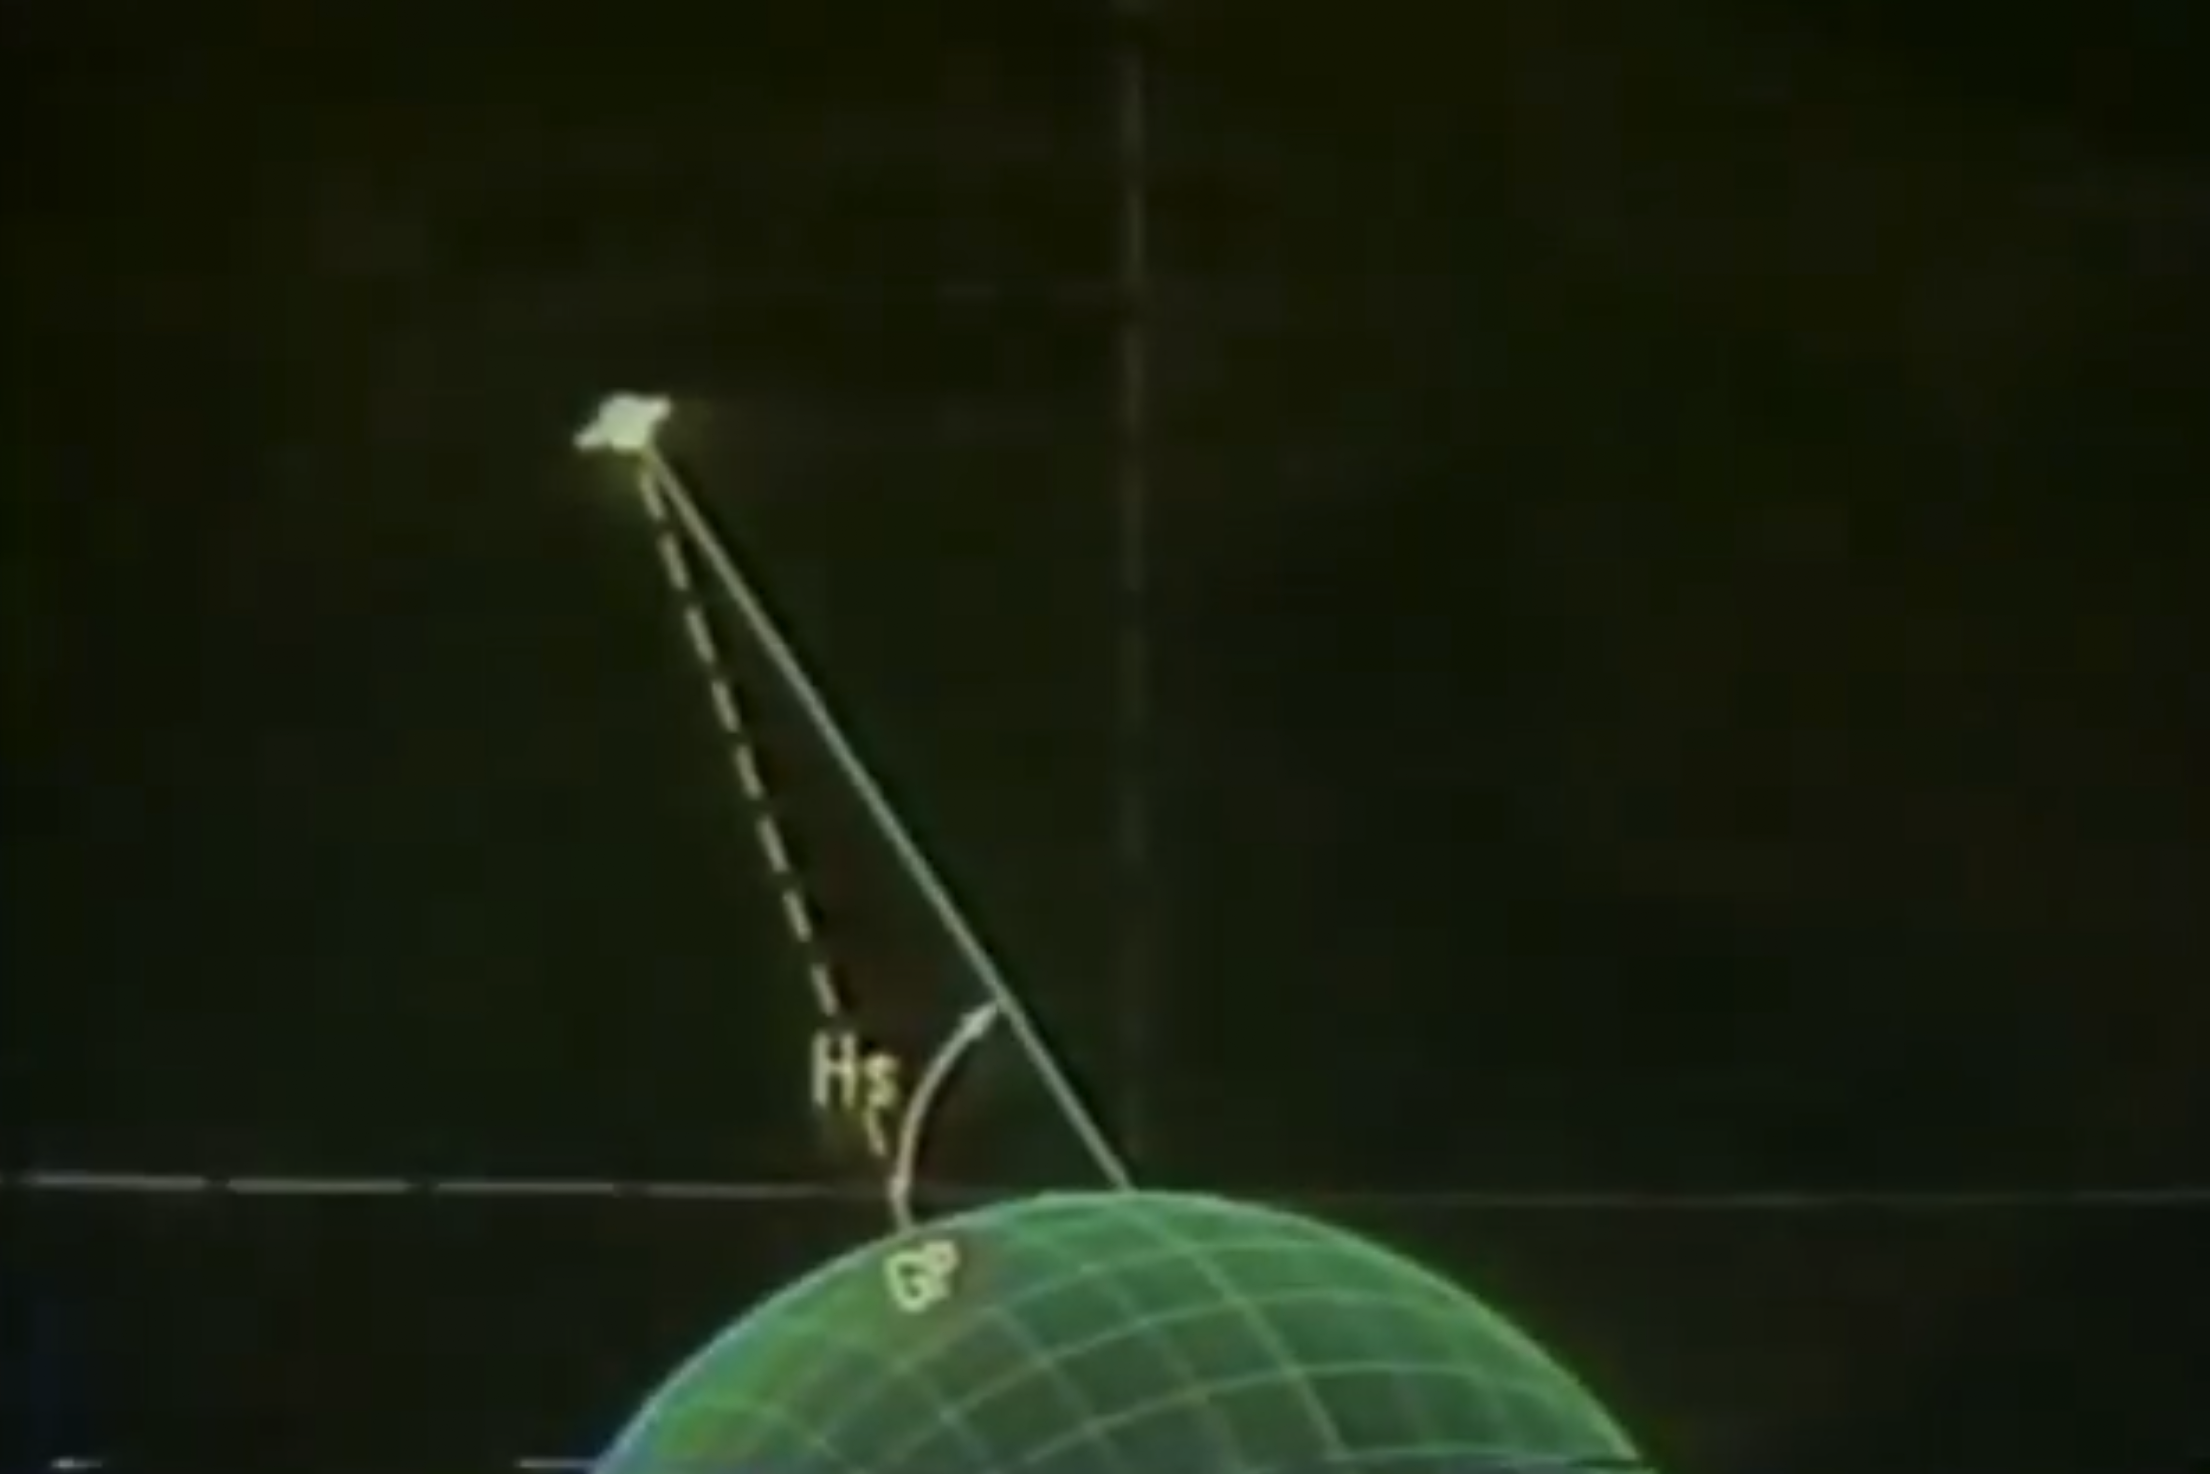
Hs – Sighted Altitude
The angle you see when you sighted the celestial body is that body’s Sighted Altitude (Hs). Hs cannot be more than 90° -- the celestial body is directly above you. Hs is normally no less than 0° -- level with you but could theoretically be at bit lower.
Ho – Corrected Altitude
Horizon Method Circle of Equal Altitude
The Air Almanac and other manuals have ways to correct the Sighted Altitude (Hs) for refraction and other errors. The result is Corrected Altitude Ho.
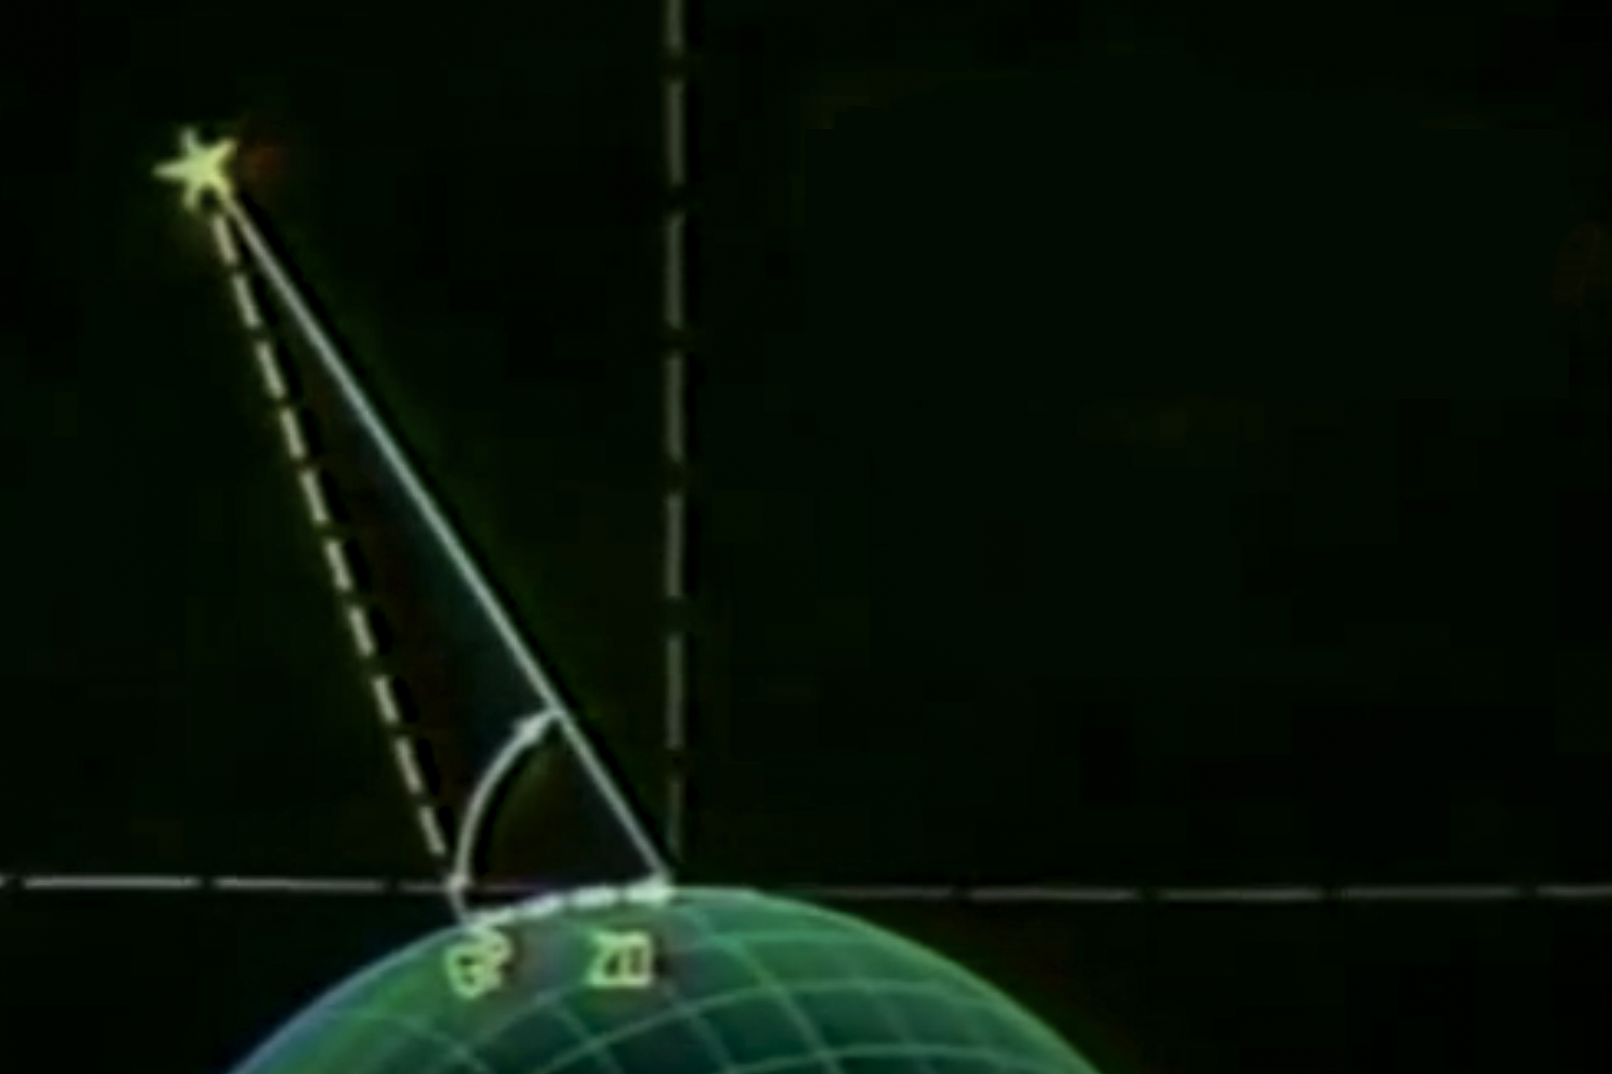
Zenith Distance ZD
The distance between you and the Geographic Position of the celestial body is the Zenith Distance ZD.
Let’s consider a celestial body that you’ve sighted, and Hs is 70°. Since the angle from you to the celestial body is 70°, you know the angle from the body straight down and to you is 20°. (The sum of the inside angles in a triangle is 180°, so 180 – 90 – 70 = 20°.) That’s 20° Zenith Distance ZD over the earth, at 60 nm per degree, so the radius of that circle is 20 x 60 = 1,200 nm. That’s a big circle to plot on a chart. Hence . . .
Limitations of the Horizon System
Most celestial navigators think any Corrected Altitude Ho lower than 85° is too low to plot. With Ho = 85° you will have a Zenith Distance of 5° x 60 = 300 nm, which you could easily plot. Let’s say your celestial object is 30° above the horizon for example. Your Zenith Distance will be 60° x 60 = 3,600 nm. Is your chart big enough to plot that? Once Ho gets lower than 85°, you will need another method . . .
5
The Intercept Method
As a celestial navigator, you probably have a good set of “Sight Reduction Tables” which do all the math for you. We’ll cover that, but we need to go through the math first just to show what those magical tables are doing for you.
“Precomps” versus “Shoot and pray”
Most competent navigators will do the computations that follow before picking up their sextants. They will usually take three shots and the time of the shots need to be very close to make the result accurate enough to use. Precomputing the shot is the way to go. If you shoot then compute, three times, the speed of the aircraft will make the first shot less relevant. We’ll shoot then compute in the examples just to make it easier to explain but be aware it would be best to compute first.
Find Sighted Altitude (Hs)
Determining Hs
As with the previous method, we begin by sighting a celestial body above the horizon with our sextant, recording the Sighted Altitude Hs and the date / time of our observation.
Find Observed Altitude (Ho)
You then correct Hs to get Corrected Altitude Ho using correction tables in the Air Almanac:
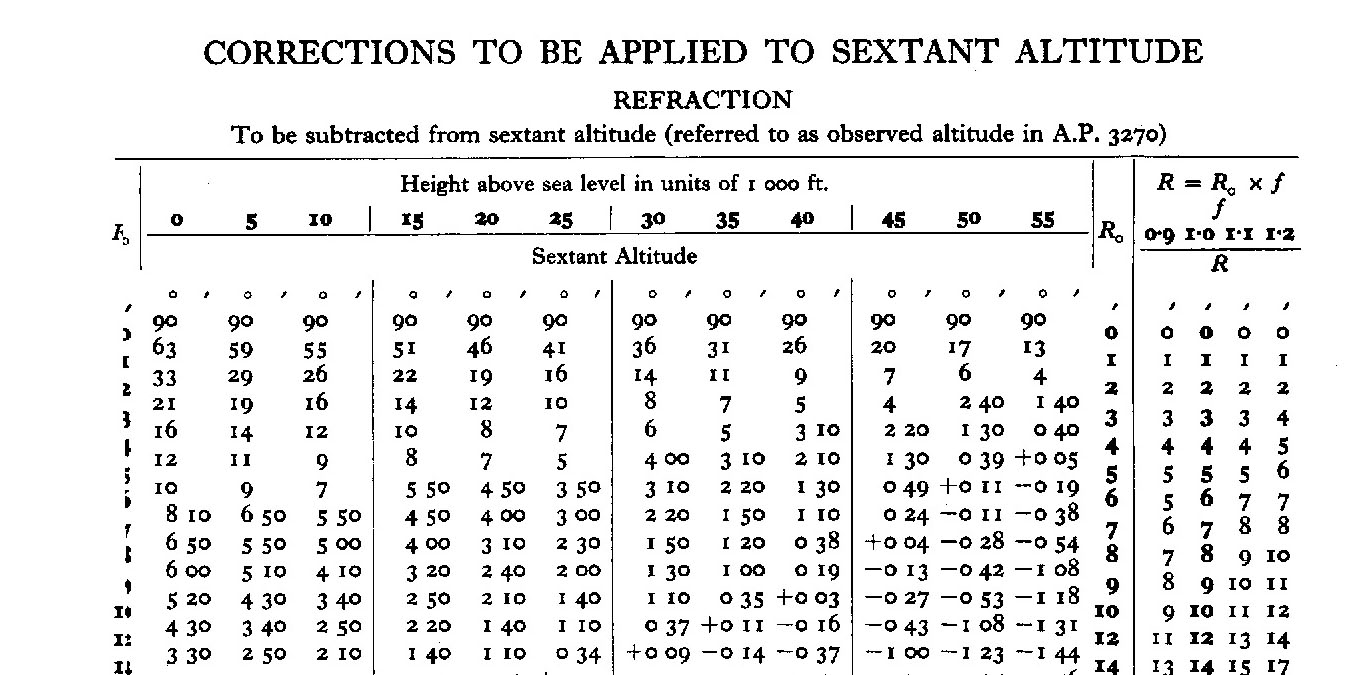
Example corrections to Hs (Air Almanac, back inside cover)
GHA and declination
GHA and Declination
Next you determine the celestial body’s position using the GHA and declination from the Air Almanac, as before. Recall that the Greenwich Hour Angle GHA shows the angle between the Prime Celestial Meridian and the hour angle of the celestial body, effectively its longitude. The declination is the celestial body’s altitude (latitude).
You use the GHA and declination to determine the celestial body’s Geographic Position GP on earth.
Assumed Position
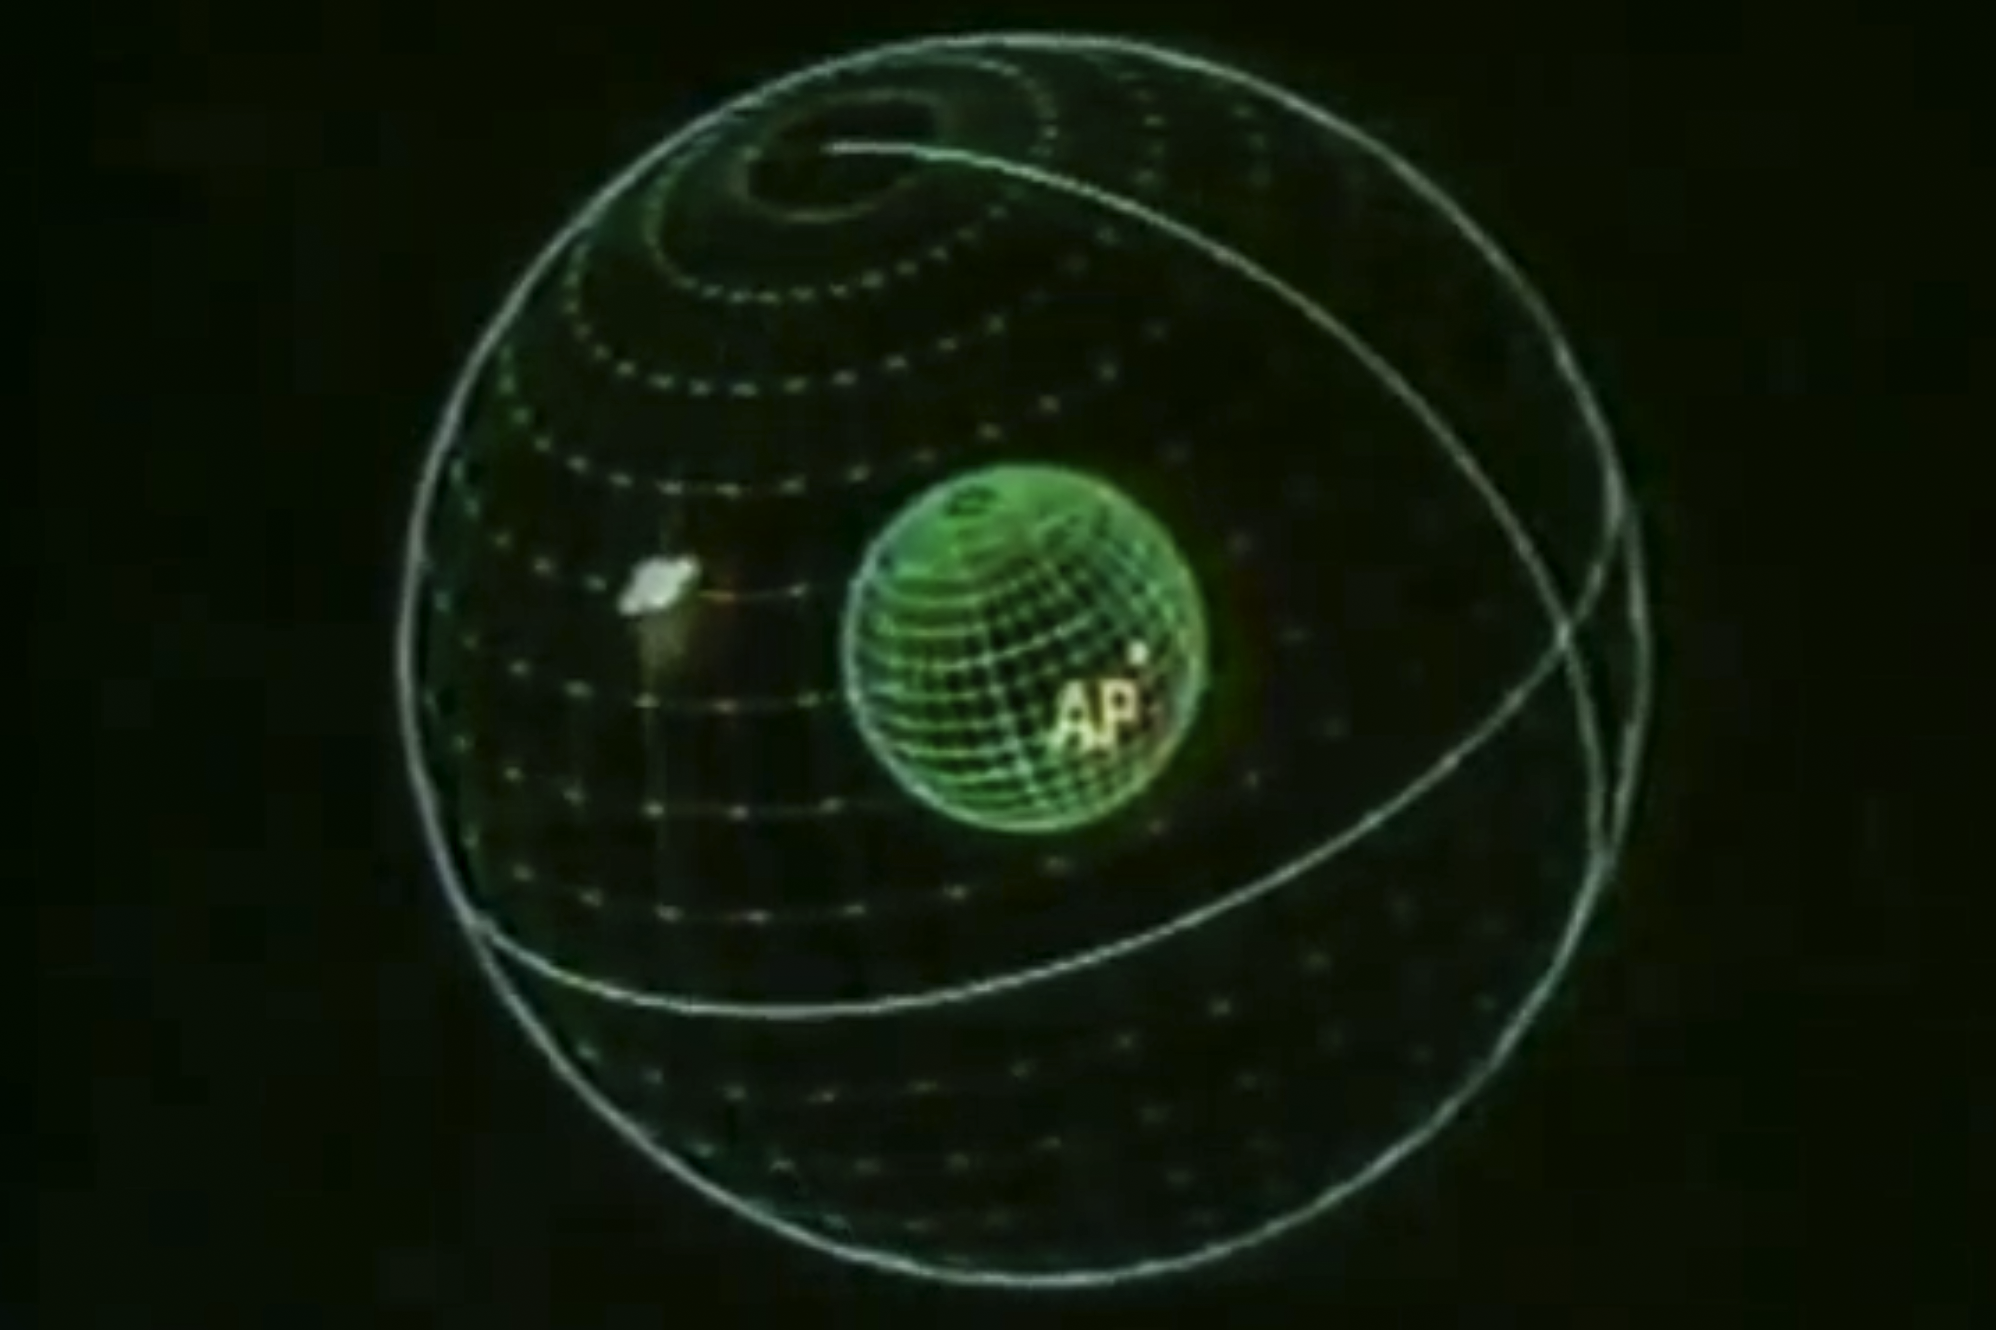
Assumed Position AP
Now mark your Assumed Position (AP) on a chart, based on where your dead reckoning believes you are. We will determine our actual line of position relative to our Assumed Position AP.
To do this, we need to solve a celestial triangle and bring that down to earth.
Solving the Celestial Triangle

The points of the celestial triangle
The points of the celestial triangle are the celestial body, the celestial pole (either North or South), and the Zenith of your Assumed Position AP.
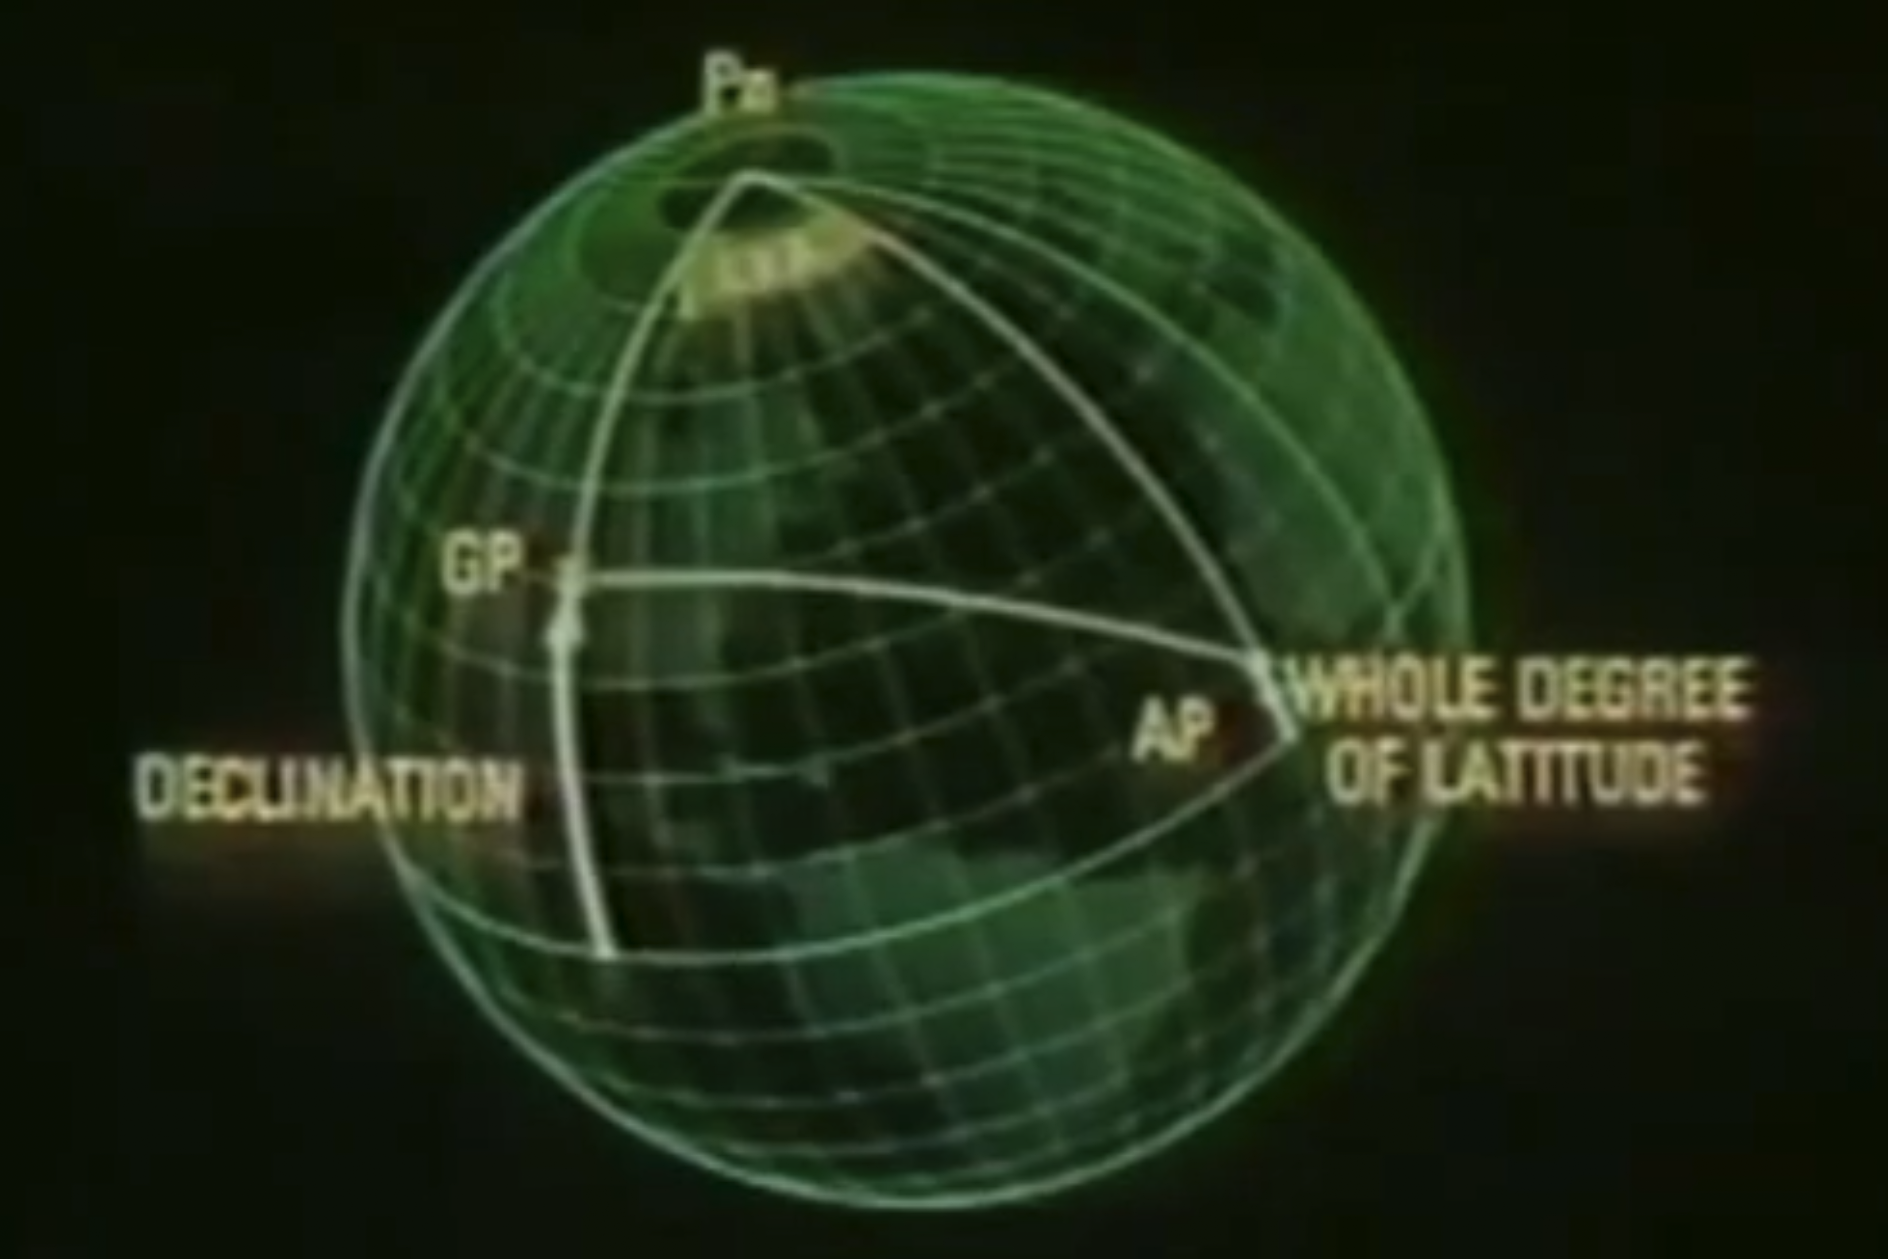
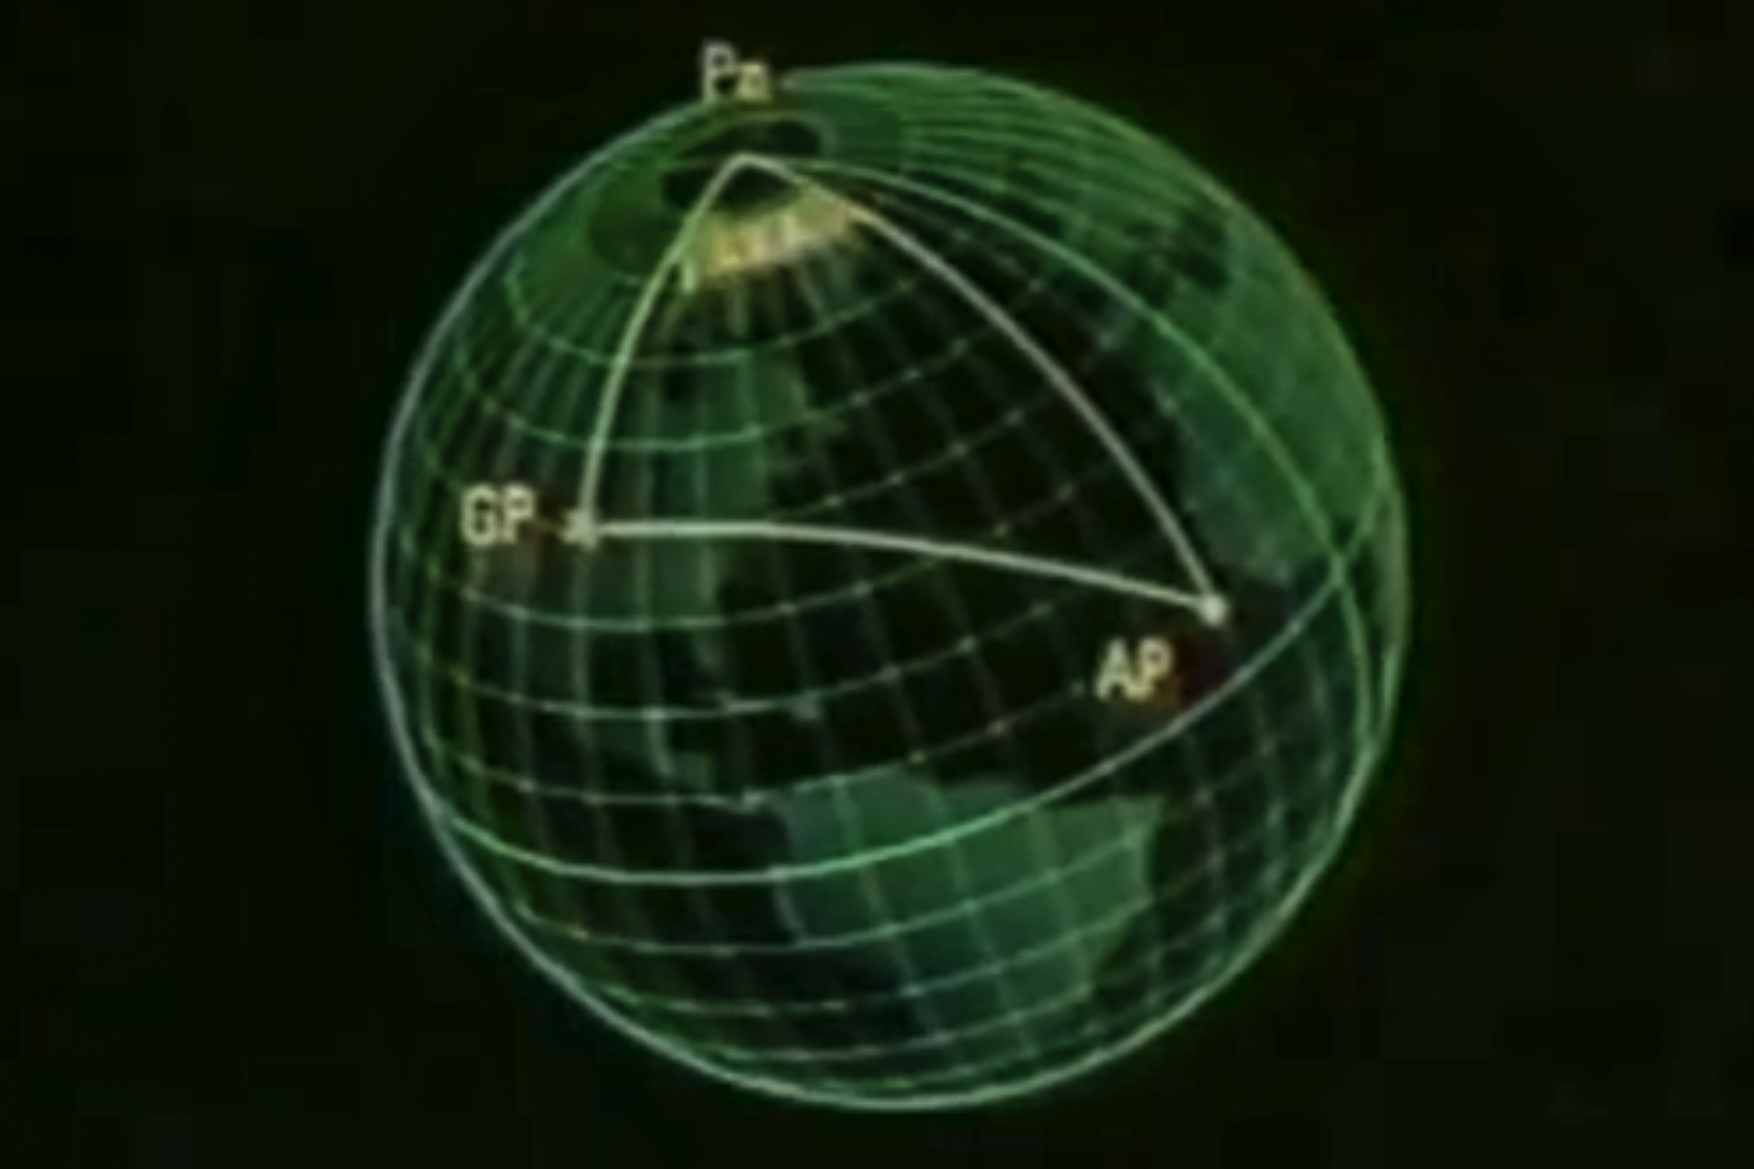
On earth, those points become the Geographic Position GP of the celestial body, the appropriate pole Pn or Ps, and your Assumed Position AP.
As we know from trigonometry, if we know the length of two sides of a triangle and the included angle (the angle between those two sides), we can determine the other side and angles.
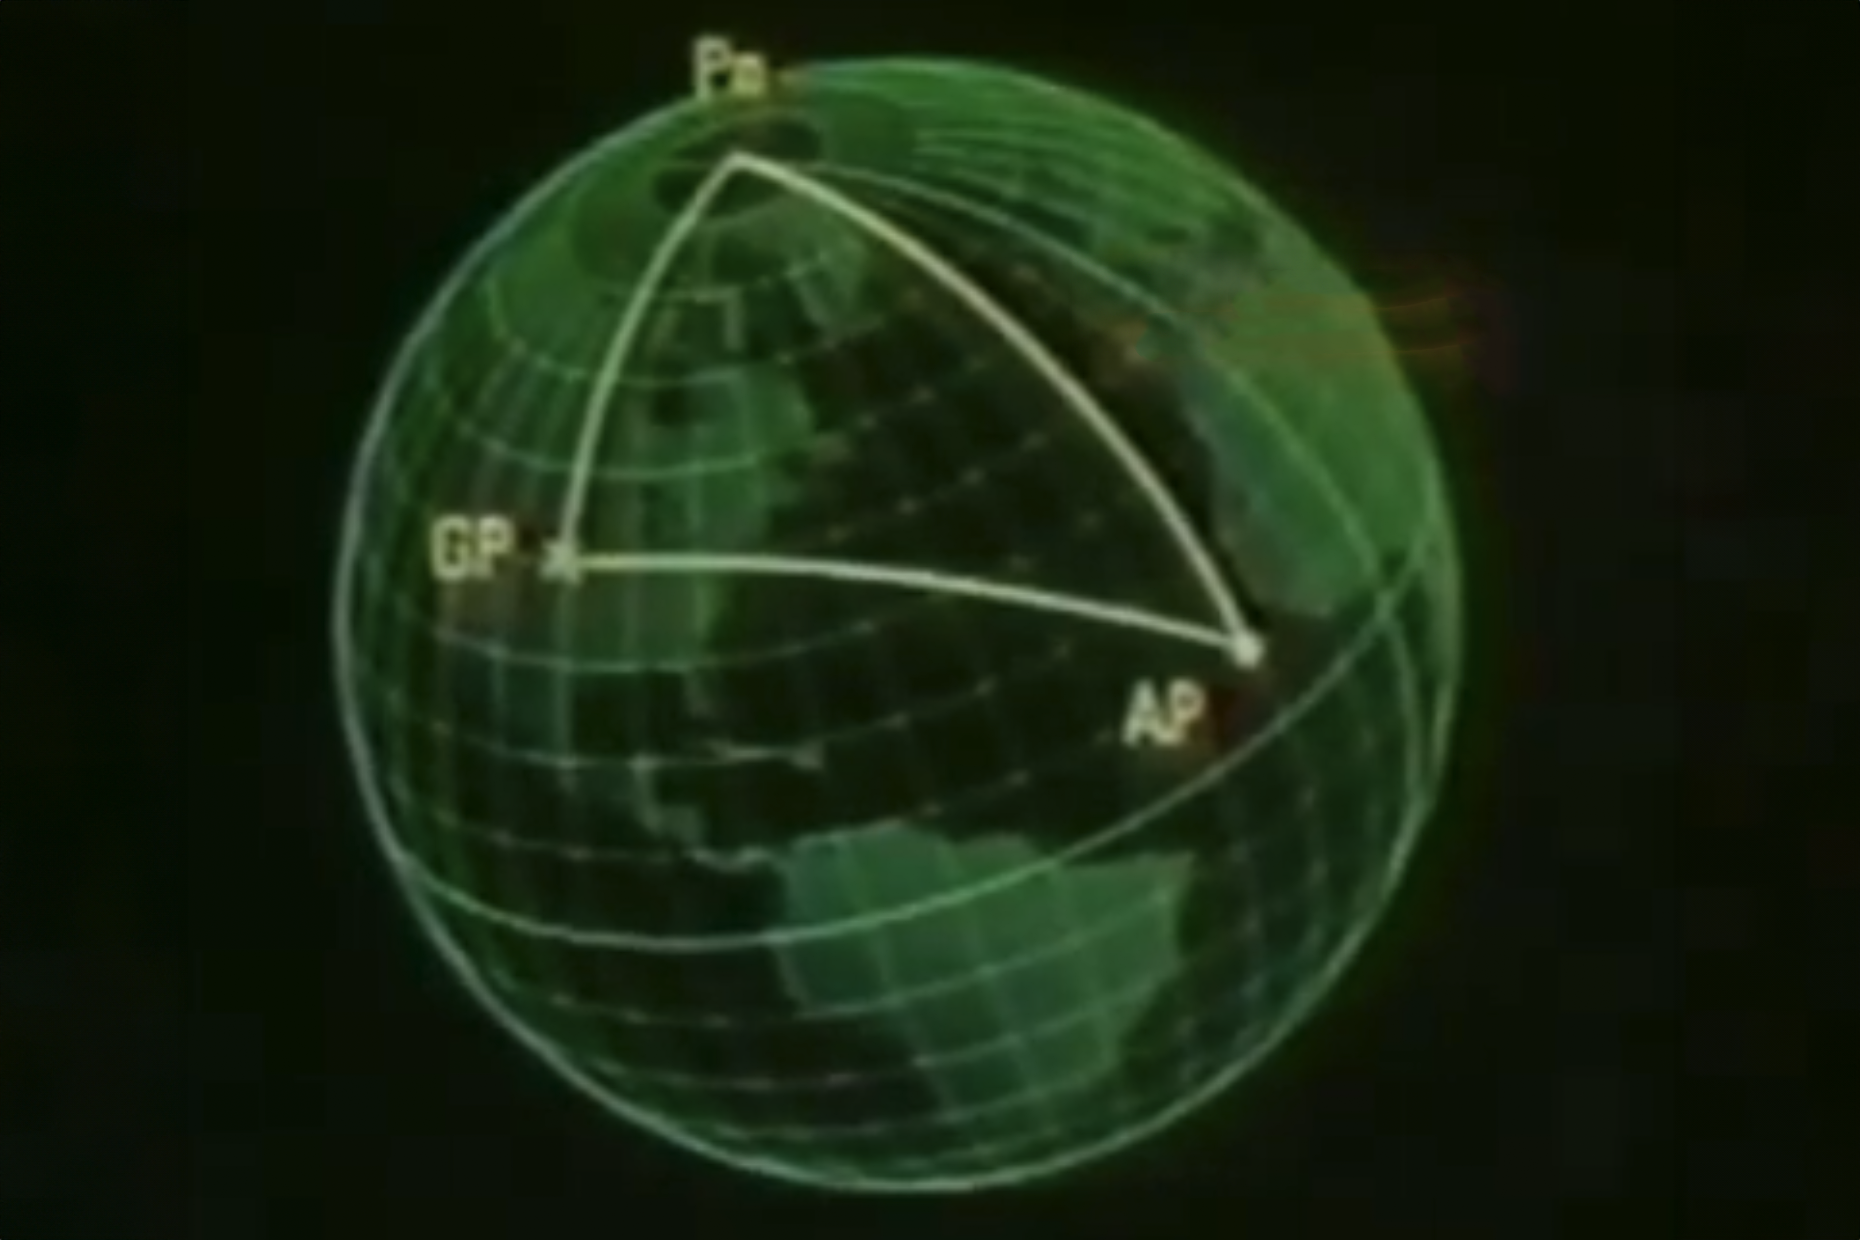
The terrestrial triangle
In our example, the sides of the triangle are:
- [Pn ↔ AP] the line between the North Pole Pn and our Assumed Position AP
- [Pn ↔ GP] is the line from the North Pole Pn to the Geographic Position GP of the celestial body.
- [GP ↔ AP] this is the line from the Geographic Position GP of the celestial body and our Assumed Position AP.
Finding two sides
As it turns out, we already know two of those three sides and the included angle.
Co-latitude: Because we know the latitude of our Assumed Position AP, we know [Pn ↔ AP] = 90 – Lat-AP.
Co-declination: Because we know the celestial body’s declination, we know [Pn ↔ GP] = 90 - Declination.
The included angle is Local Hour Angle (LHA) from your Assumed Position (AP) to the Greenwich Hour Angle (GHA), which we looked up in the Air Almanac.
LHA = GHA – Long AP
Just remember that LHA and GHA are measured to the west, so depending on their relative locations, the math may require addition or subtraction.
Sight Reduction Tables
Sight reduction table inputs
Though the math is straight forward, there is a lot of it and each computation is a chance for error. Fortunately, we have Sight Reduction Tables that do the math for us. These tables require three inputs:
- Local Hour Angle LHA of the celestial body, from the Air Almanac
- Declination of the celestial body, from the Air Almanac
- Lat-AP, the whole degree of the latitude of your Assumed Position AP, from your dead reckoning
With these three inputs, you can turn to Sight Reduction Tables.
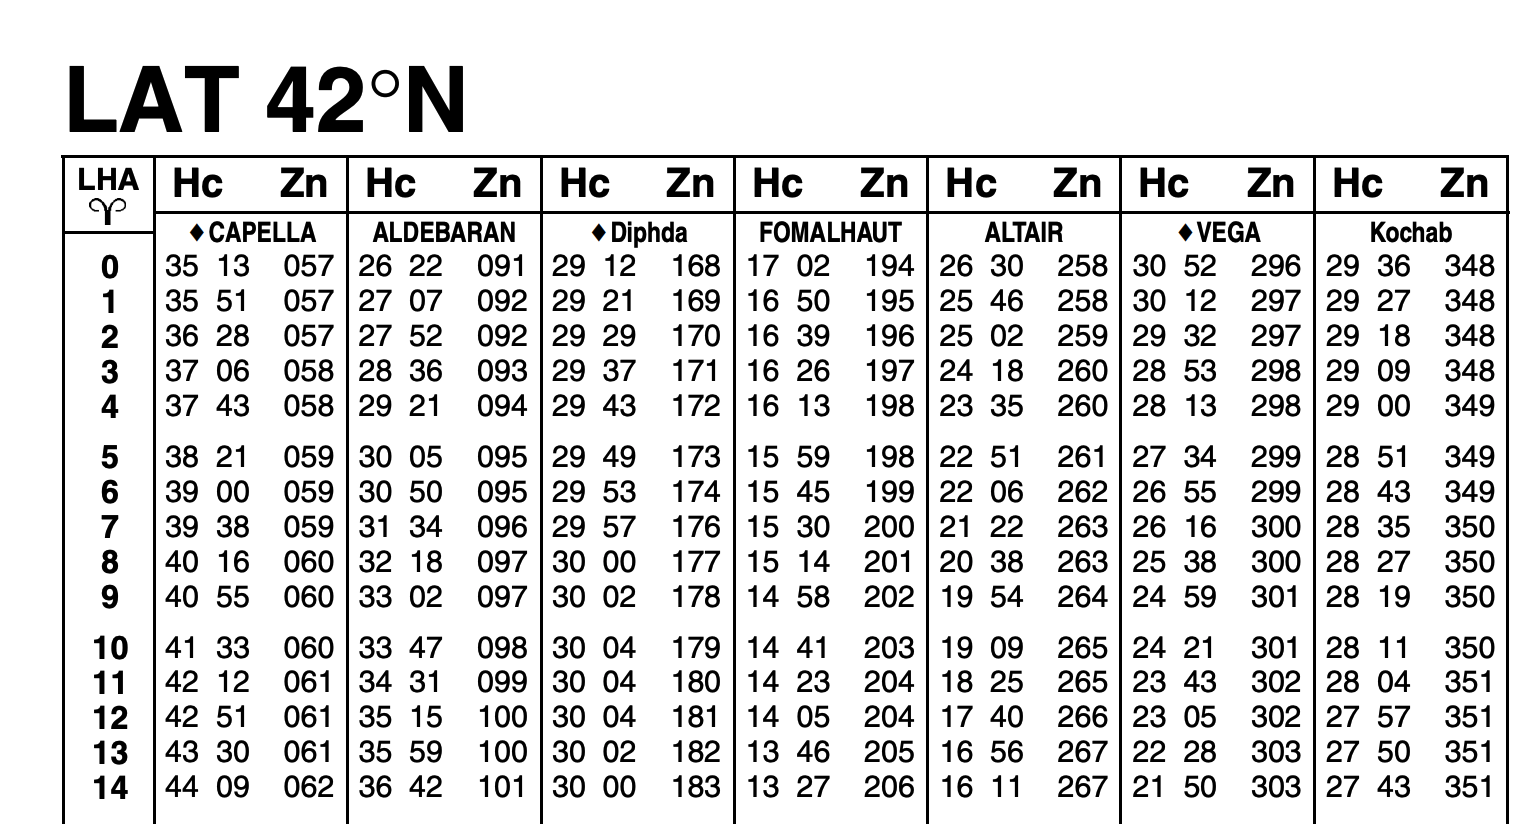
Sight Reduction Table example
To use the Site Reduction Table, select page that contains the latitude of your AP, find LHA Aries, and then move right to the celestial body you have shot. The table gives you the Computed Altitude Hc and the True Azimuth Zn, more on that in a bit.
Computed Altitude Hc
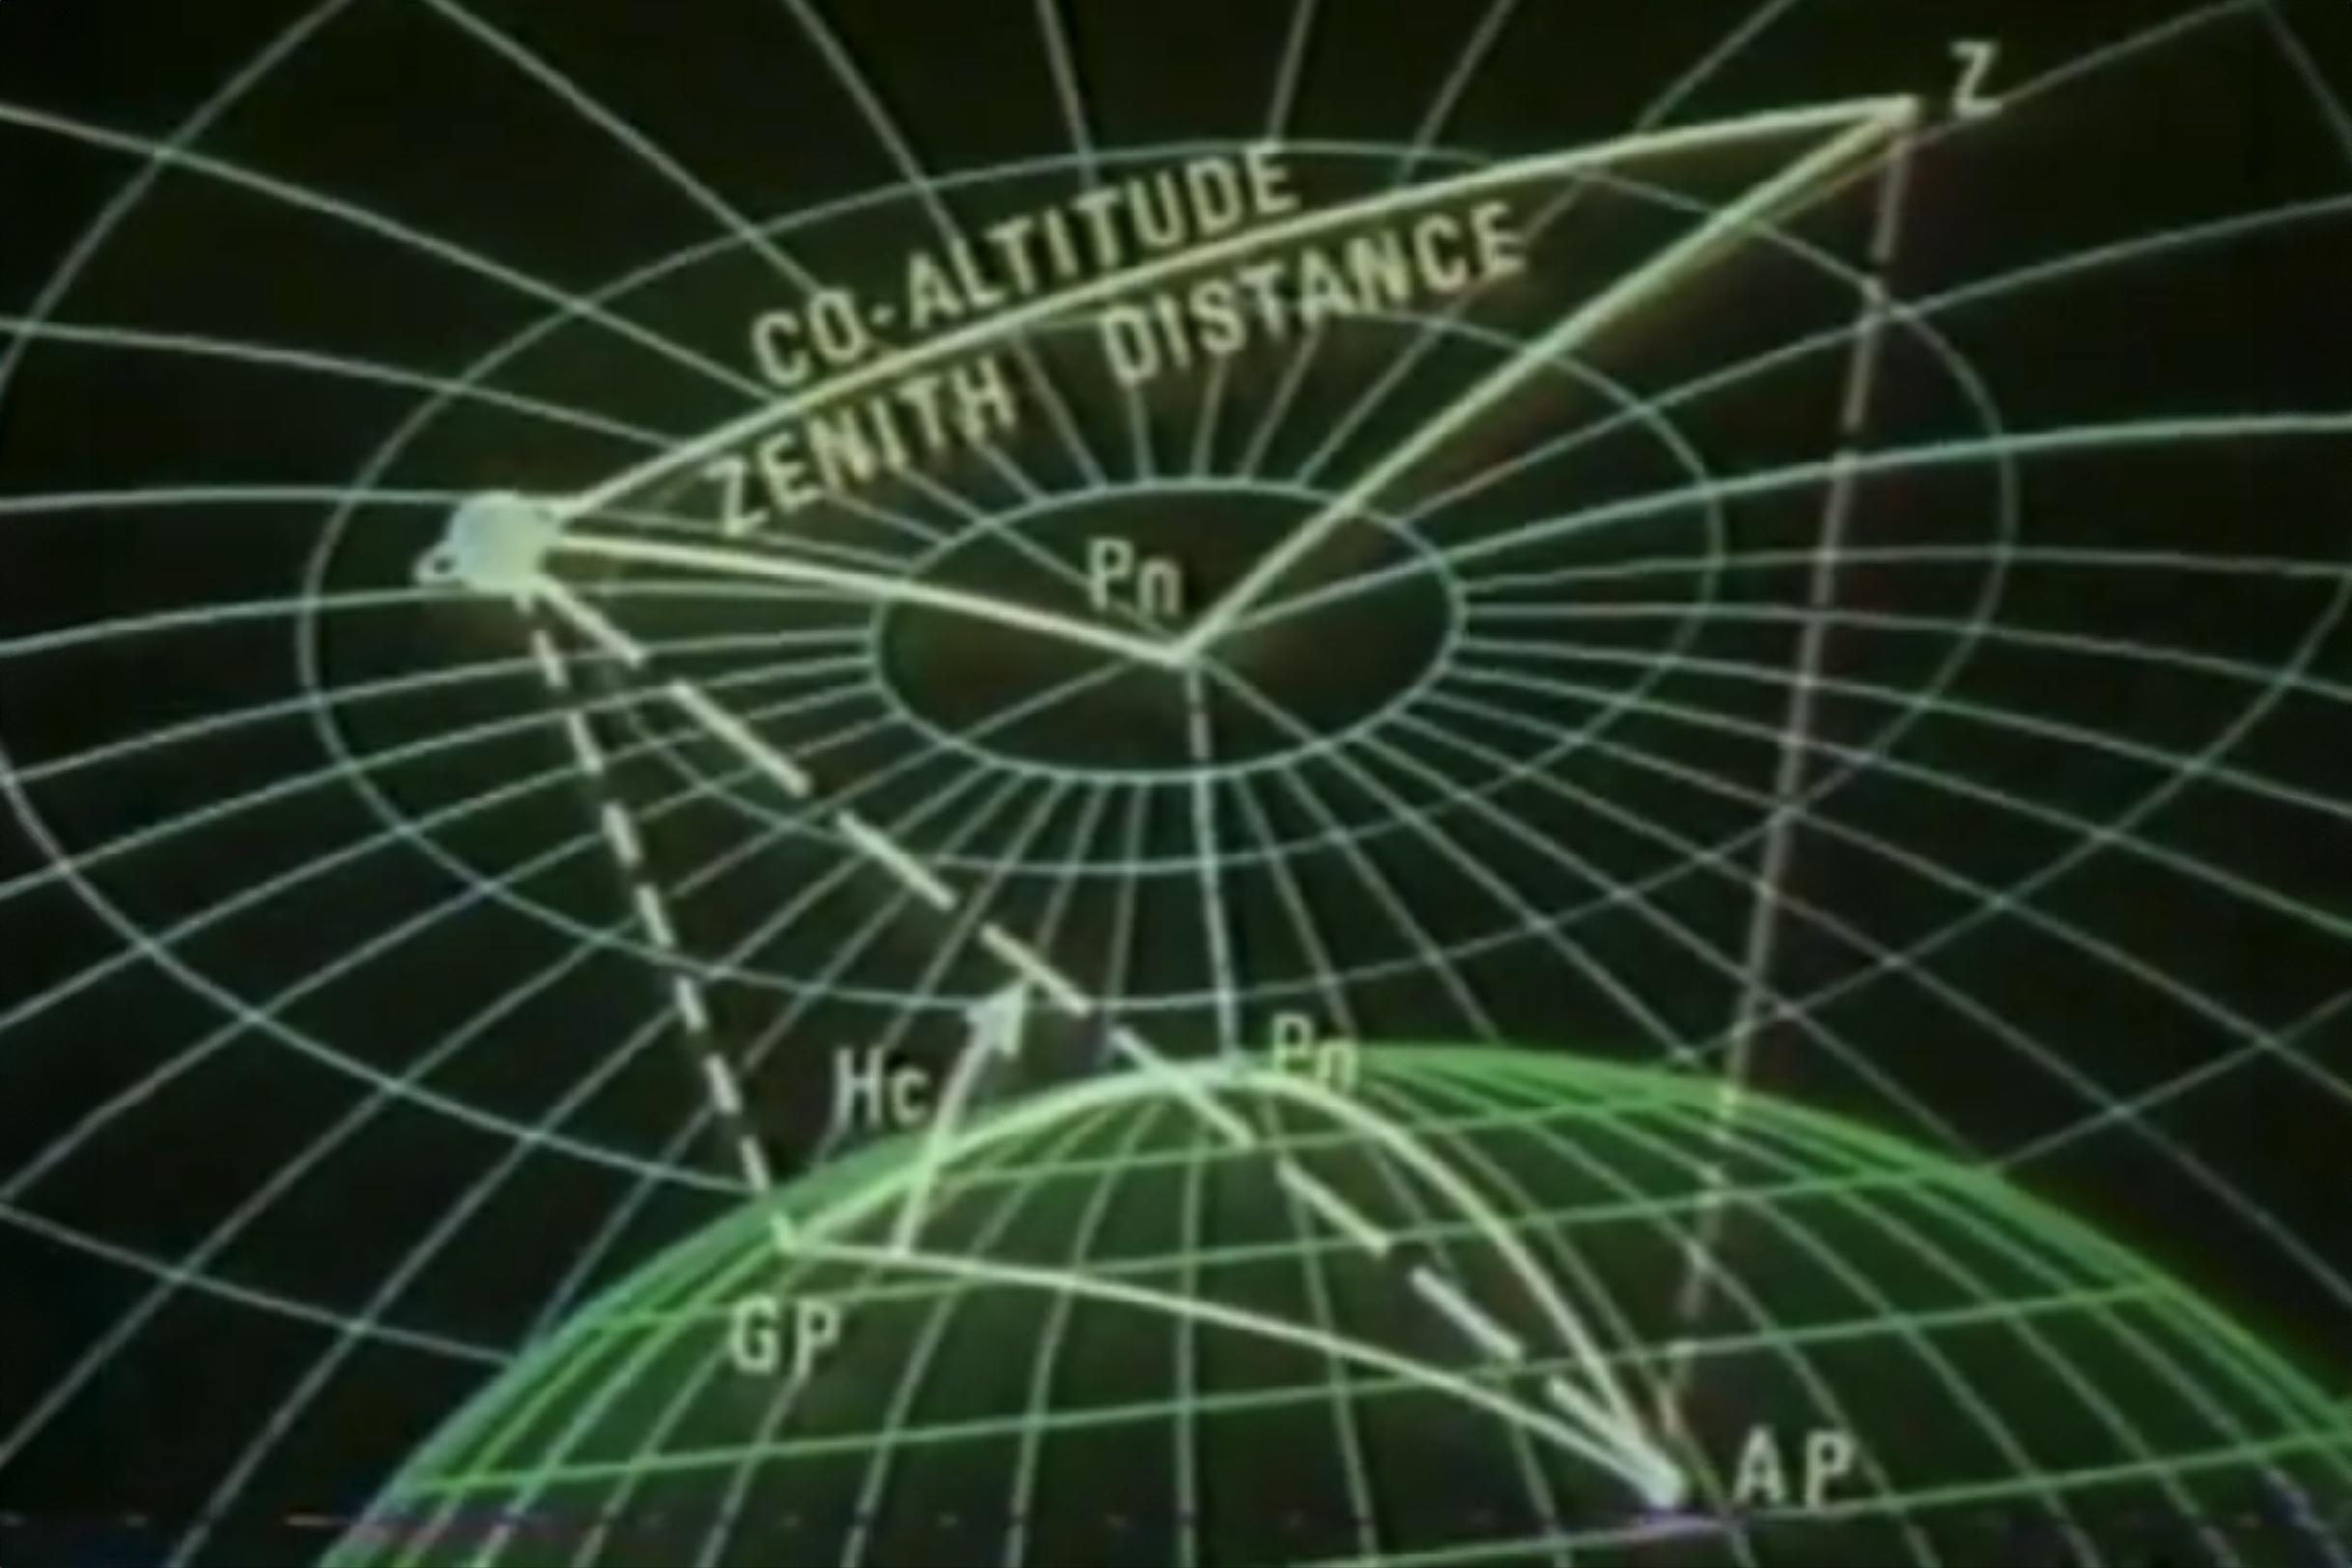
Finding Hc with trigonometry
The Computed Altitude Hc of the celestial body is the altitude you would observe from your sextant if you were actually at your assumed position.
Once you have Hc, you can find the co-altitude, also known as the Zenith Distance, the third side to your celestial triangle.
This gives you the linear distance from the Geographic Position GP of the celestial body and your Assumed Position AP.
Circle of Equal Altitude
Circle of equal altitude
The [GP ↔ AP] distance is the radius of the Circle of Equal Altitude for this sighting.
That circle includes all locations on earth that have the same angular view of the celestial body. The circle is a very large Line of Position LOP.
True Azimuth Zn

Z and Zn
Sight Reduction Tables give you True Azimuth Zn.
Z is the interior angle of your Assumed Position AP. True Azimuth Zn is the complement to that angle and is found in the Sight Reduction Tables.
If you were to plot Zn, it would be the line [AP ↔ GP]
AP plotted
The line along the circle of equal altitude through your Assumed Position is probably not a Line of Position, because your Assumed Position AP is probably not your actual position. The True Azimuth pointed to the Geographic Position GP of the celestial body will intercept with the actual Line of Position, either closer to or farther away than the AP. But which?
Comparing Corrected Altitude Ho and Computed Altitude Hc
Recall that we have two forms of altitude for our celestial body. We have the Corrected Altitude Ho derived from our sextant sighting, and we have the Computed Altitude Hc based on the very long math problem coming from the Air Almanac and the Sight Reduction Tables. Ho is tied to your Assumed Position AP. Hc is tied to your actual position.
Let’s say Ho = 50°00’ and Hc = 49°15’, that means our actual position is (50°00’ – 49°15’) = 45’, or 45 nm away from our Assumed Position AP. But which way, closer to or farther from the GP?
To determine if you are closer or farther, recall that the higher the altitude the closer to the celestial body you are. Since in our example our Corrected Altitude Ho is more than our Computed Altitude Hc, we are really closer to the celestial body.
Celestial navigators remember “HOMOTO,” if Ho is More than Hc, move the LOP toward the GP.

The Line of Position is perpendicular to the azimuth and in this example, is 45 nm toward the celestial body. We know that we are somewhere on that LOP. We now need to do two more sightings to get a more confident position:
6
Example problem (Intercept Method)
In my experience, most navigators prefer to do the computations first – called a precomp – and then do the observation. For sake of explanation, we’ll do the observation first.
Observation
We take an observation of the sun at 1630 Z, recording that with the date. We’ll say we get an Hs = 32°21’. We’ll assume no corrections, so Ho = 32°21’.
Air Almanac
We will need the declination of the observed body, in this case the sun. We’ll need the latitude of our assumed position, Lat-AP. And we need the LHA between the sun and our AP.
Open the Air Almanac and turn to the page for the correct date. Look down the GMT column for the time of the observation. Read the GHA of the sun. In our example, GHA = 64°26.8’ which we round to 64°27’ and declination is S19°8.1’. The sun is 64°27’ west of the prime celestial meridian and 19°89’ south of the celestial equator. This is one point of the celestial triangle.
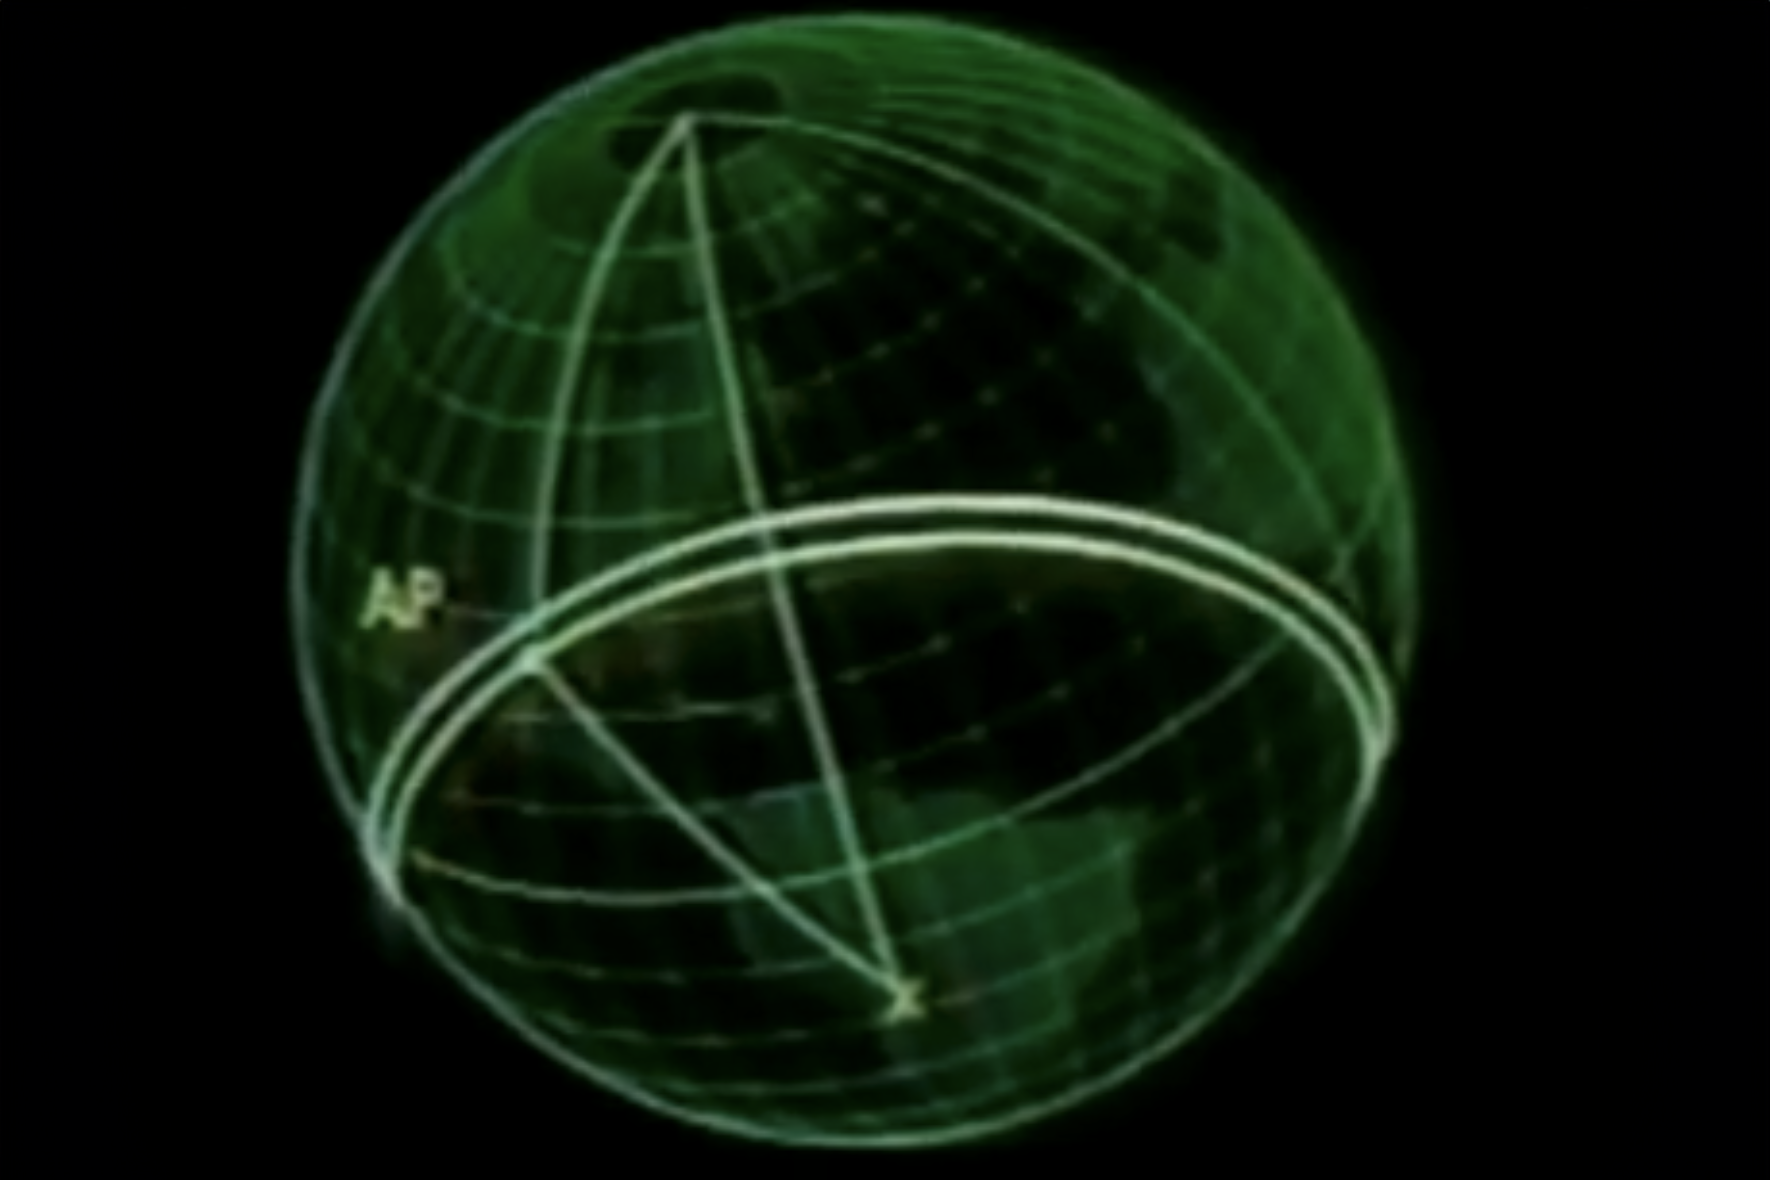
Assumed Position AP

You then consider your DR position, in this example, N27°42’ W97°12’. Since we are operating in the northern hemisphere, the north pole becomes the second point of the celestial triangle.
The third point is your Assumed Position AP. The Site Reduction Tables require whole degrees of latitude, so we make AP-Lat N28°. The longitude of our AP, when added or subtracted from GHA, must also result in a whole number, so we’ll make it 97°27’. We are west of the sun. We’ve established our AP: N28° W97°27’.
We know the length of the side [Pn ↔ AP]: 90° - 28° = 62°.
The sun’s declination, given in the almanac as S19°08’ so we know the length of the triangle from [Pn ↔ GP] = 19°08’ + 90° = 109°08’.
Local Hour Angle LHA
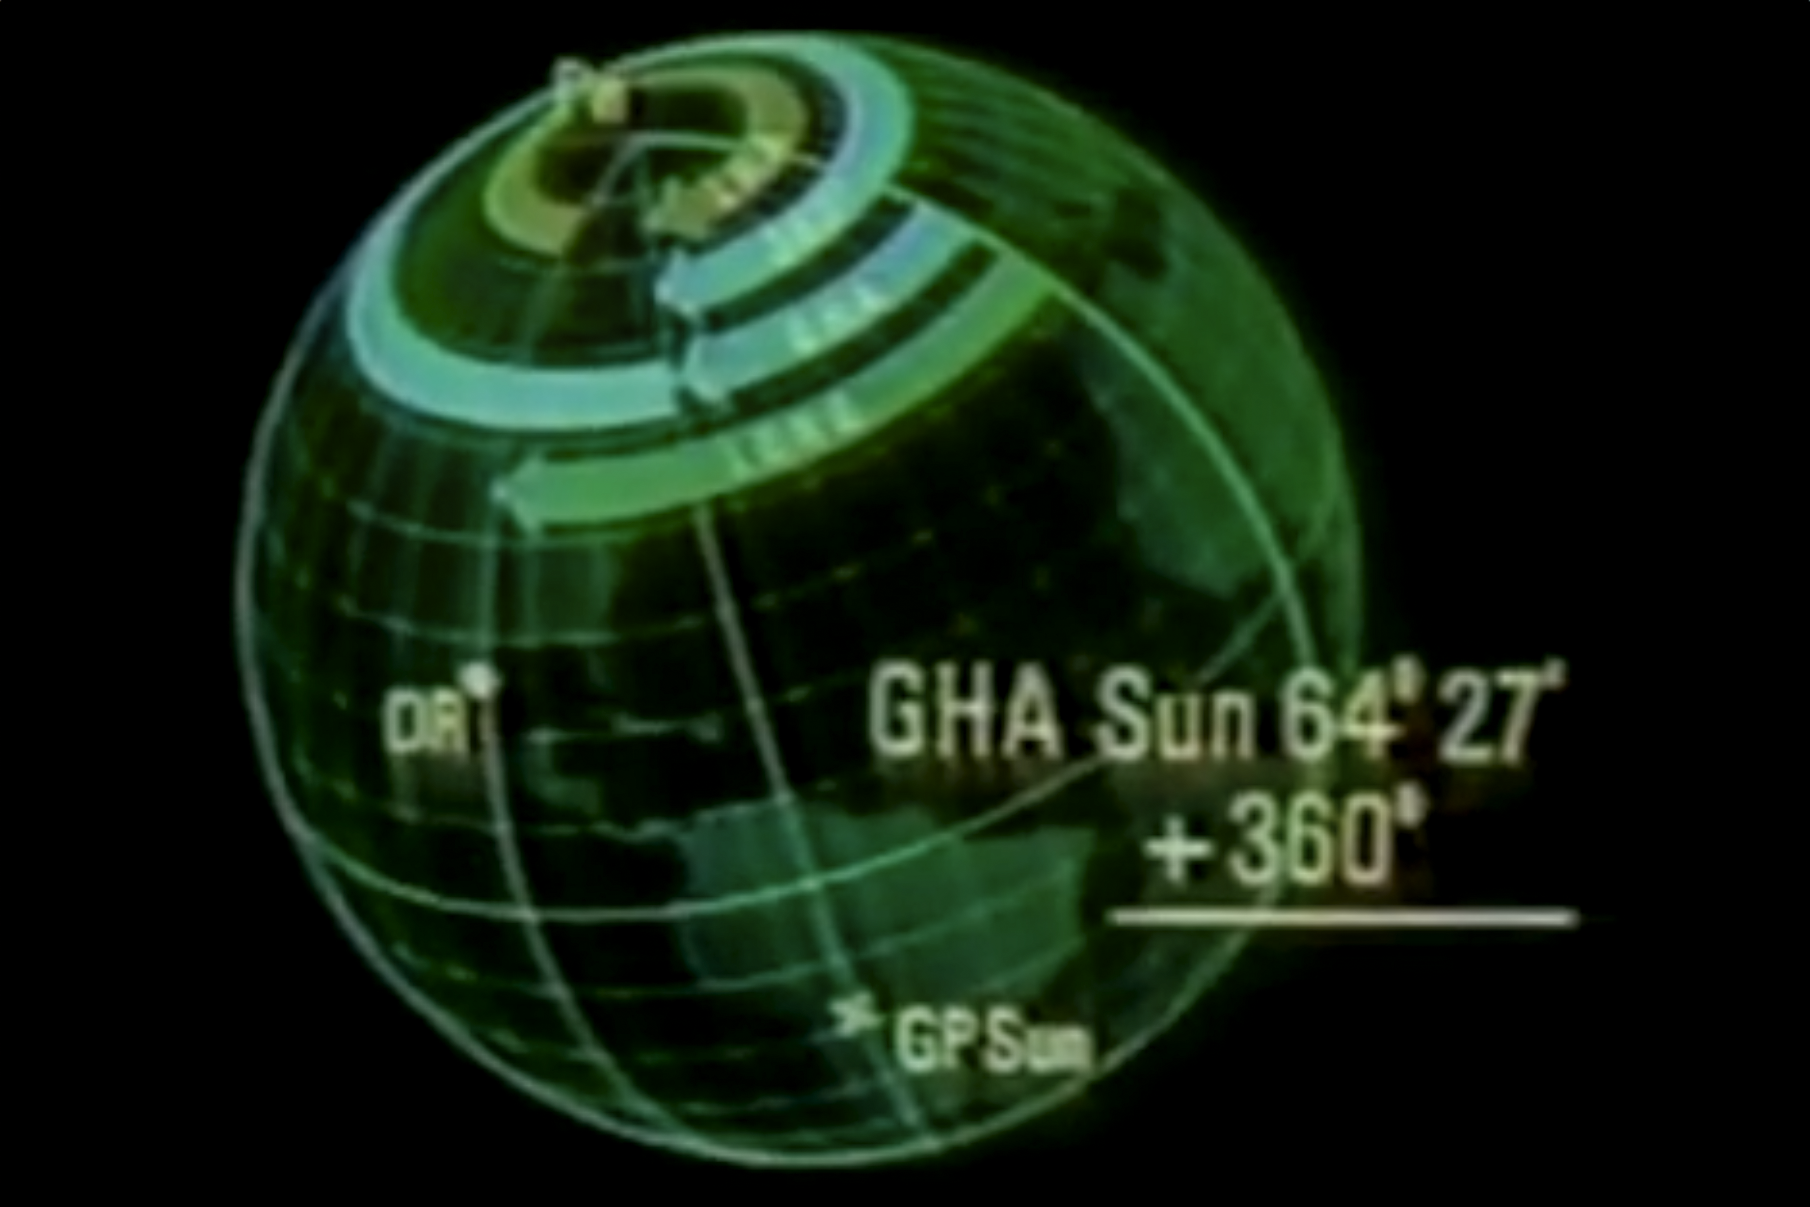
The Local Hour Angle LHA is measured west of our Assumed Position AP, so we need to add 360° to GHA-Sun before subtracting our longitude. So:
64°27^'+360°-97°27^'=327° LHA Sun
So the inside angle at Pn = 360° - 327° = 33°. In actual practice, we don’t need to do any of this math. All we need to know is:
1) The whole degree of latitude of our Assumed Position AP
2) Declination of the observed celestial body
3) The celestial body’s LHA
To this we add two items from the site reduction tables:
4) Altitude Corrected Hc
5) Zn
We need to make sure we have the correct Site Reduction Tables. Volume 1 is used for selected stars while Volume 2 and 3 are for other celestial bodies, depending on latitude and declination. In this example, we need Volume 2. In Volume 2, there are two sets of latitudes, one for declinations with “same name as latitude” and another for declinations with “contrary name to latitude.” Since our Assumed Position AP Latitude is 28° North and the Sun’s declination is 19° South, we select the tables for 28° Latitude, declination contrary name to latitude. We read down to row LHA = 327° and over to the column declination = 19° and read Hc = 33°11’, d = 49, and Z = 142°. The d = 49 is used for interpolation using a provided chart. For this example, we’ll skip that chart, only to say that d = 49 corrects our Hc by -7’, so that Hc = 33°4’.
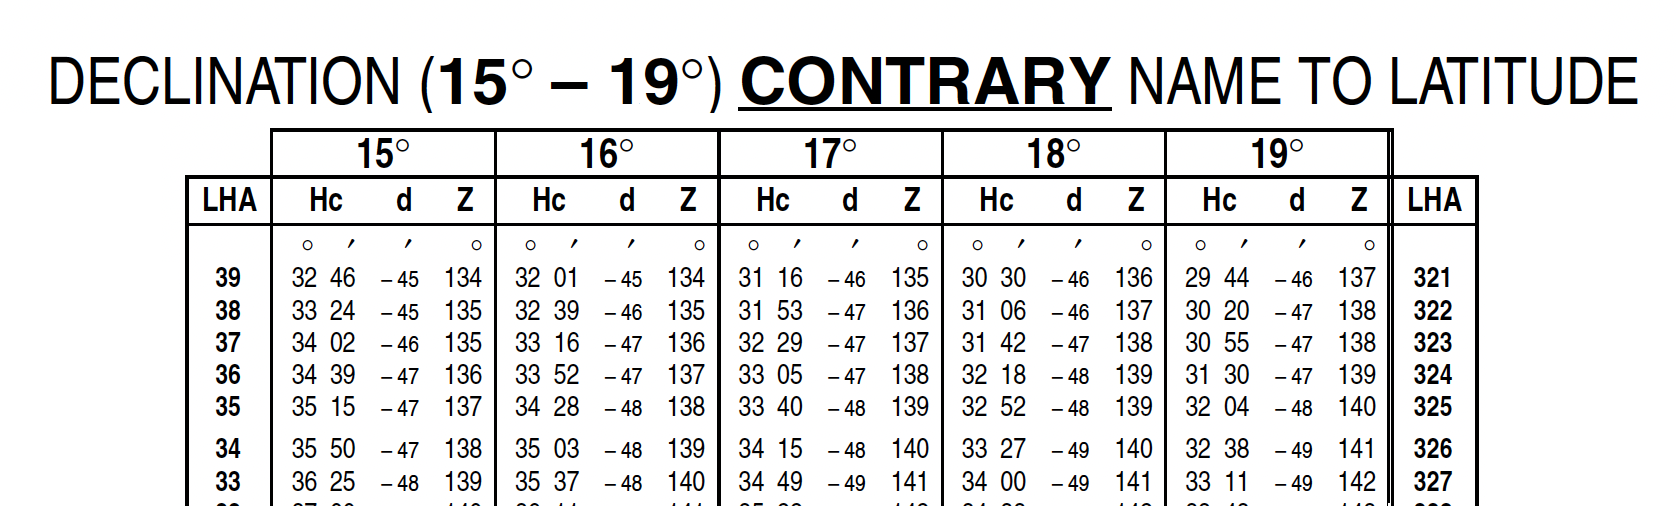
Example Site Reduction Table
Note: I’ve greatly truncated the chart for readability. In the resulting chart, look to the bottom row and the 19° column.
Since LHA is greater than 180°, Zn = Z. So Zn = 142°.
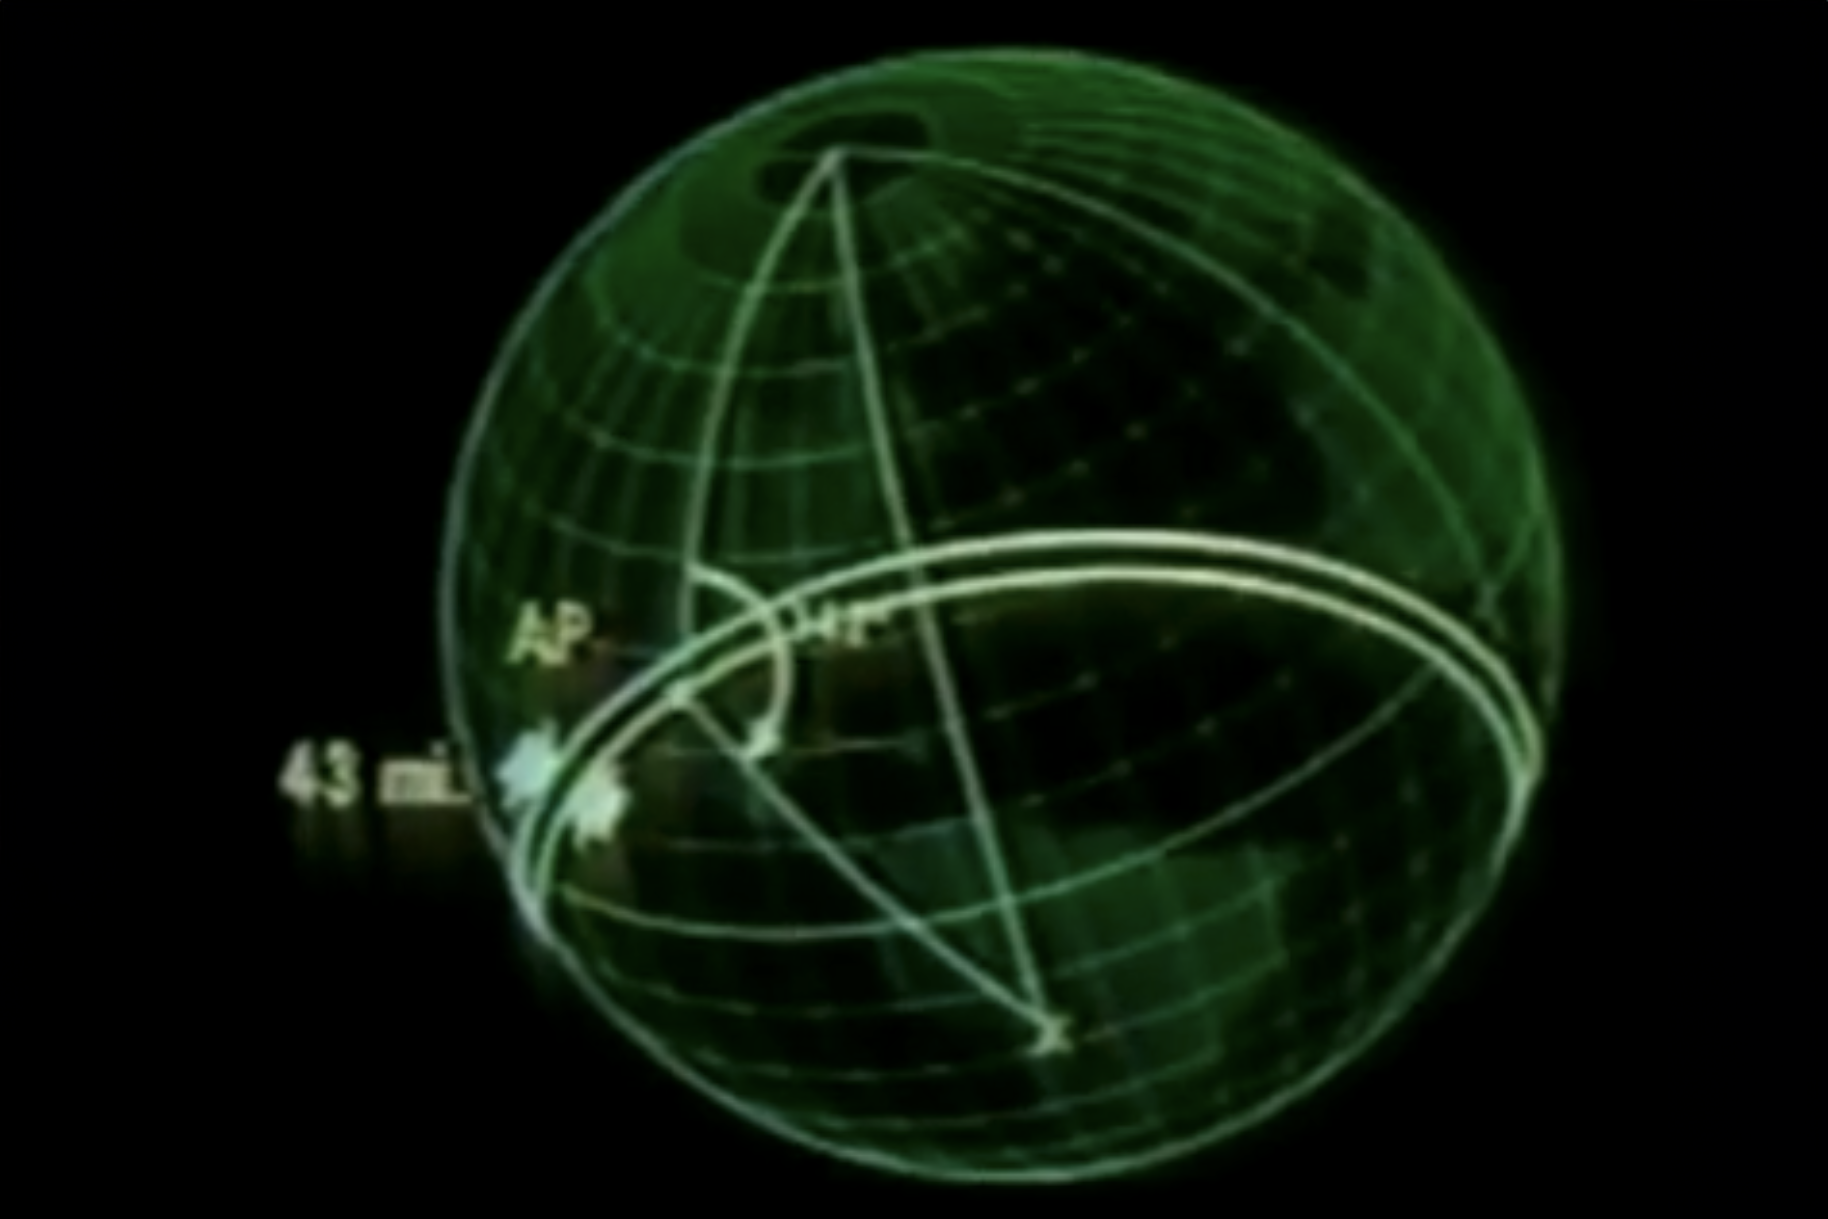
Recall that Ho = 32°21’ and Hc = 33°4’. Since Ho is less than Hc, we are farther away from the celestial body than our Assumed Position AP. Since Hc – Ho = 33°4’ – 32°21’ = 43’ which is 43 nm.
Plotting
We know that our actual position is 43 nm farther away from the circle of equal altitudes around the sun’s GP.
We also know that the true intercept distance is measured on a true azimuth line of 142°.
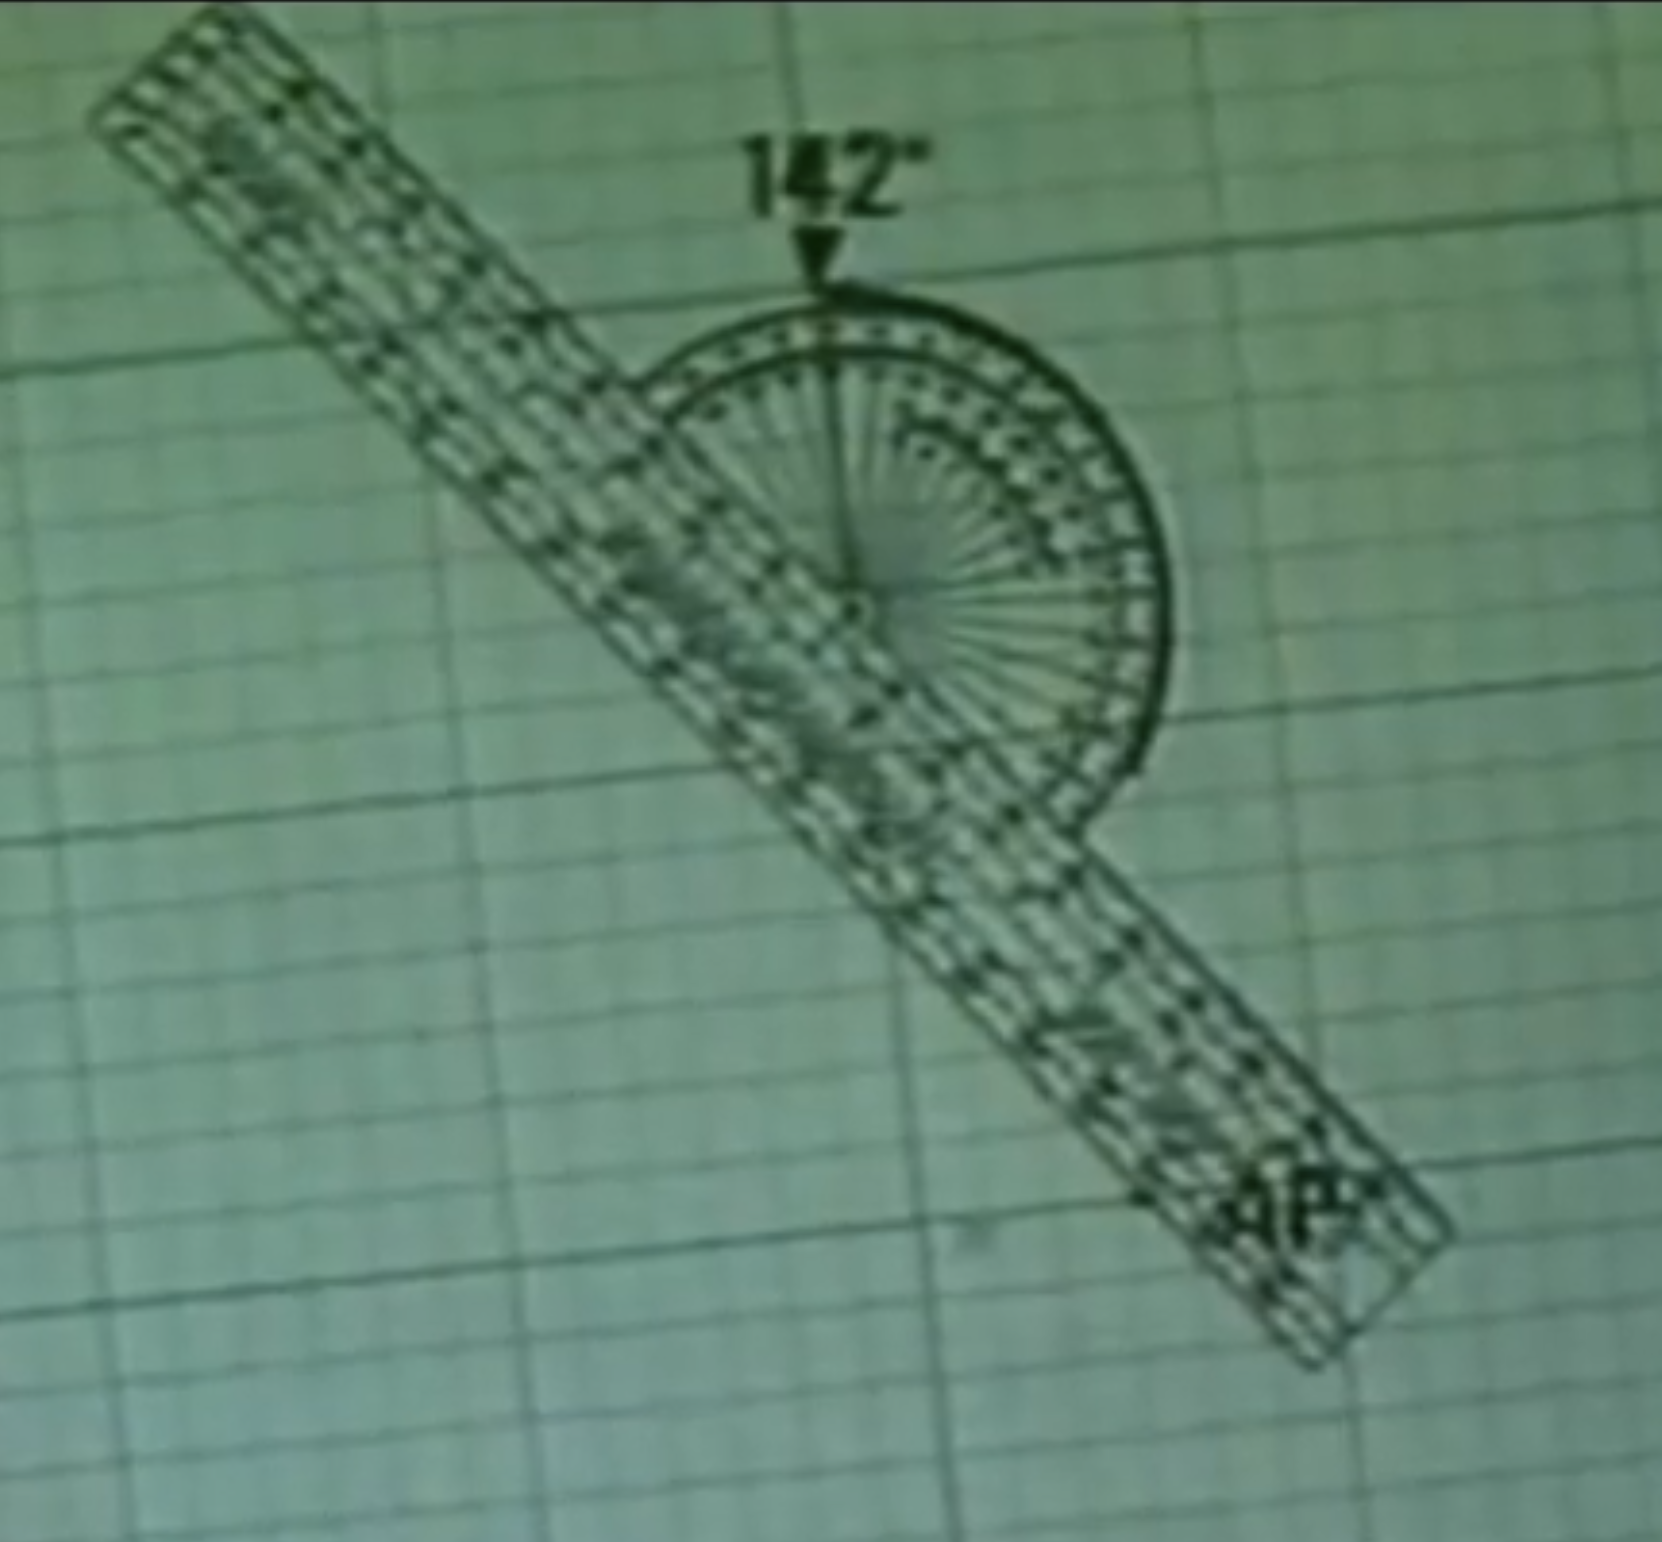
To plot, start by placing a dot at your AP.

Lay your plotter over that point at an angle of 142°.
se your dividers to find the point 43nm away from the AP.
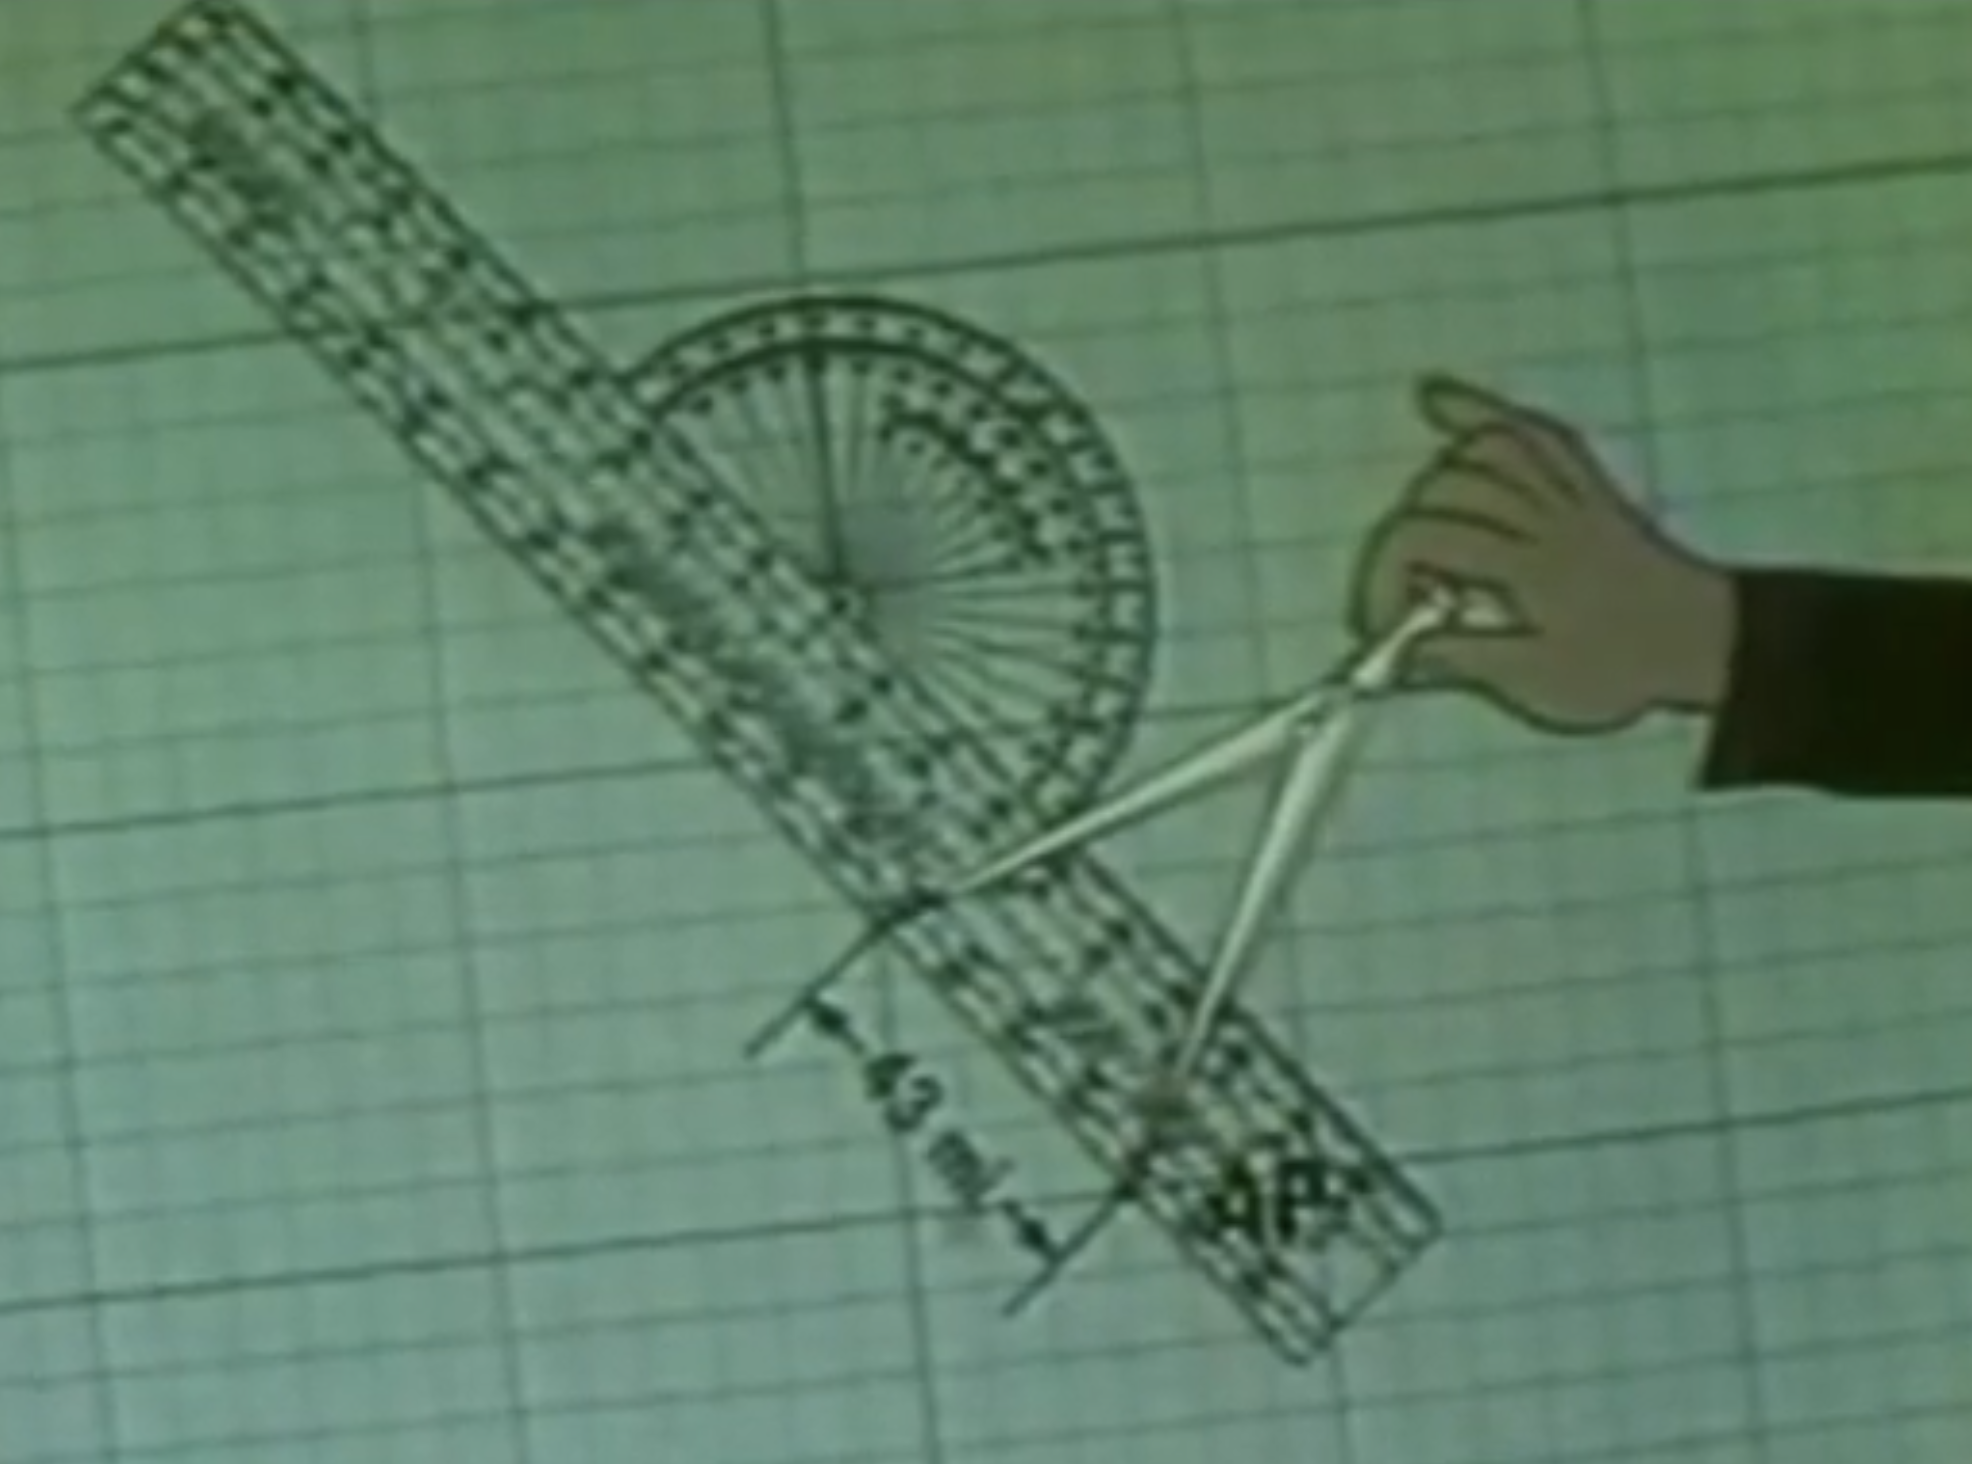
Draw a line at right angles to this line. This is your LOP.

Do this two more times and you will have a triangle and can assume your position is inside the triangle. Of course, the longer it takes you to do this, as the aircraft moves, the larger that triangle will be. For this reason, it may be advantageous to precompute for three celestial objects and shoot them quickly.
Conclusions
This only scratches the surface of celestial navigation. Let’s say you are shooting in the middle of the day and the only celestial object in view is the sun. There are techniques for that! I offer this overview just to illustrate how oceanic navigation used to be and to perhaps improve your dead reckoning skills without a sextant.
References
(Source material)
Air Almanac: 1972, September – December, Washington, United States Naval Observatory, 1972.
Celestial Navigation: Instruction Video, U.S. Army Air Force Training Film, undated.
Celestial Navigation: Position Finding on the Earth, War Department Training Film 1-204, Produced by the Signal Corps in Collaboration with the Chief of Air Corps, undated.
Sight Reduction Tables for Air Navigation, Pub No. 229, Vol. 1, National Geospatial-Intelligence Agency, 2010.