Years ago, I was surprised by a Gulfstream G450 recurrent simulator instructor’s preflight briefing because he added a requirement that I didn’t know about. He said, “I will need to see at least one approach and landing using the HUD.” I had long before learned to appreciate the Head Up Display (HUD) as a cockpit tool that made my life easier and the requirement seemed as superficial as saying, “you will need to take regular breaths during this flight.” I got into the seat, lowered the HUD into position, and kept it there. About halfway through the 2-hour session the instructor said, “you’ve done enough with the HUD, you can put it away if you want to.” I left the HUD where it was. After the session I asked him about all this and he said, “most of my clients prefer to fly without it.”
— James Albright

Updated:
2021-09-01
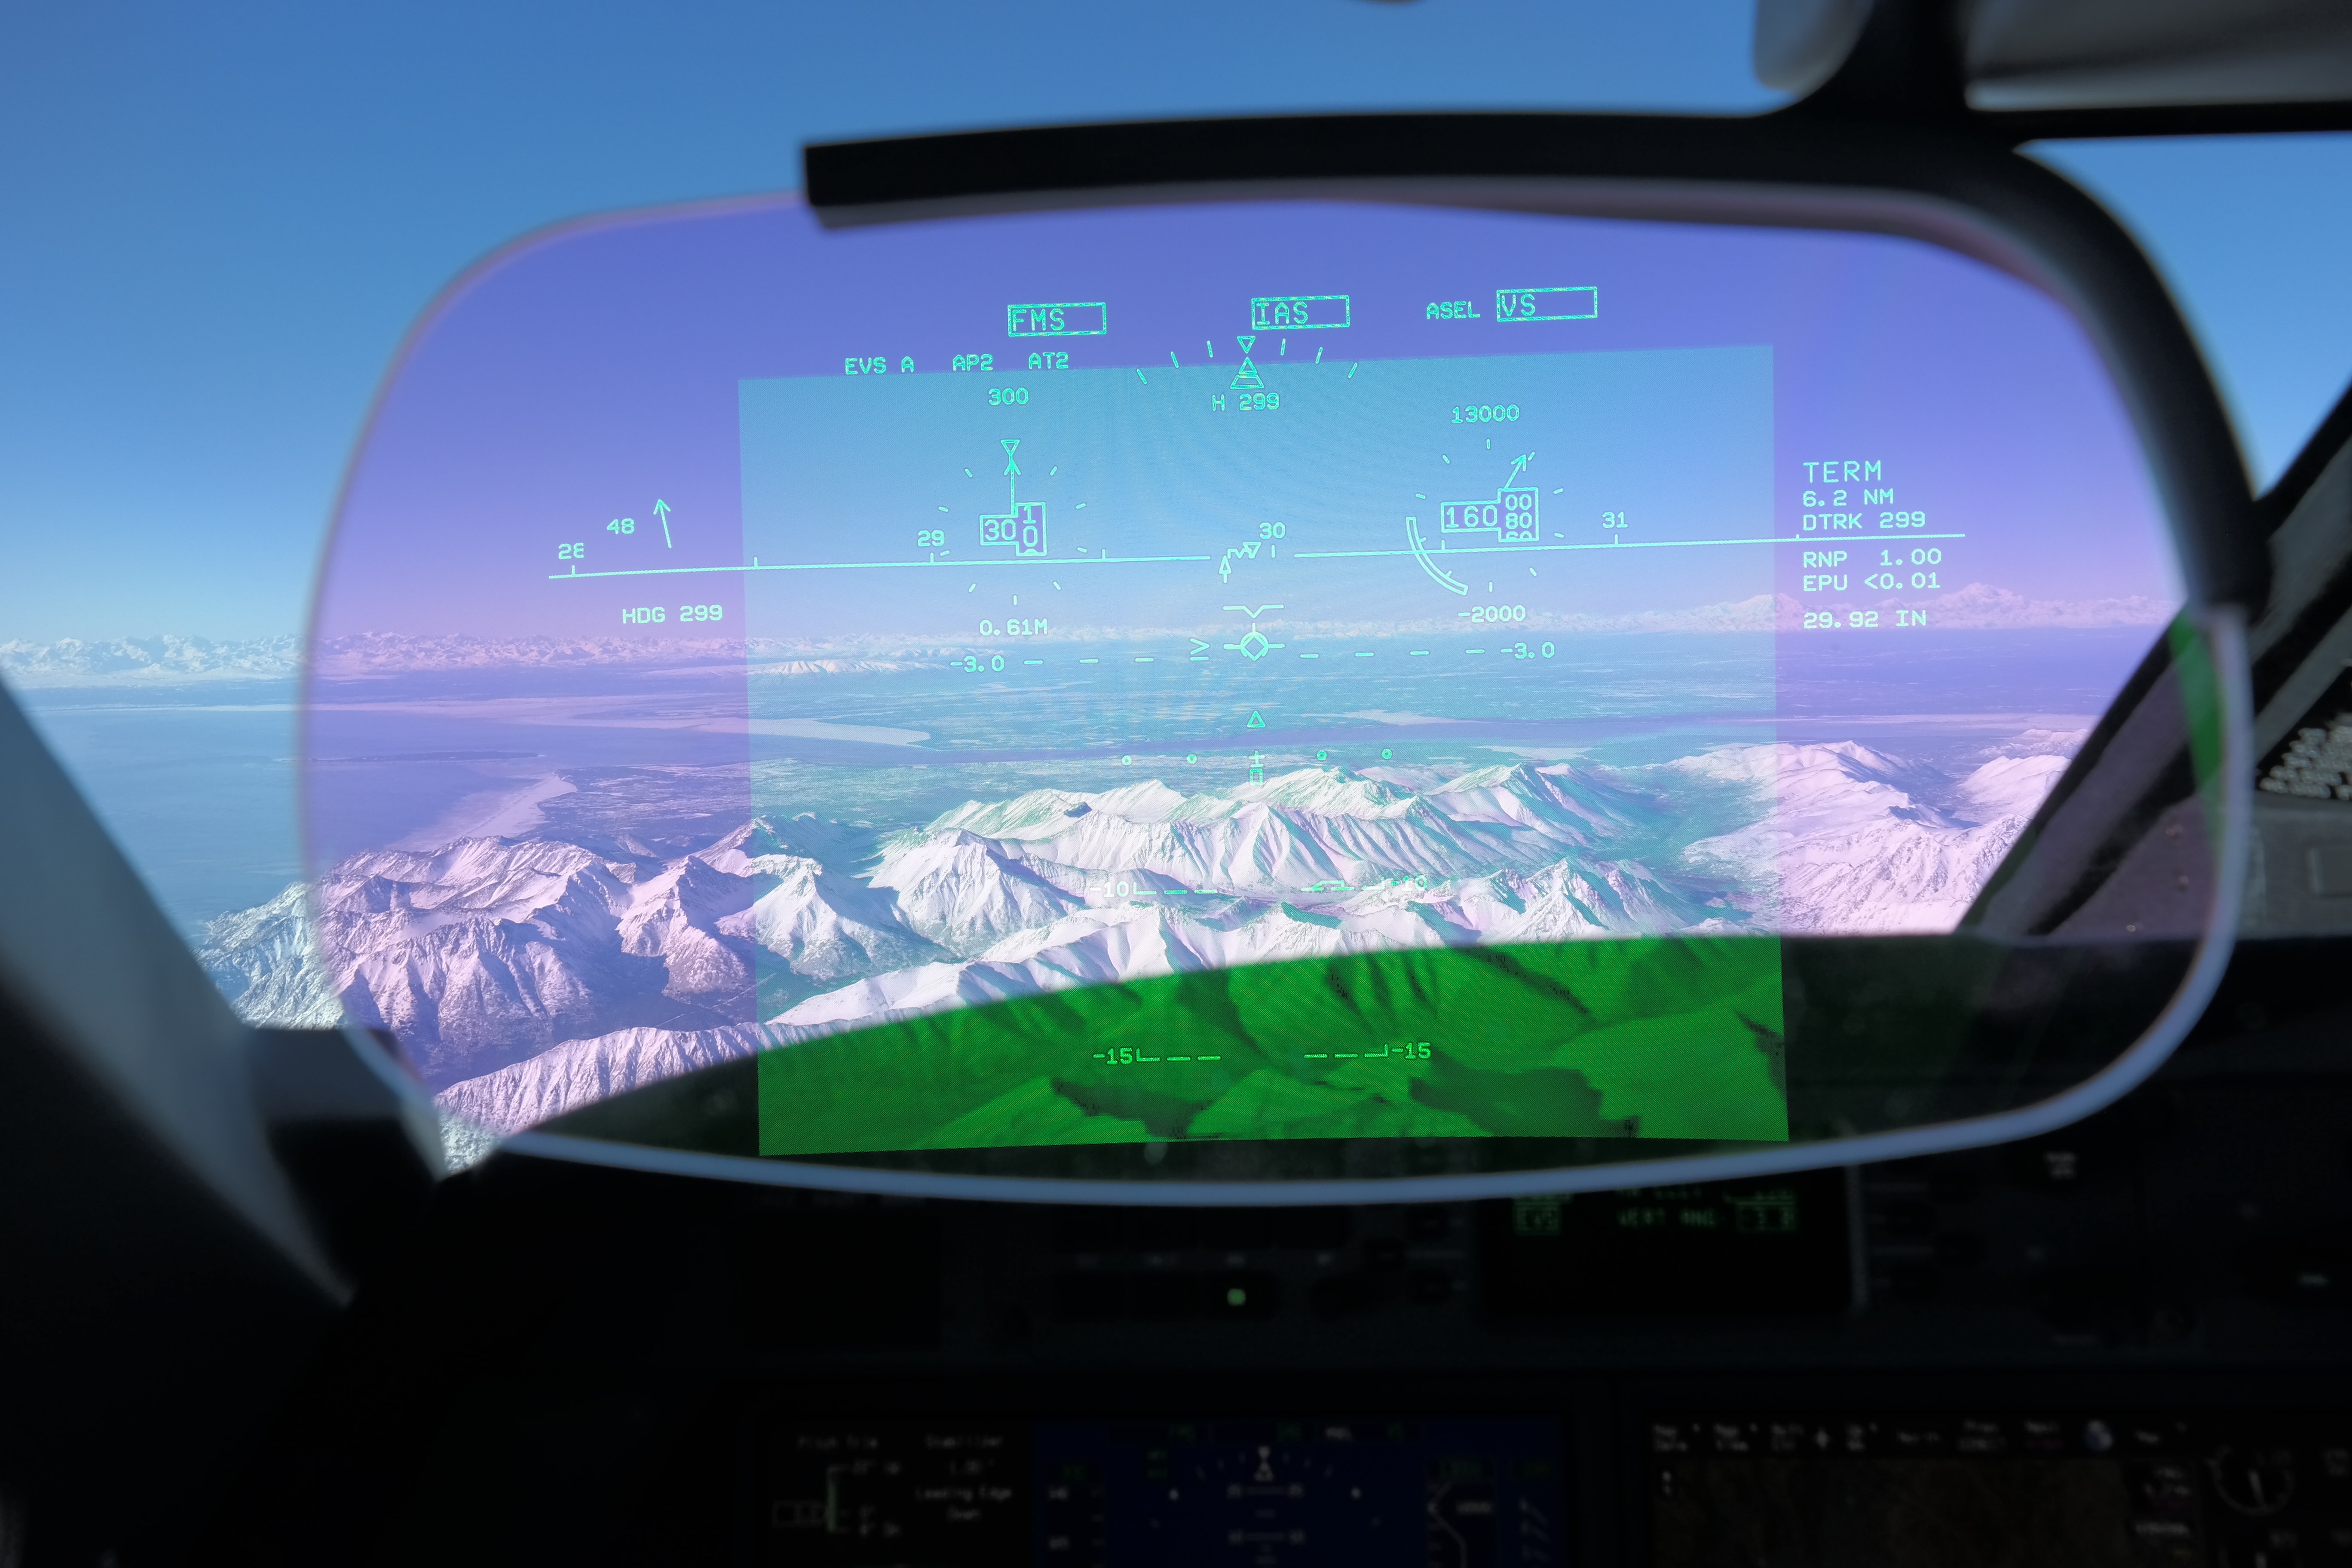
A view of Alaska through
a Gulfstream G450 HUD
(Photo Mike Keller)
In the years since I’ve noticed about half the pilots I was paired with in the G450 simulator used the HUD the way I did (all the time) and the rest used it sparingly. In the newer Gulfstream GVII aircraft, every pilot I’ve been paired with uses the HUD all the time. Why the difference? In the older airplane, the conventional “heads down” view in the Primary Flight Display (PFD) defaulted to what you would find in an airplane with a mechanical Attitude Director Indicator (ADI) from fifty years ago. These ADIs present a horizon, an airplane symbol, and a flight director using “vee bars,” so called because they were shaped like an inverted letter V. HUDs don’t use this symbology and going from one to the other can be confusing. (In the G450, the pilot can change the PFD to use HUD symbology, but few pilots did that.) In our GVII, the pilot has no choice: the PFD mirrors the HUD. I think that is the way things are going, so if you are not “one with the HUD” and your airplane has a HUD, it is time to get with the program.
1 — Understanding a conventional Primary Flight Display (PFD)
2 — Understanding a typical Head Up Display (HUD)
4 — Adding an Enhanced Flight Vision System (EFVS)

1
Understanding a conventional Primary Flight Display (PFD)
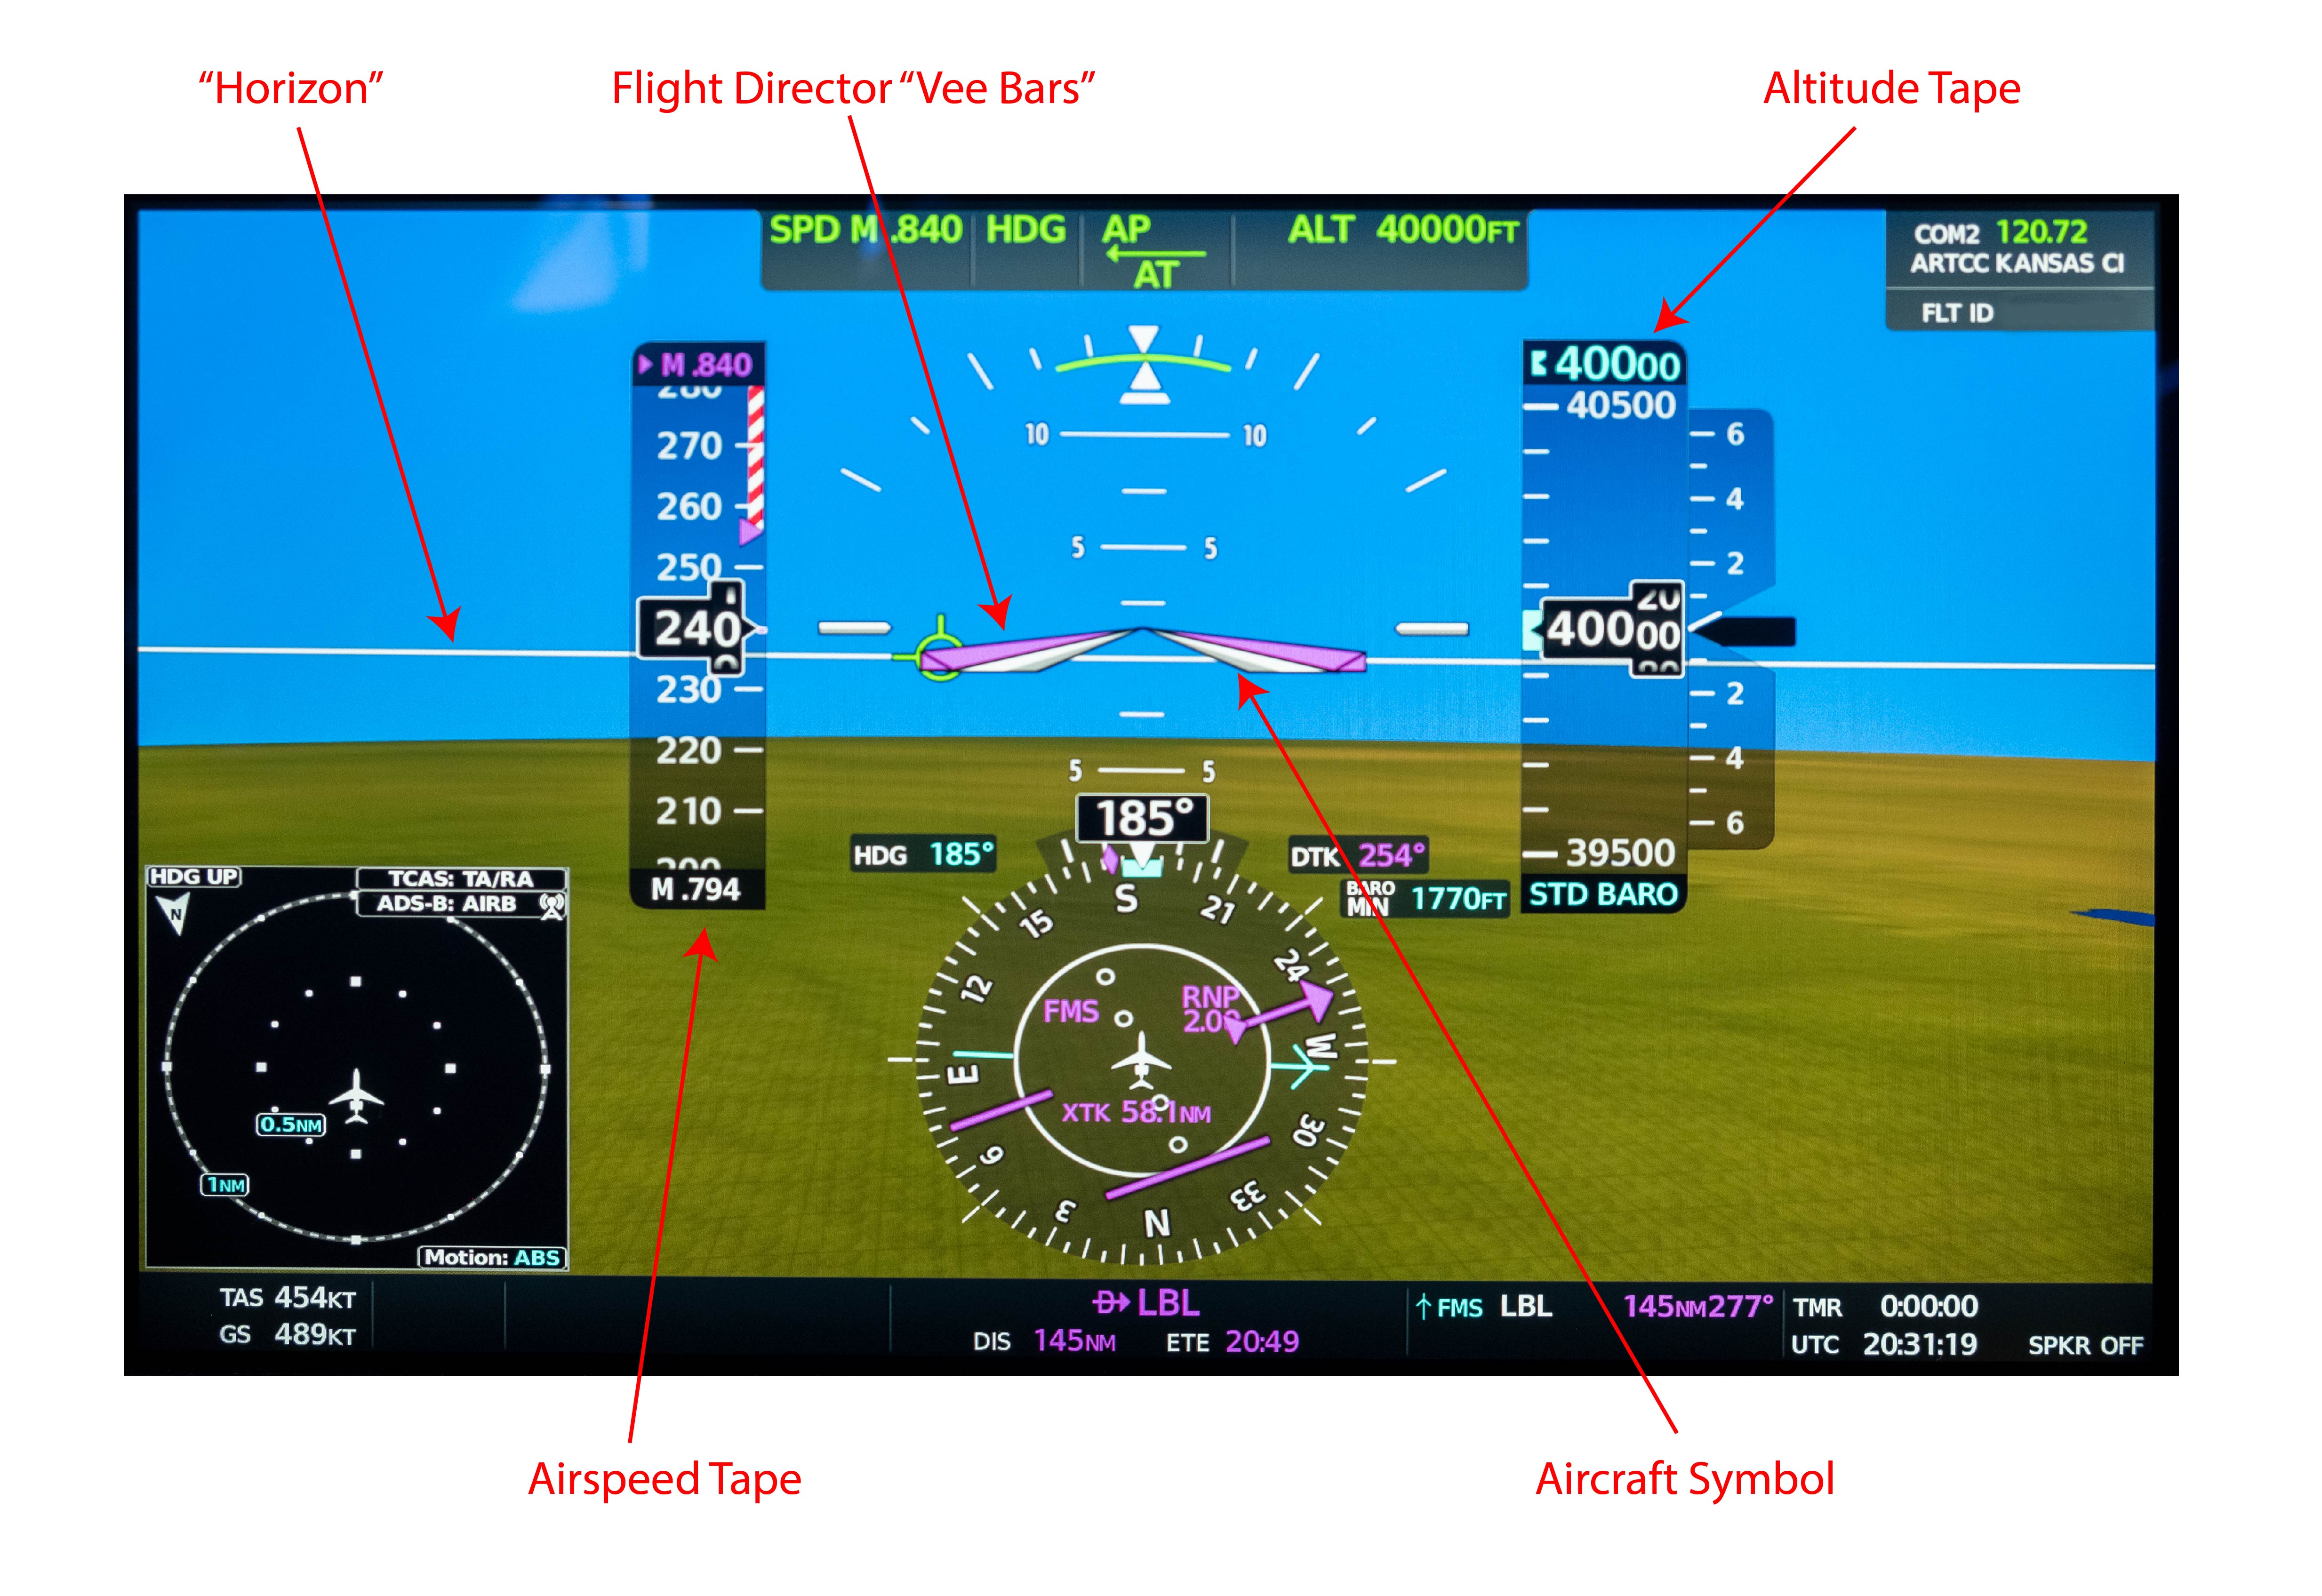
A modern “conventional” Primary Flight Display
Early attitude indicators used mechanical gyroscopes to stabilize an artificial horizon which was calibrated on the ground to be wings level and aligned with an aircraft symbol. That symbol was drawn or mechanically placed in the display, so you could be assured that it truly represented the aircraft. The artificial horizon, however, was forever suspect because it could drift or even tumble. Modern electronic PFDs share much in common with their mechanical ancestors: the aircraft symbol is tied to the aircraft structure and the horizon is set relative to the aircraft’s attitude on the ground.
The photo of a conventional PFD is about as modern as they come, taken from a Citation Longitude, in level flight at 40,000 feet, Mach 0.794. Most pilots will be instantly comfortable with the display. The aircraft symbol is a white inverted “vee” which is fixed in position. Flight director commands are presented by matching pink “vee bars” so that the pilot flies the fixed v-bars into the moving v-bars to satisfy flight director commands. The pitch of the aircraft is shown to be about 2 degrees above what pilots have come to call the horizon but is really a relative horizon. It is relative because placing the nose of the aircraft on this line will mean the aircraft is parallel to where it was on the ground, that is, it is a horizon relative to the ground. This PFD also shows a synthetic view of the terrain, and the actual horizon is shown about 5 degrees below the relative horizon.
Note that aircraft symbol doesn’t point to where the aircraft is going, only where the nose is pointing. The aircraft’s pitch is above the relative horizon so as to maintain level flight.
2
Understanding a typical Head Up Display (HUD)
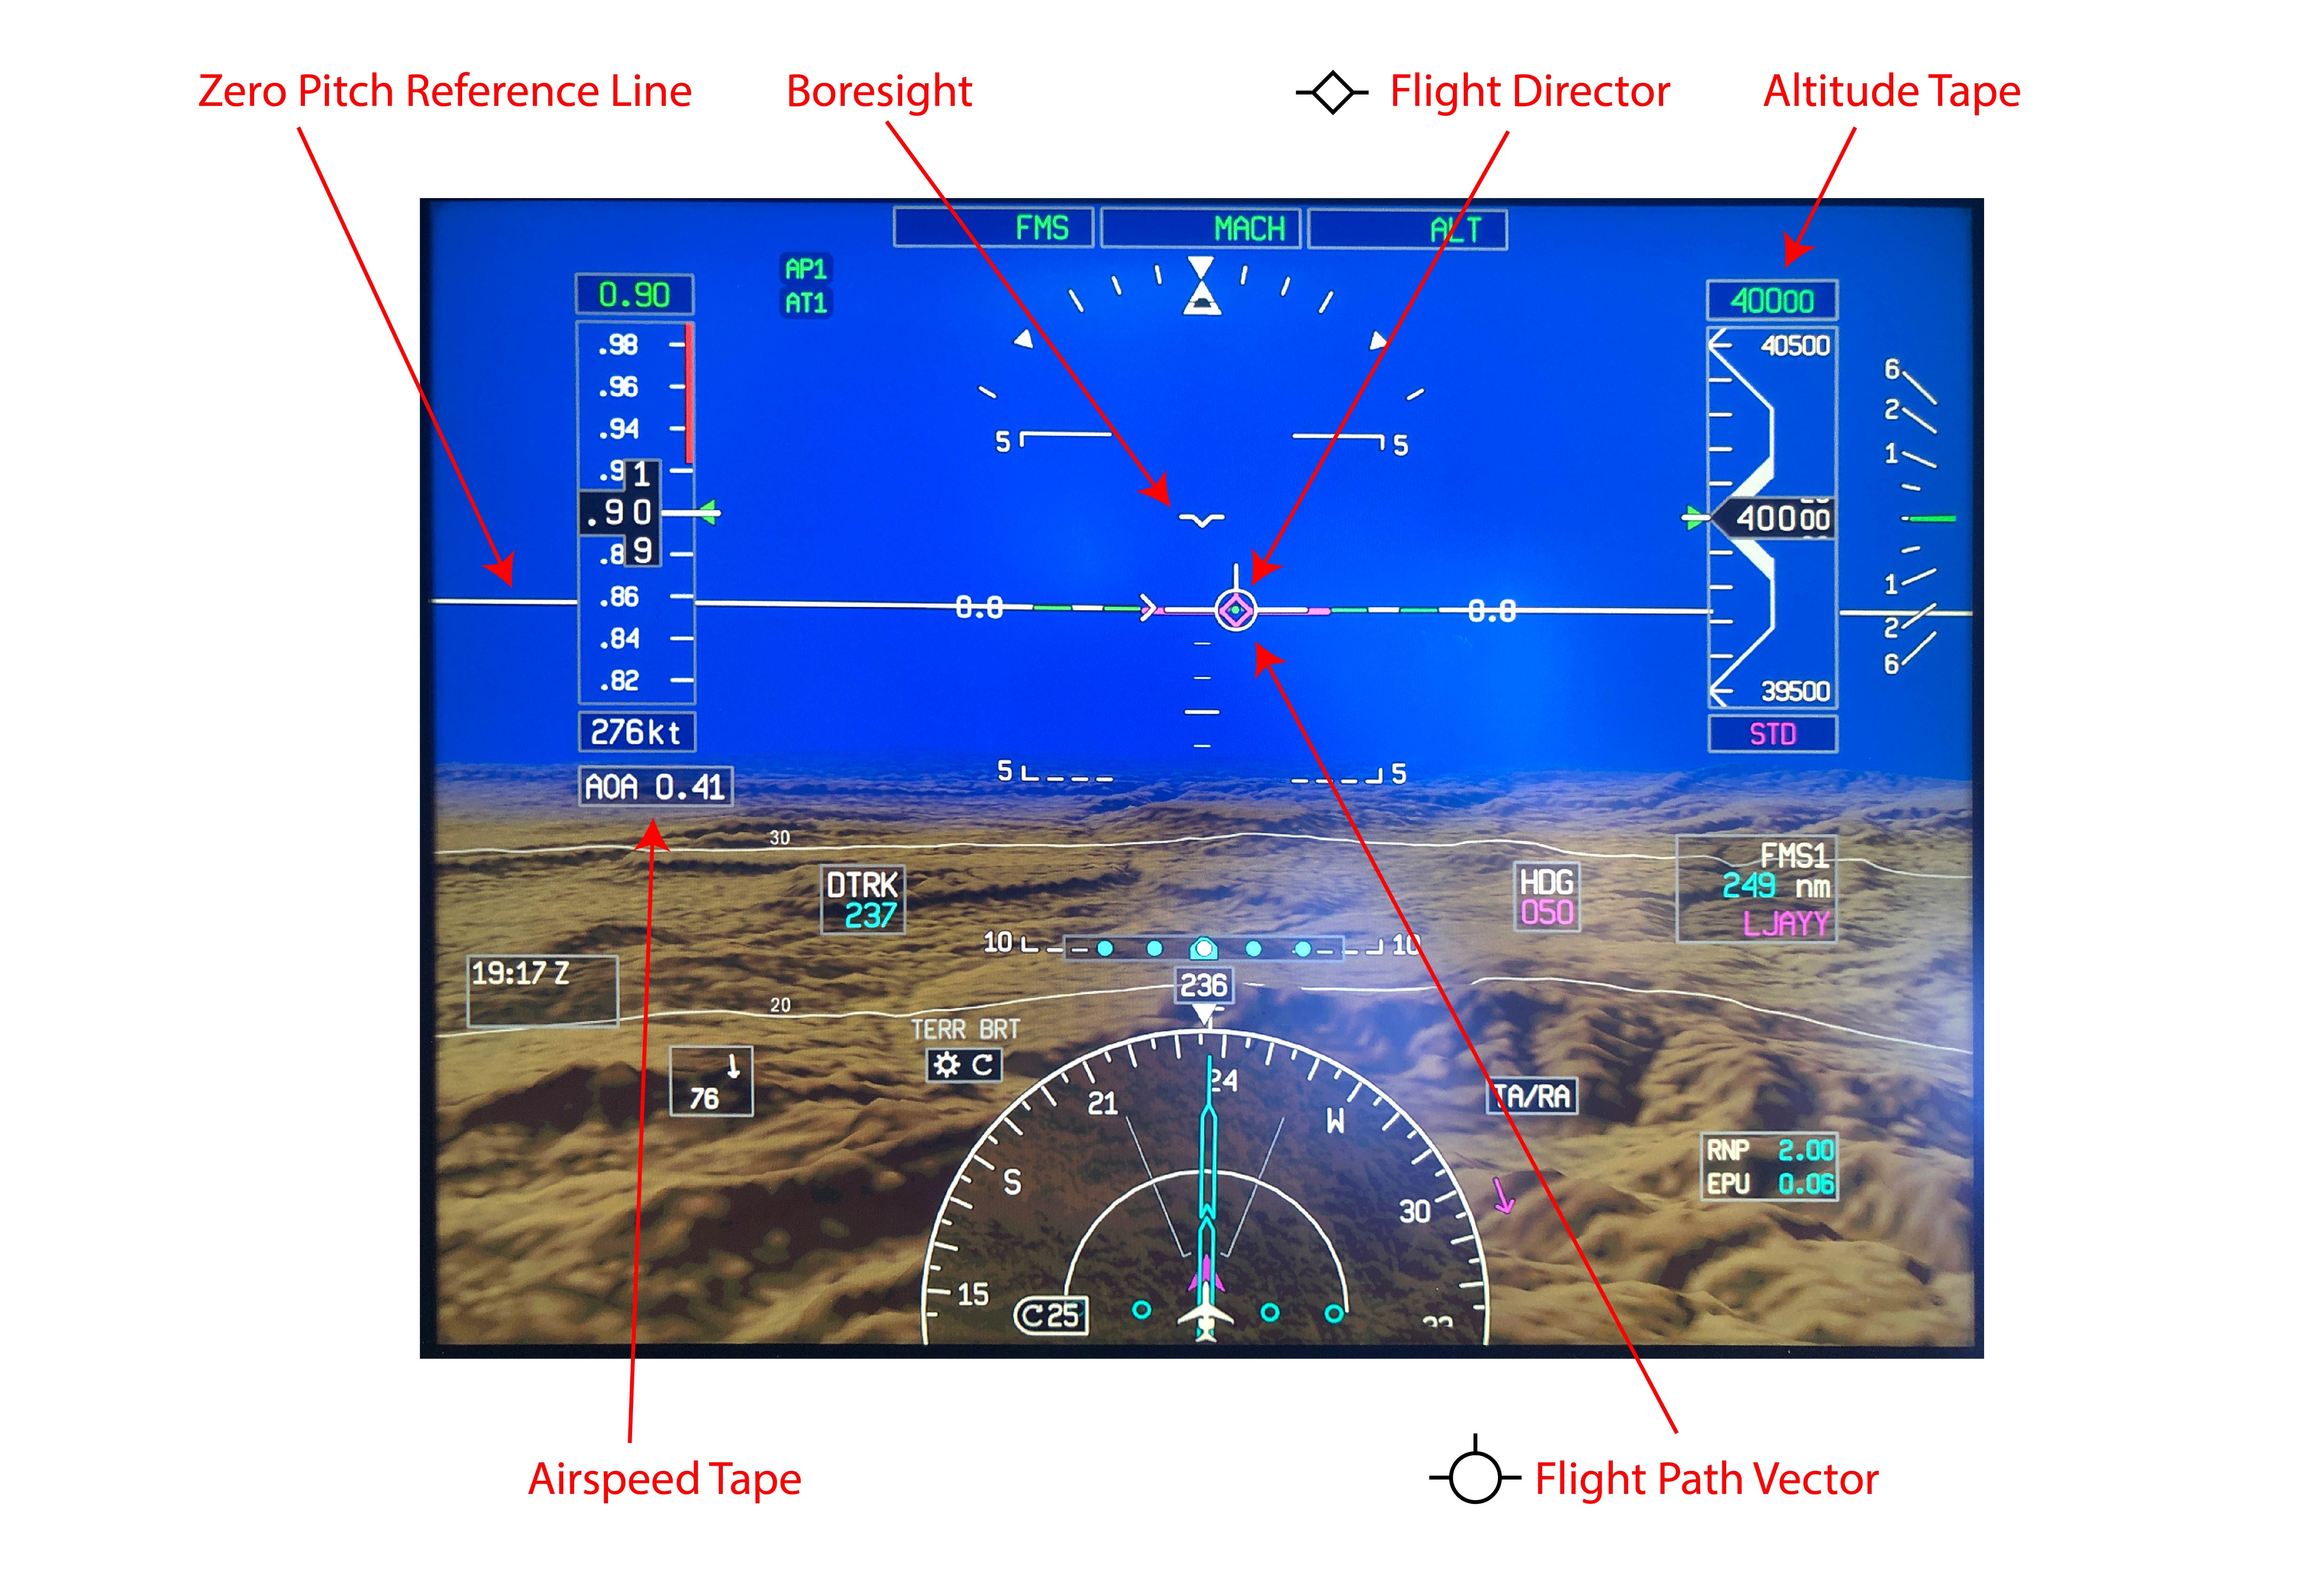
A Primary Flight Display using HUD symbology
Early HUDs were added to conventional avionics suites requiring pilots learn two separate symbologies. Avionics designers have realized having two systems is confusing and are now using HUD symbology in the PFD.
The photo of a PFD using HUD symbology is taken from a Gulfstream GVII-G500 in level flight at 40,000 feet, Mach 0.90. Most pilots will recognize much of the display but will struggle with what looks like a horizon and will search in vain for an aircraft symbol. “Where is the nose of the aircraft?” they will ask. It is shown as a flat vee with wings and is called a boresight by Gulfstream but goes by other names by other manufacturers. Like the aircraft symbol on a conventional PFD, it does show where the aircraft is pointed. But that is no longer the pilot’s primary focus. “Where is the horizon?” is the next question. It is below you, as shown by the synthetically drawn terrain. Once again, that is of lesser importance when flying using HUD symbology.
The pilot’s primary focus is no longer where the aircraft is pointed, but where it is going. That is represented by the Flight Path Vector (FPV) and is drawn as a circle with small wings and a tail. The white horizontal line can be thought of as a horizon that has been adjusted to consider the altitude of the aircraft, as if the earth’s diameter has been increased. In some HUDs it is called a Zero Pitch Reference Line. You maintain level flight by placing the FPV on the Zero Pitch Reference Line.
3
What a HUD gives you
A common complaint of users new to HUDs is information overload: “What am I supposed to be looking at?” You will hear the same thing from nonpilots visiting a cockpit for the first time: “How do you keep track of everything all at once?” The answer is the same for both questions: with training you realize where you need to look and when you need to look at it.
If you are flying a pilot-friendly aircraft, you know the attitude indicator is in front of you, to the left is airspeed, to the right is altitude, and below that is a heading reference. This system is continued in the HUD but your eyes have shorter distances to travel. The primary advantage is that all this information is presented to you where your eyes need to be for takeoff and landing: outside.
The accompanying video combines what the pilot is looking at “heads up” through a HUD during takeoff with the “heads down” view shown below. With the HUD, the pilot’s eyes never leave the view outside.
4
Adding an Enhanced Flight Vision System (EFVS)
EFVS versus natural vision
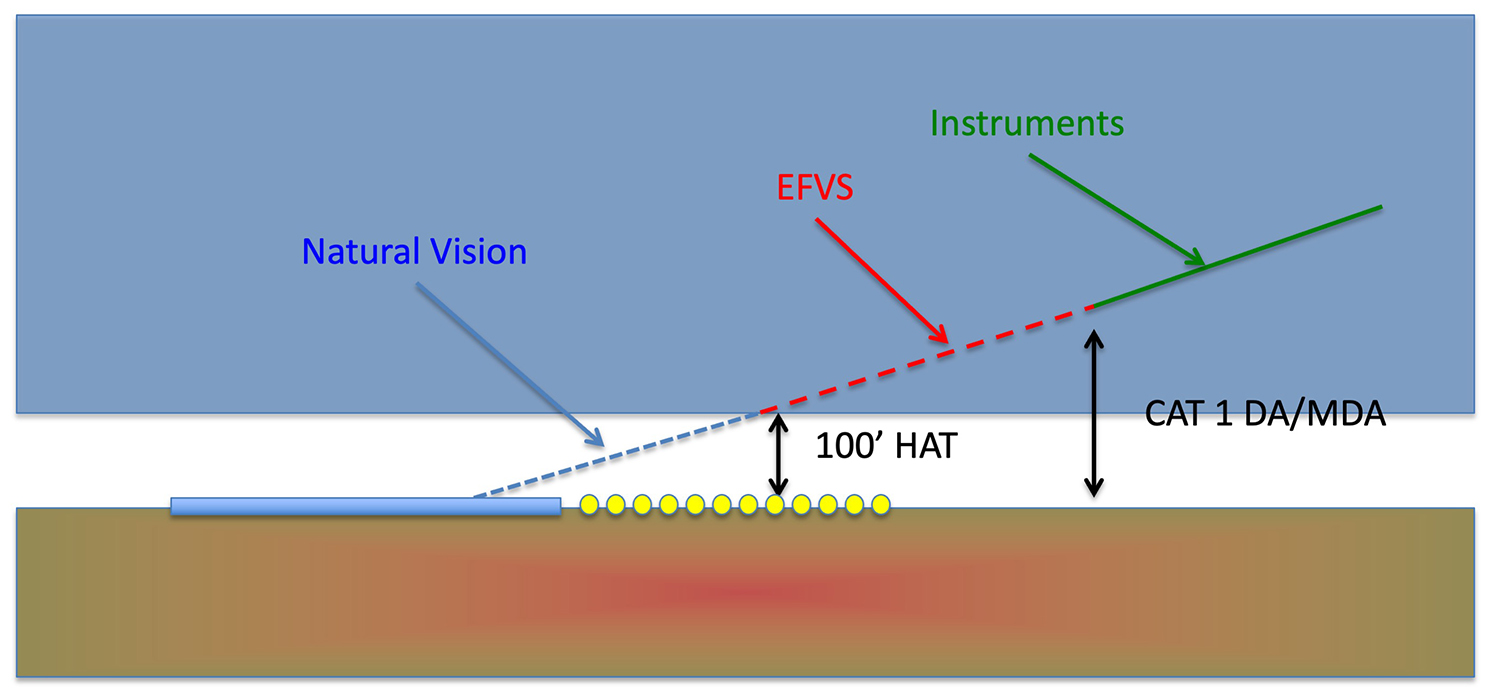
The HUD makes takeoff and landing easier, no doubt about it. But does it allow you to land at lower visibility? No, not unless you pair it with an Enhanced Flight Vision System (EFVS), also known as an Enhanced Vision System (EVS). Then the answer becomes, yes, depending on where you are flying, how low you intend to go, and what authorizations you have.
The U.S. rules are given in 14 CFR 91.176 and are further explained in Advisory Circular 90-106A. If you meet the requirements of section (b) of that FAR, you can operate using EFVS to 100 feet above the touchdown zone elevation, at which point you must take over what the regulations call “natural vision” to complete the approach and landing. If you are operating under part 91K, 121, 129, or 135, you will need a management or operations specification. If you meet the requirements of section (a) of that FAR, you can operate using EFVS to touchdown and rollout. You will need a letter of authorization, management specification, or operations specification. AC 90-106A lists 1000 RVR as an adequate flight visibility and authorizations are normally written with this as a minimum.
International rules are given in International Civil Aviation Organization (ICAO) Document 9365, Appendix G, and are similar to the U.S. rules with the notable addition of Runway Visual Range (RVR) reduction tables. A 1200 RVR minimum, for example, may be reduced to 800 RVR when using EVS. Most foreign countries, however, require a specific approval to conduct EFVS operations. You will need to check that country’s Aeronautical Information Publication to be sure.
Keep in mind there are recency of experience requirements. Here they are for the U.S. FAA:
Recent flight experience: EFVS. Except as provided in paragraphs (f) and (h) of this section, no person may manipulate the controls of an aircraft during an EFVS operation or act as pilot in command of an aircraft during an EFVS operation unless, within 6 calendar months preceding the month of the flight, that person performs and logs six instrument approaches as the sole manipulator of the controls using an EFVS under any weather conditions in the category of aircraft for which the person seeks the EFVS privilege. The instrument approaches may be performed in day or night conditions; and
(1) One approach must terminate in a full stop landing; and
(2) For persons authorized to exercise the privileges of § 91.176(a), the full stop landing must be conducted using the EFVS.
Source: 14 CFR 61, ¶61.66 (d)
5
Learning to use a HUD
The first challenge when learning to use a HUD is deciphering the symbology and where in your field of view to expect it. You should understand the difference between the Flight Path Vector and the Boresight (or aircraft reference) and know what each looks like.
The “where do I look” question can be even more complicated when factoring wind. The FPV shows where the aircraft is going, but that could be outside your field of view with a strong crosswind. Some manufacturers allow you to “cage” elements of the HUD so they are always directly in front and produce a “ghost” image of where the FPV really should be.
Confused? That is natural when learning any new language and the only cure is to sit behind the HUD with a symbology list and quiz yourself. Preflight preparation is key.
The accompanying video shows the last 1,000 feet of an ILS approach in good weather conditions. Everything the pilot needs is through his field of view without having to go heads down.
A final challenge you may not have thought about is with crew coordination. If your aircraft has only one HUD for the Pilot Flying (PF), the Pilot Monitoring (PM) will have less information available or will not have that same information in as timely a manner. Calling “V1” during takeoff can cause confusion if not done properly. While the PM is busy shifting from inside to see the airspeed indicator and outside to monitor progress along the runway, the PF’s eyes are heads up for both. The PF may see V1 before the PM calls it. Landing with an EFVS poses a similar challenge. The PF may see enough of the runway to land but may not be legal to land until the PM also sees the runway. Good callouts are key to keeping it safe.
HUD Phobia?
If you find having a plate of glass in front of you distracting, try flying a few visual approaches with the combiner down and dimmed all the way down. This should help you get in the habit of “looking through” the combiner, instead of “at” it.
Fly visual, or even instrument approaches when the weather is good with the EFVS on and adjusted properly. Leave it on to 100’, so that the first time you see that sight picture is not when you really need it.
6
Unlearning those vee bars
Once you’ve learned the entirely new language your HUD is speaking – that symbology can be thought of as a foreign language of sort – you need to get familiar with the intent behind each one of those symbols. None of these can be more confusing than that of your flight director symbol. A bit of a history lesson will help.
Early attitude indicators were nothing more than mechanical spheres attached to mechanical gyroscopes that gave pilots an idea of which way is up when flying in instrument conditions. First generation flight directors did include rudimentary computers, but these were connected to mechanical needles that gave pilots an indication of needed pitch and bank adjustments. A vertical needle was centered when the pilot had the correct bank angle applied; it would move left or right to indicate the bank had to be adjusted. Let’s say you had 10° right bank and the flight director wanted 25° instead. The needle would be right of center. Once you had the requested 25° the needle would center, meaning the bank angle was correct. When it was time to roll out, the needle would move left. A second needle, mounted horizontally, behaved similarly for pitch commands. These were called cross pointers and they would center over the aircraft symbol when the flight director was “satisfied” that the pilot was maneuvering the aircraft as needed.
The next generation, the one almost all aircraft without HUDs use these days, is called “single cue” because the two needles are replaced with a single symbol, what some call a “bat wing” but are mostly known as “vee bars.” They look like an inverted letter V that has been squashed a bit. The aircraft symbol is a smaller v-bar and the flight director is satisfied by flying the aircraft symbol into the larger v-bar. The system may seem intuitive since it is what most instrument pilots start with.
Intuitive or not, I didn’t much care for the single cue system since I started out with cross pointers. My first aircraft with a flight director was a Northrop T-38 and cross pointers were what we had, like it or not. My next three aircraft, all Boeings, defaulted to single cue but gave me the option of cross pointers, which I took. Then I lost that option and learned to appreciate single cue for what they are: an easier solution for a complex problem. It took me a few years, but I learned to think in single cue.
I mention all this to say when you graduate to a HUD, you will have to embrace a new flight director symbology and you will hate it at first. Get over it! I’ve seen several basic approaches to flight director symbology in HUDs and I think all are superior to the old-fashioned single cue vee bars. But they do require a different way of thinking.
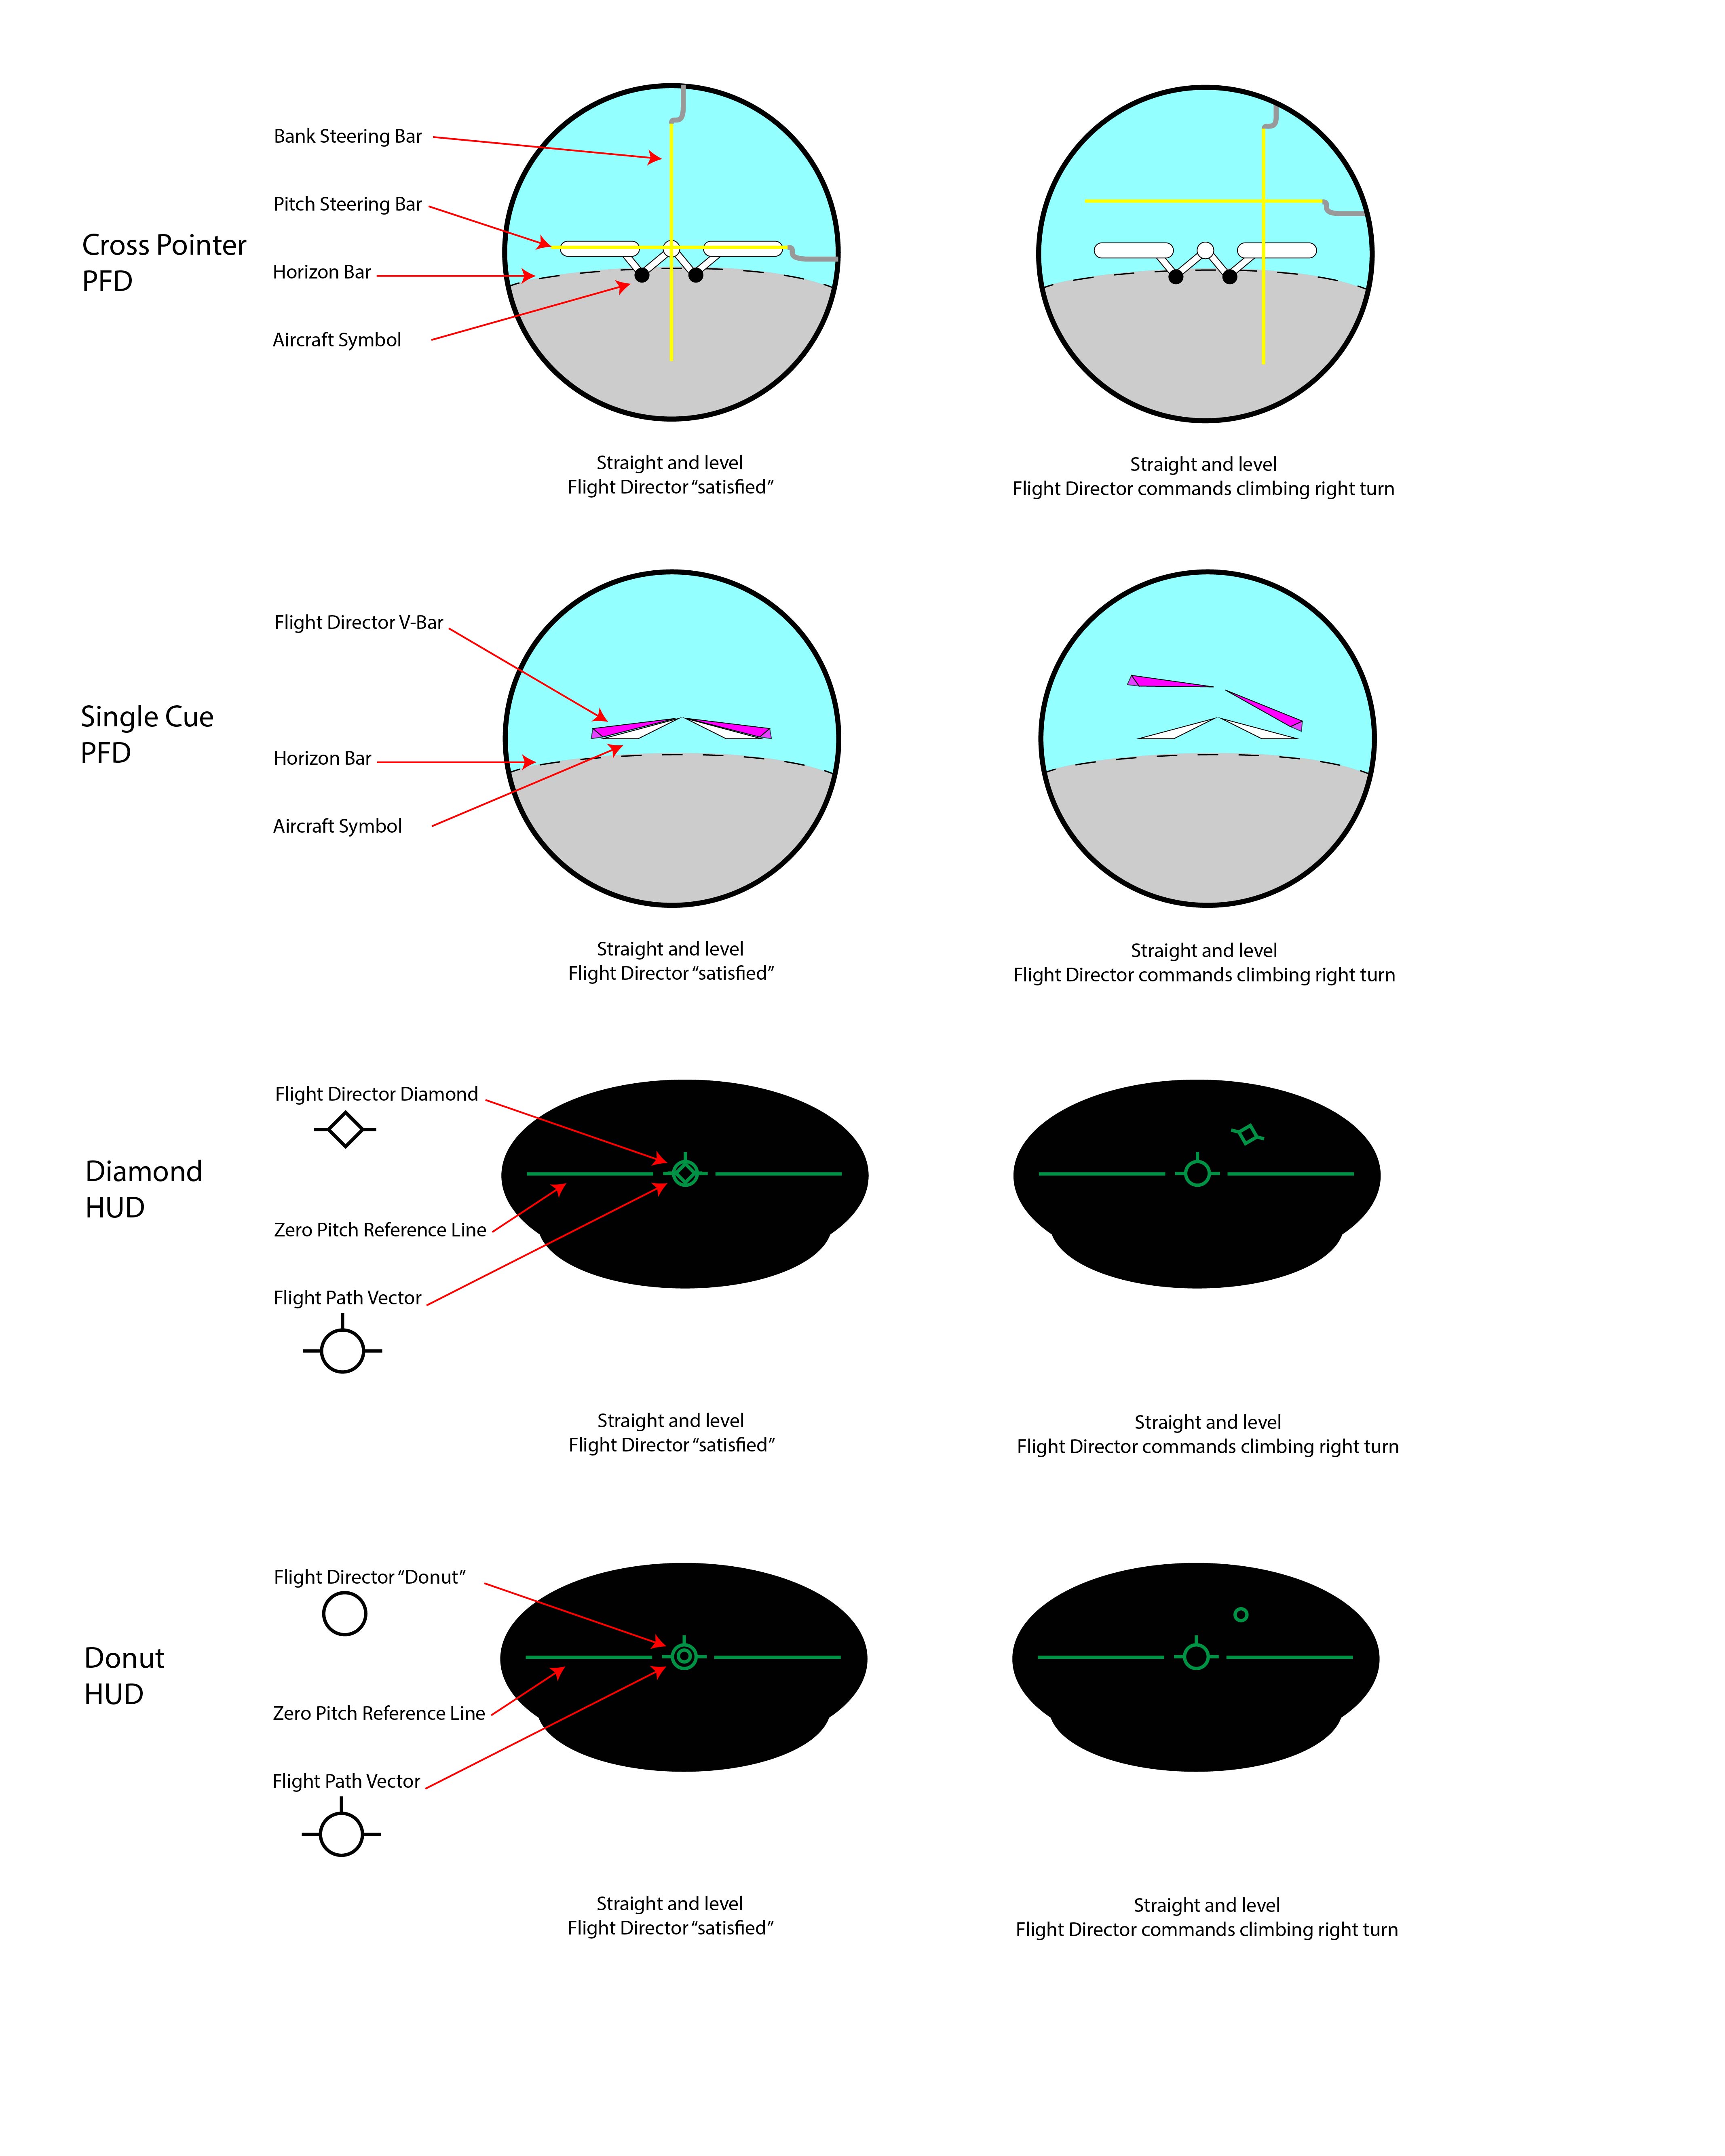
A comparison of flight director symbology
I’ve drawn a simple scenario of flying straight and level followed by the flight director’s request that you climb and turn right. The cross pointers are pretty basic: bank right, pitch up. The single cue system does the same, but in a more intuitive way, giving you an example aircraft symbol that begs you: “I know the way, follow me.” The HUDs on the Gulfstreams that I’ve flown use a diamond with wings for the flight director. The diamond moves vertically and horizontally and it is your task to “capture” the diamond with the FPV. The wings on the diamond give you a subtle hint as to which way you need to bank. The Bombardier solution is a donut that does the same thing, but without the wings. I’ve heard new Bombardier pilots react in frustration, “what is that UFO trying to tell me?” I tell them to think of that donut as the intersection of the cross pointers. The Dassault solution is to put wings on the donut. Better.
There are other challenges in front of you and the lesson from this flight director discussion is to never assume you know what is going on behind the curtain. Sit down with someone who already thinks in this new language and ask about everything.
7
Learning to use a HUD with EFVS
Using a HUD with EFVS poses additional challenges of understanding what the images represent, learning how to set the intensity and contrast of the image, and knowing where to look for the cues needed to land. Unfortunately, the technology is so new that many instructors are not familiar with the systems in the real world and are not prepared to teach as effectively as needed. A well-prepared student can help the instructor which will of course benefit the student.
An EFVS system converts infrared radiation frequencies into visible imagery viewed on the HUD. In other words, it allows you to see differences in heat. That is why you can see warm approach lights shining through a cold fog or even the runway itself after sunset if it had been baking in the sun all day. On the other hand, you will not be able to see mountains on approach to a Colorado airport in the dead of winter if the ground and the air are very cold. The accompanying video shows the last sixty seconds prior to a landing at near minimums. The approach was in the late afternoon when the runway was still quite warm. The approach lights show up first but even the runway itself shows up in the EFVS before natural vision.
After years of trial and error, I’ve found the EFVS is next to useless if not properly set. When I started flying EFVS the conventional wisdom seemed to be “light it up” or “make it green,” meaning to turn up the intensity in an effort to see as much as possible. But that only made it harder to see what you needed to see when looking for the runway approach lights. If the intensity is set too low, you will also fail to see the lights. Clearly there must be a sweet spot.
I think the quickest way to learn what is best for you is to fly a coupled approach in the simulator with the weather set at minimums, and then have the simulator operator freeze the motion at Decision Altitude or Height. At this point you should adjust your seat as the manual dictates and then adjust the HUD and EFVS intensities, contrast, and any other settings until you maximize your view of the approach lights. Record the settings for each. This could be a numerical value, the position of the knobs (i.e., three o’clock), or the number of clicks from one extreme. Then place the airplane on the runway, ready for takeoff, at your lowest takeoff minimums. Try to remember the view (or take a photo if the instructor allows it) to help you set the intensity and contrast for your next simulator session.
Even after you’ve done all this, you may find that your success rate finding the approach lights with the HUD and EFVS is actually worse than it was before you had a HUD. If so, you may have fallen into the same trap that got me after using these systems for about five years. I had become so glued in at looking at the FPV, I forgot to scan below for the approach lights. With a heads down system this happens naturally as your eyes move from the instrument panel (heads down) to the windscreen (heads up). Your field of view naturally includes the area where the approach lights will be. When using the HUD, you could completely miss the approach lights because your eyes are too high. You need to remind yourself what you are looking for (the approach lights) and where they will be (well below the FPV). In the photo, you can barely see the approach lights below the -3.0 degree pitch ladder and above the course deviation indicator.
8
Becoming "one with the HUD"
Using a HUD presents a massive learning curve that can be discouraging at first and can make it harder to do things that had long ago become easy. But that is no different than many things that have challenged us along the way, not unlike the hurdles when becoming an instrument rated pilot. If you can fly an ILS to minimums without the HUD, why bother having to learn a new trick? You should embrace the advantages to keeping your eyes outside and being able to retrieve the information you need, when you need it, with a mere flick of your eyes. You have trained your eyes where to look for airspeed, altitude, course, and glidepath. You have long ago become “One with the PFD.” Now it is time to move to the next level and become “One with the HUD.” It will improve your odds of keeping straight on the runway for takeoff even while keeping a closer eye on critical airspeeds. It will make it easier to spot the runway at minimums while watching the altimeter unwind. As with many things in aviation, the easier you make things, the safer they become.
References
(Source material)
14 CFR 61, Title 14: Aeronautics and Space, Certification: Pilots, Flight Instructors, and Ground Instructors, Federal Aviation Administration, Department of Transportation